


Tutorial: Designing a cool fantasy skull medallion
 is licensed under a Create Commons Attribution-Non Commercial 3.0 Unported license.")

Motivation
In this tutorial I'm creating a fantasy style skull medallion. I use some new stuff of GIMP 2.8 so be sure to have GIMP 2.8 at least. The medallion will have some cool glowing effects in the eyes of the skull and on the sides. It will be popped up with some glassy shivers around the skull in the middle. This is a pretty long (actually one of my longest tutorials ever) tutorial - and it is intended more experienced users. There are lots of techniques combined here. I hope you like it!
Tutorial details
- Category: Special FX
- Time to reproduce: ≈180.0 minutes

- Tested with GIMP 2.8
-
1
_800x800_%E2%80%93_GIMP_001-thumb.jpg)
Create a new image: 800×800px. Fill the canvas area with a very dark gray color. It can be black too (but sometimes I feel that a pure black is very hard when working long in GIMP) . We’re doing the base shape first. We need to create a elliptical circle: Choose the elliptical selection tool and set it to 500×300px.
To help us centering the circle go to Image / Guides / New guide py percent. Add one horizontally at 50% and another one vertically. Click in the canvas to place the selection in the very center (a small “+”-symbold is displayed to help you centering it). Fill the selection with a different dark gray on a new seperate layer.
-
2
_800x800_%E2%80%93_GIMP_002-thumb.jpg)
Keep the selection active and move it to the top so that only the half of the selection is shown inside the canvas. Delete the part on the layer – do the same with the bottom part.
-
3
_800x800_%E2%80%93_GIMP_003-thumb.jpg)
Next we need a elliptical circle that has a larger height than width. Set the size of the selection tool to 250×350. Plase it in the middle again and on a new layer fill it with a slightly different gray to see that we have 2 objects.
-
4
_800x800_%E2%80%93_GIMP_004-thumb.jpg)
Next we want to give our back part of the medallion a little more characteristics – therefore we use the paths tool to cut out a nice shape.
Create a triangular path as seen in the image. Start at the top and place the points – hold CTRL on you keyboard to connect the first point with the last one and to complete the shape.
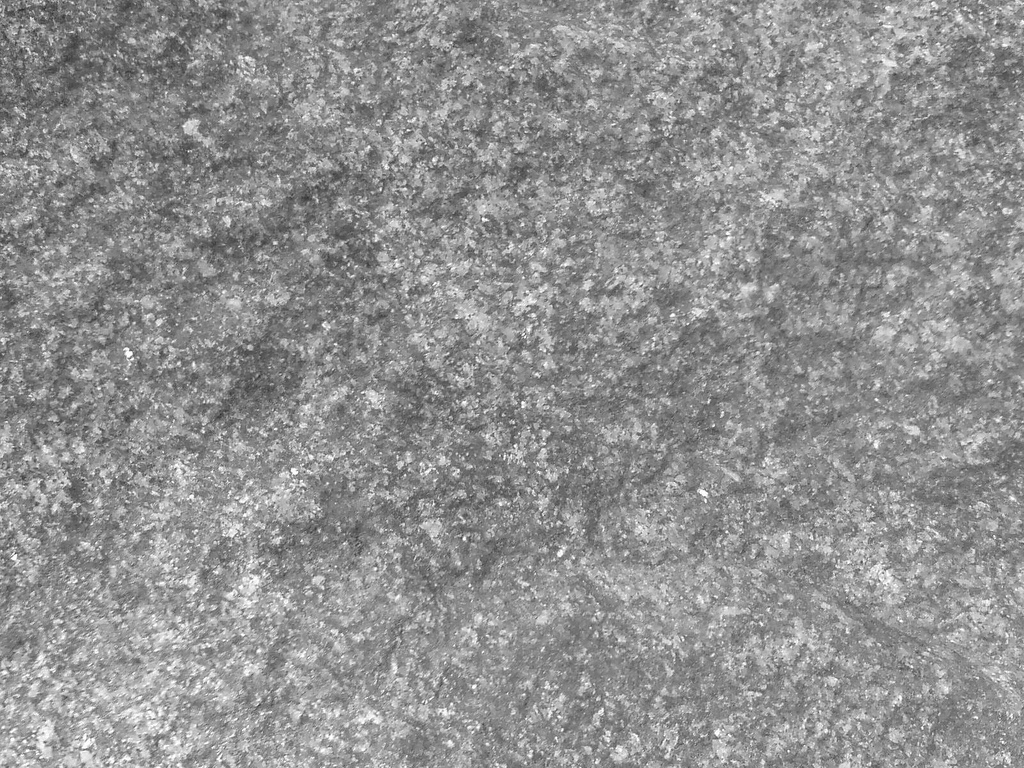
-
5
_800x800_%E2%80%93_GIMP_005-thumb.jpg)
If you have one point active hold CTRL again – the you can drag a ploating point out of a paths point to controle the curve. Make a shape of your own decision or just do it as seen in the image.
-
6
_800x800_%E2%80%93_GIMP_006-thumb.jpg)
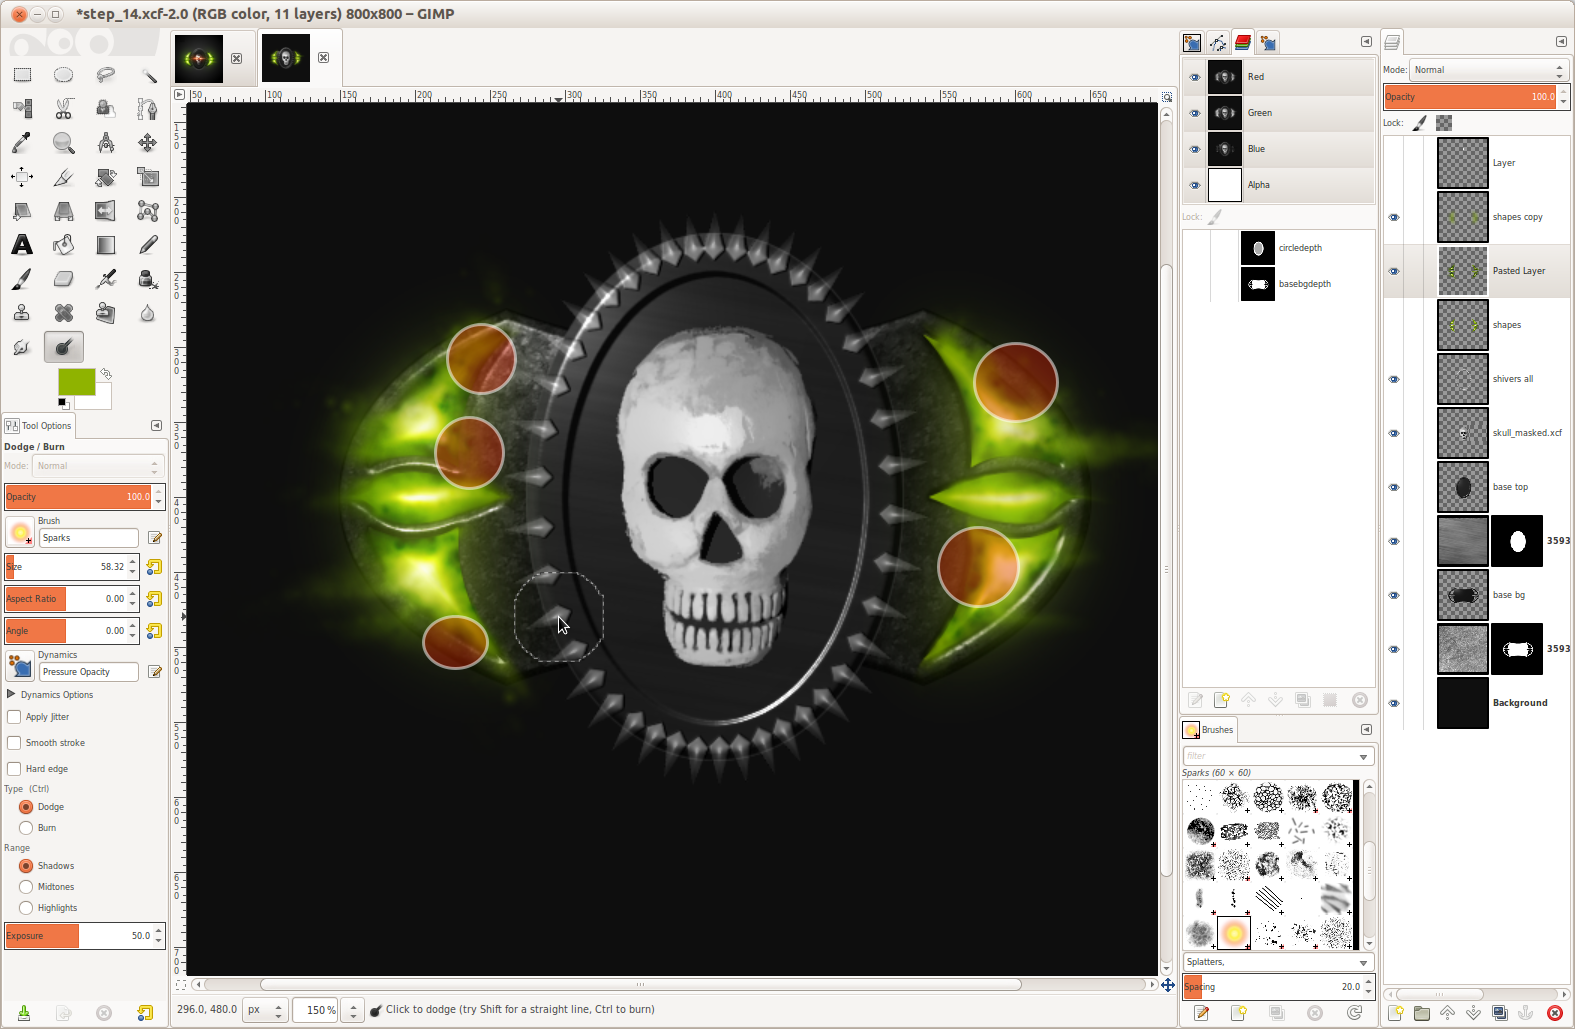
Make a selection from the path. To have a good structured overview I then created a layer group that will contain the shapes for later work.
- Create the layer group and a new empty layer in it – I named it Shapes (group) and shape1.
- fill the selection with a brighter gray.
- deselect all
-
7
_800x800_%E2%80%93_GIMP_007-thumb.jpg)
Duplicate shape1 and use the flip tool vertically to place the duplicate at the bottom of the left medallion side.
-
8
_800x800_%E2%80%93_GIMP_008-thumb.jpg)
Now I used the paths tool again to fill the space between the shapes just created with a another shape on a new layer again.
-
9
_800x800_%E2%80%93_GIMP_009-thumb.jpg)
Now duplicate the shapes and flip them horizontally with the flip tool to have a copy of each on the right side.
-
10
_800x800_%E2%80%93_GIMP_010-thumb.jpg)
To get all the shapes on a single layer now merge down the layer group. Choose this option whether via Layer / Merge down group or right click the group in the layers dialog.
After that every shape should be on one single layer named “shapes”. Hold ALT (on Ubuntu Linux hold ALT+WINDOWS/SUPER-key) on your keyboard and click the layer in the layers dialog to get a selection from the objects on this layers (this is a shortcut for “Alpha to Selection”). Make the shapes layer invisible, then activate the “base bg” layer and press DEL to cut this out from the layer.
-
11
_800x800_%E2%80%93_GIMP_011-thumb.jpg)
De-select all now. There is only one shape left we need: The one that will be for the glassy shivers. We need to make a single base shiver that will be automatically repeated afterwards.
I simply used the free selection tool to make it. Create a new layer and with the free selection tool make a selection as seen on the image and fill it white. Keep the selection active and copy the contents to the clipboard (CTRL+C, or go to Edit / Copy)
-
12
_800x800_%E2%80%93_GIMP_012-thumb.jpg)
Make the shiver layer invisible and deselect all.
Now that we’ve added the contents of the shiver to the clipboard this is usable as a brush (you can see it on the first place top left when you open the brushes drop down). Select the brush tool and the “Clipboard” brush.
- Create a new empty layer named “shivers all”.
- After that set the size of the brush to 35.
- Go to Windows / Clickable Dialogs / Paint Dynamics
- Create a new dynamic and set the “Angle” value in the “Direction” column.
These dynamics setting means that the the selected brush (our clipboard in this case) is being rotated when the mouse moves in a special direction.
-
13
_800x800_%E2%80%93_GIMP_013-thumb.jpg)
This mouse movement is being simulated using a path that we need to define first. I want that my shiver is automatically put around my middle object (the elliptical circle).
- Get an “Alpha to selection” in the context menu of the layer in the layers dialog.
- Go to *Select / To Path".
- Disable the selection
- Switch to the paths dialog and select it by double clicking it.
- Set the spacing of our brush to 101. (this might differ a little bit if your shiver is bigger/smaller than mine – but you can adjust the this later on if it does not perfectly fit.)
-
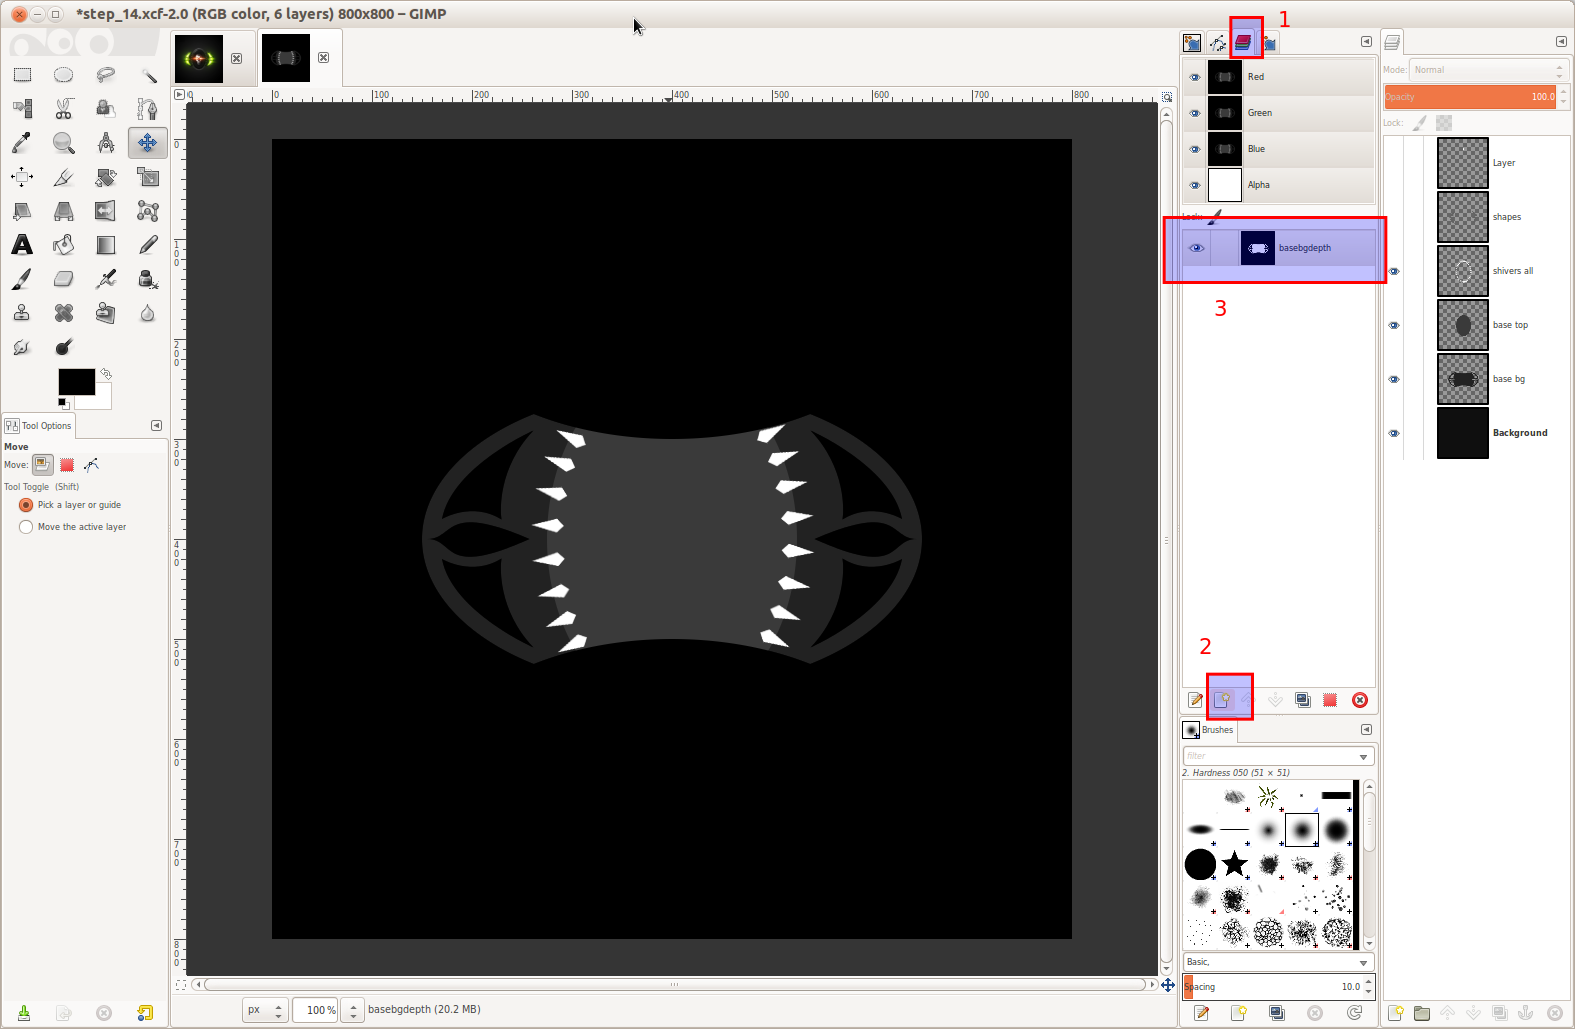
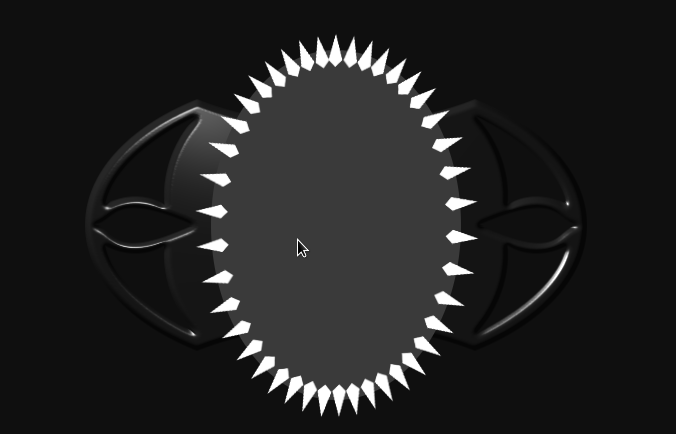
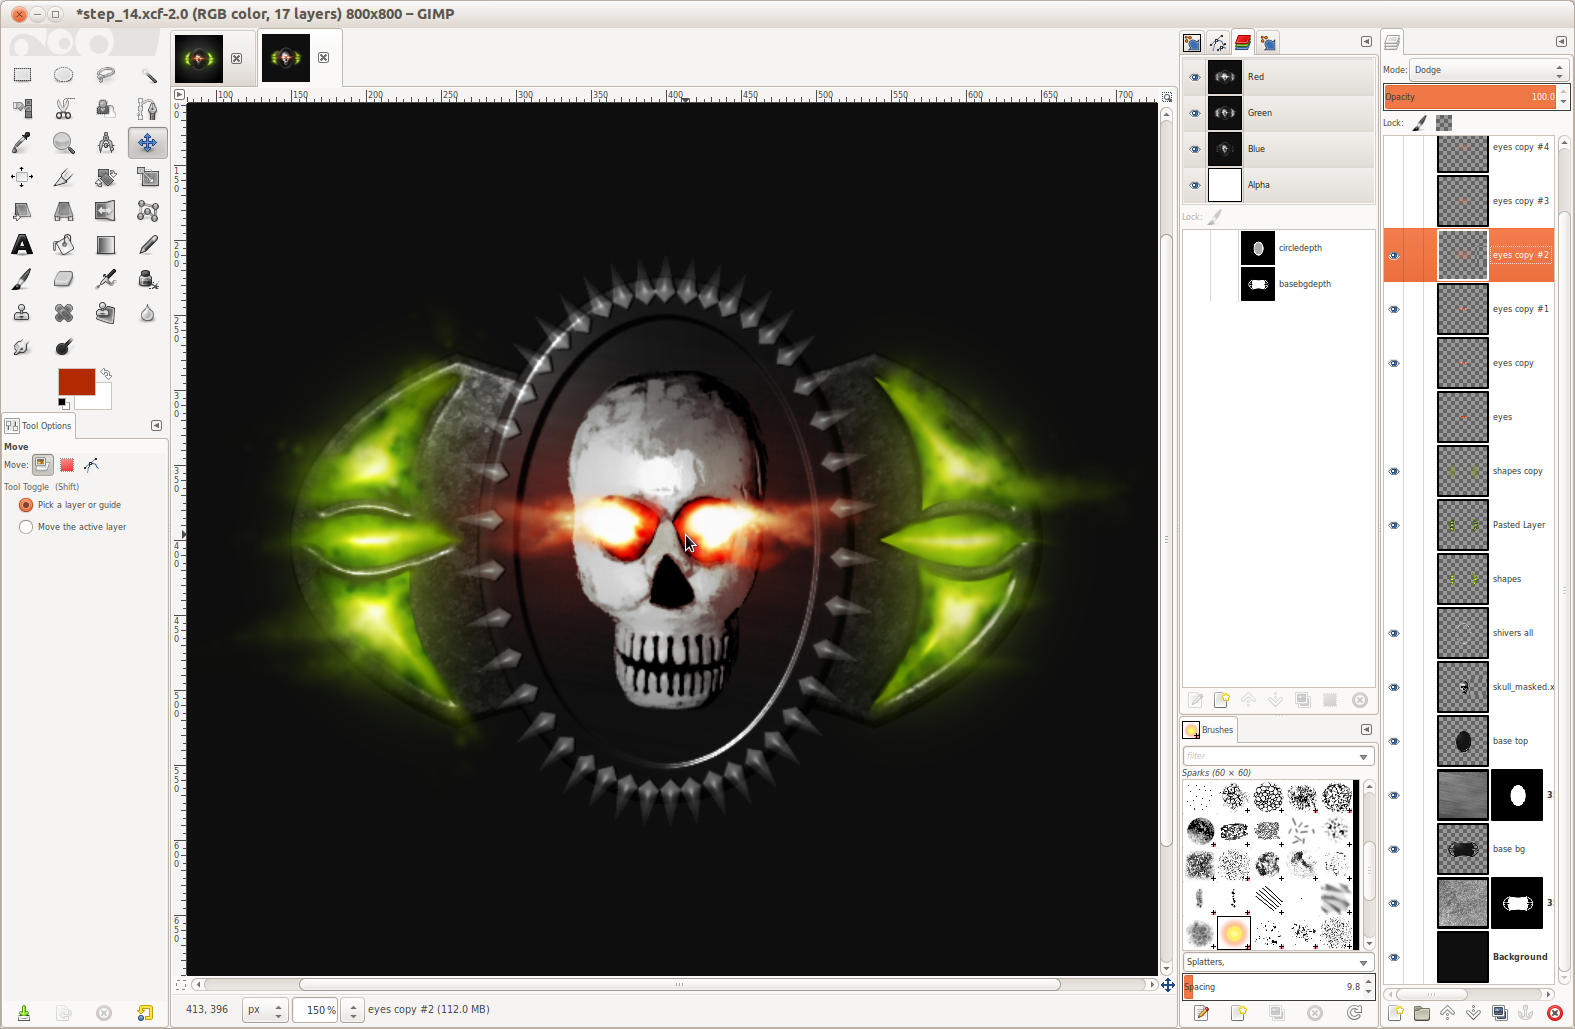
14
_800x800_%E2%80%93_GIMP_014-thumb.jpg)
Everything prepared. Very well. Now its time for the action ;)
Make sure the elliptical path is active. Choose “Stroke Path” in the tool options and use the “Paintbrush” and “emulate brush dynamics”. Stroke the path and your shivers should be well aligned automatically – no hand job ;-) If some shivers overlap or the space between 2 of them is not looking good you have to set a different spacing in the brush dialog.
-
15
So that we have our shapes ready for more work lets continue on the structure and the real-feel-depth.
*Get a selection of the “base bg” layer (right click in layers dialog: “Alpha to selection”). Switch to the channels tab and create a new channel. Check “Initialize from selection” in the new channel popup dialog. Set the channel opacity to 100%, to better see the changes we’re doing. Name it “basebgdepth” and press ok. Then deselect all.
-
16
Now repeat Filters / Blur / Gaussian Blur 4 times with the values 5,4,2,1. This gives us a very very smooth gradient of the white and black parts in the channel. We will use the channel now as a bump map to get the structure into our plain “base bg” layer.
-
17
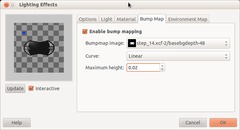
Make the channel invisible by clicking the eye symbol.
- Click the base bg layer in the layers dialog to make it active
- Go to Filters / Lights & Shadow / Lighting effects.
- Switch to the bump map tab and choose the “basebgdepth” channel.
- Set max height to 0,02.
-
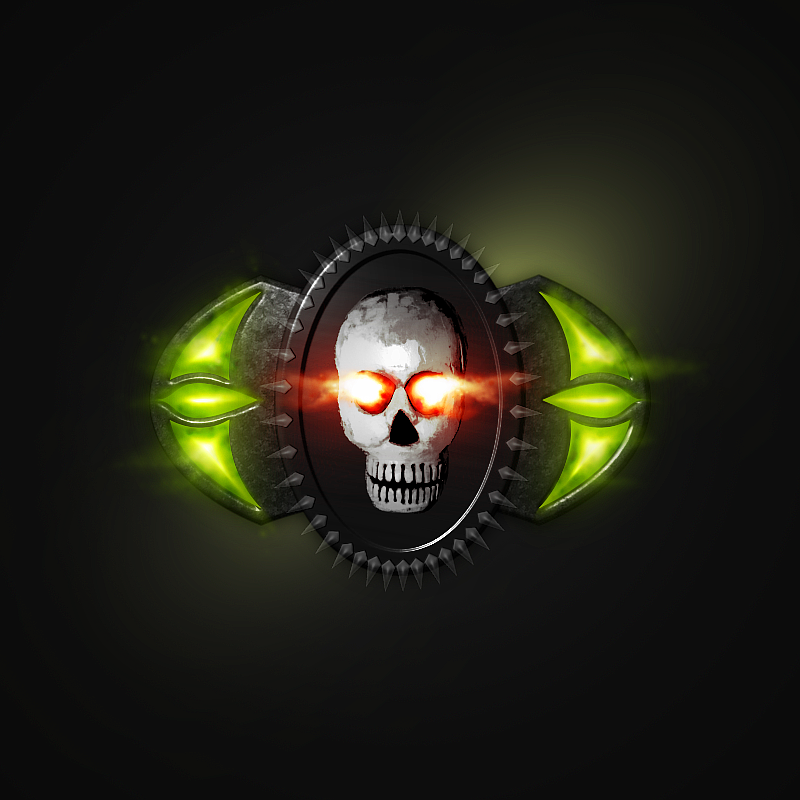
18

It should look like this now.
-
19
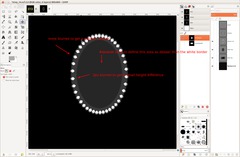
Now we can make some structure to the middle part (elliptical circle).
- Get a selection from alpha of it (same as in step 17)
- Add a channel in the same way (initialize from selection). Name it “circledepth” for instance.
- Now shrink the selection by 25px. (Select / Shrink: 25px)
- Select / Invert to select the outer border of the circle.
- Gaussian Blur it 4 times again: 5,4,2,1.
- Select / Invert again to select the inner part of the circle.
- Fill that smaller circle with a light-menium gray (i.e. #ababab)
- Deselect all
- Gaussian blur the whole channel again with 2px.
-
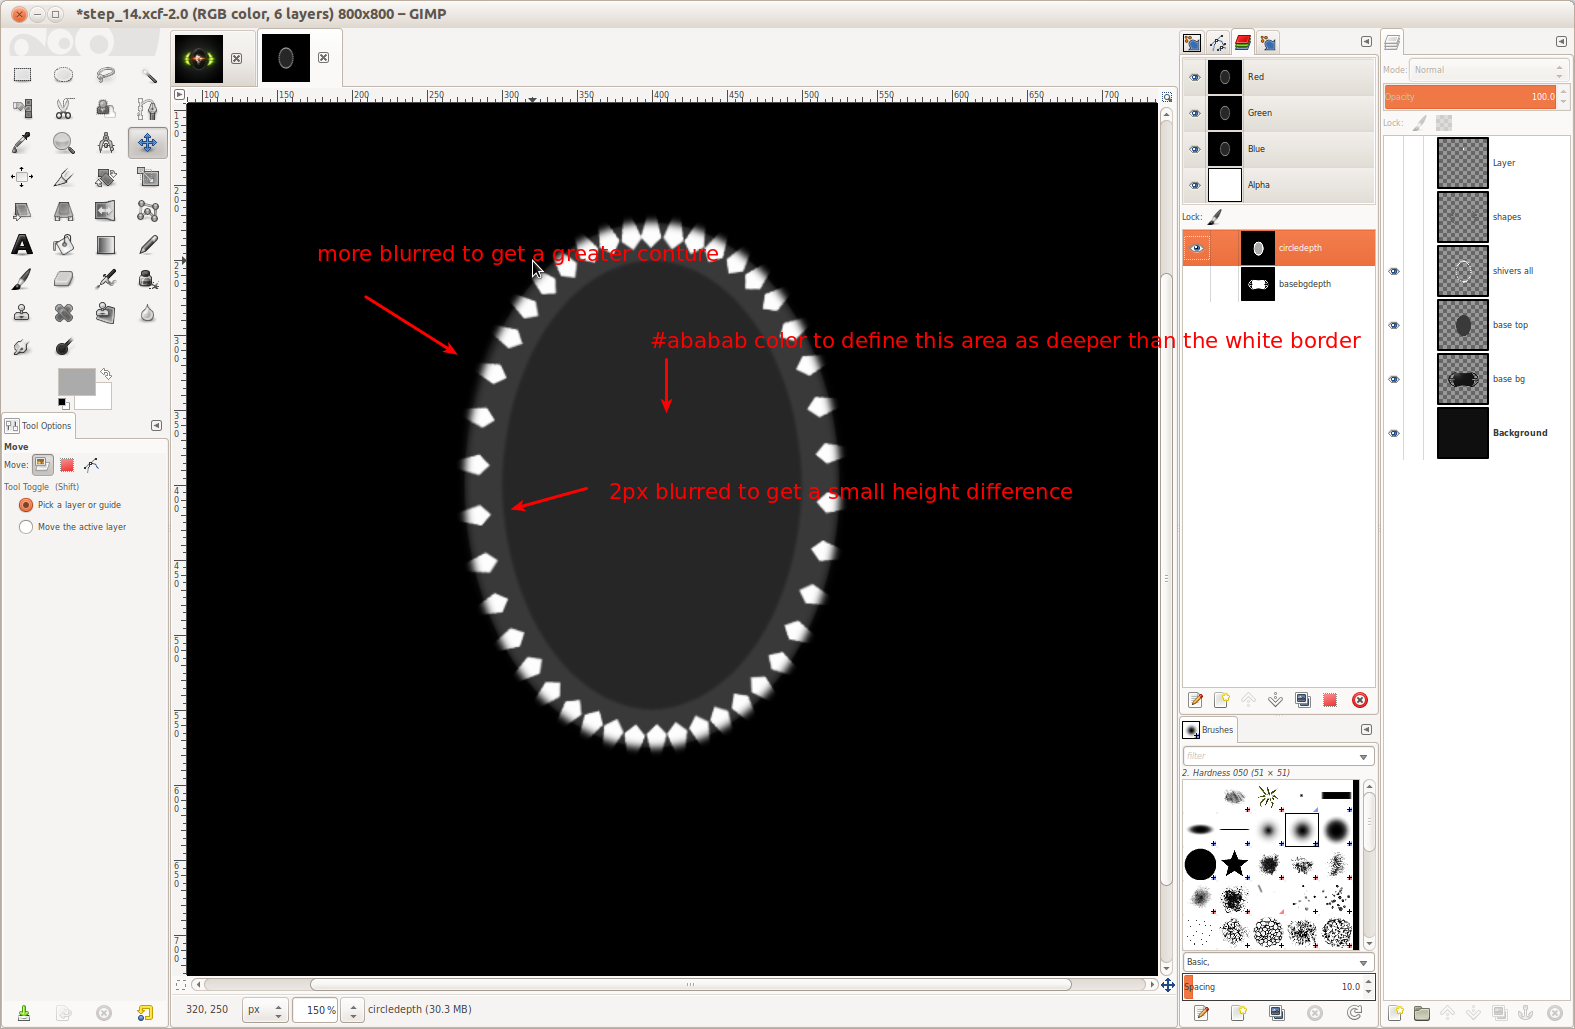
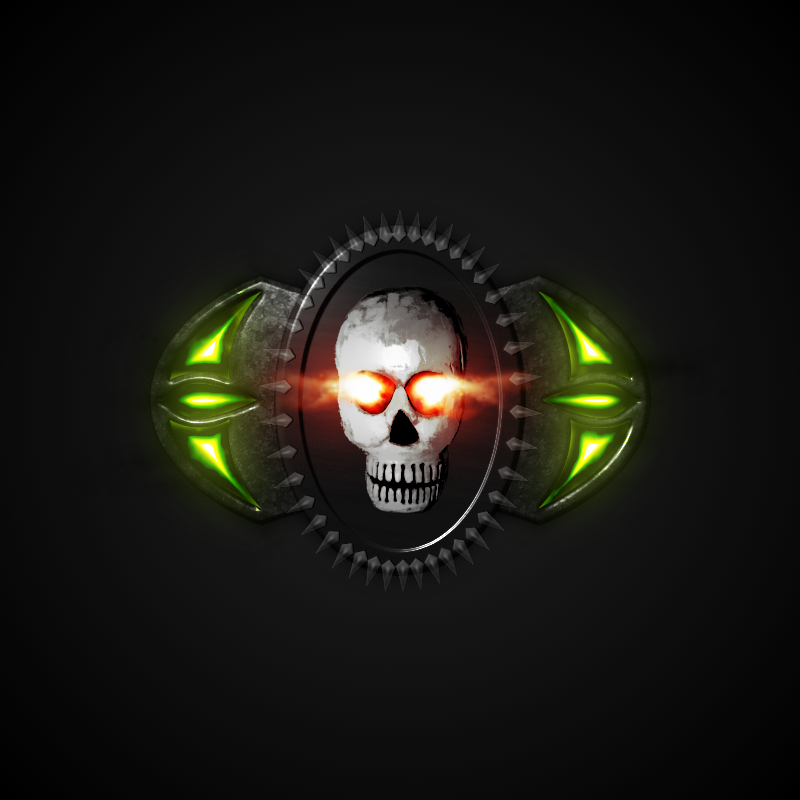
20
Now make the channel invisible and apply Filter / Light & Shadows / Lighting effects again with the “circledepth” channel as bump map. It should look like this now.
-
21
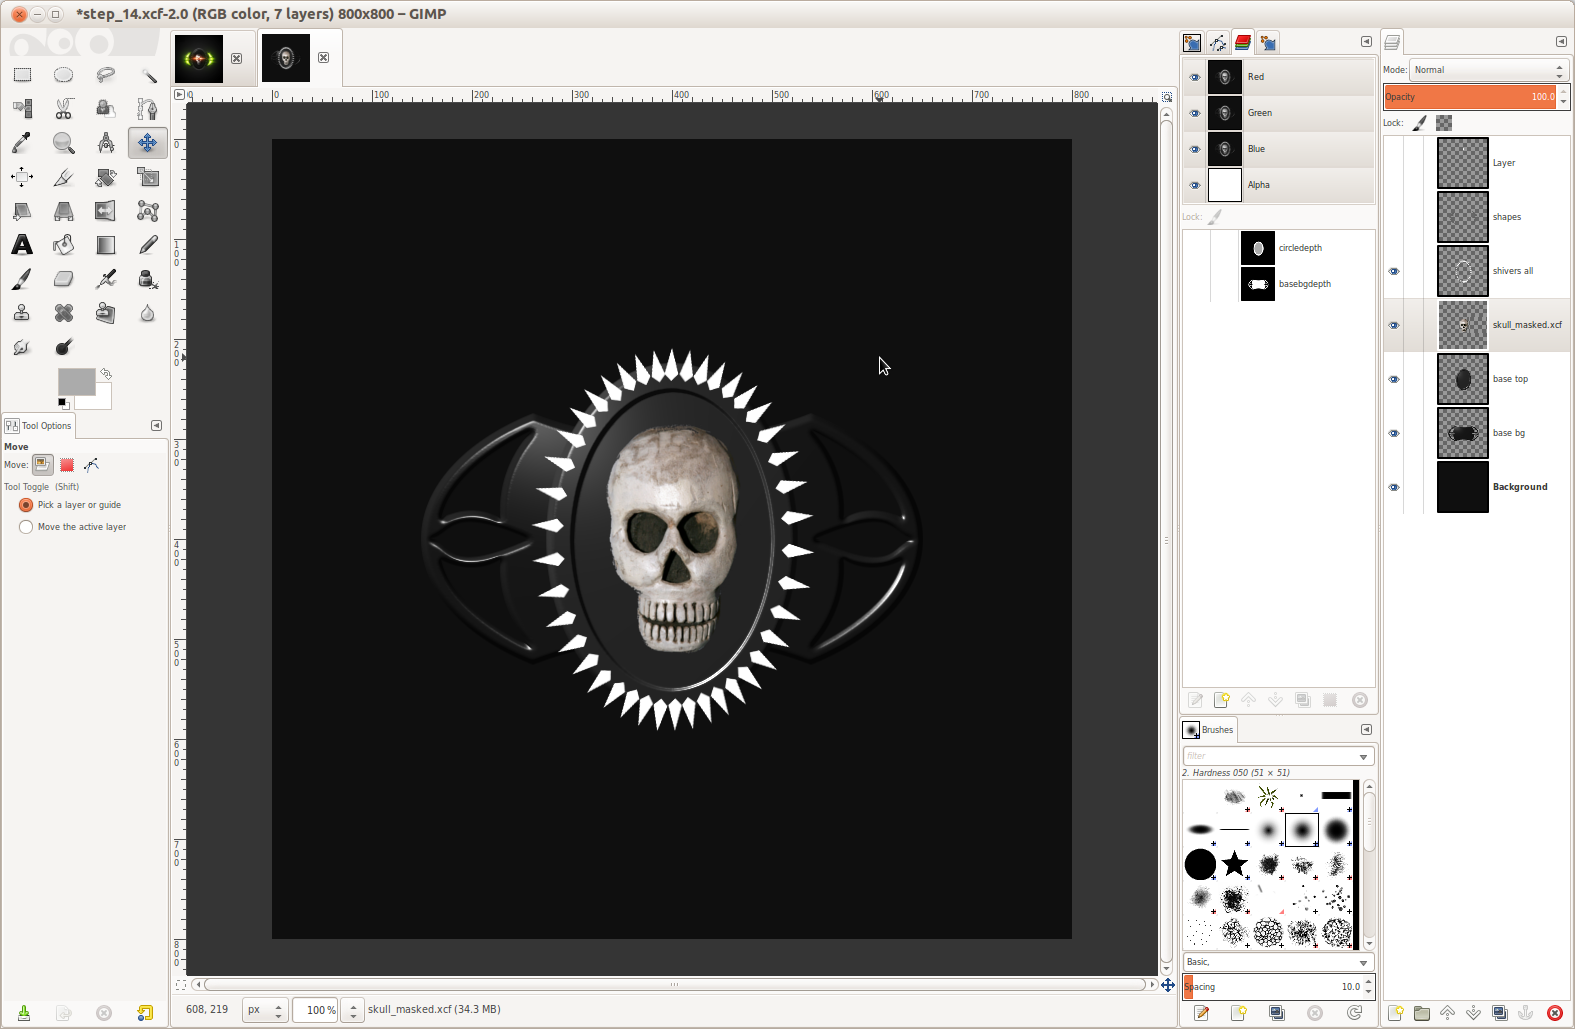
 skull_masked.xcf
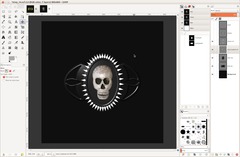
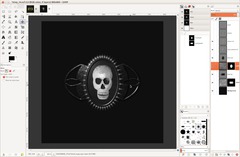
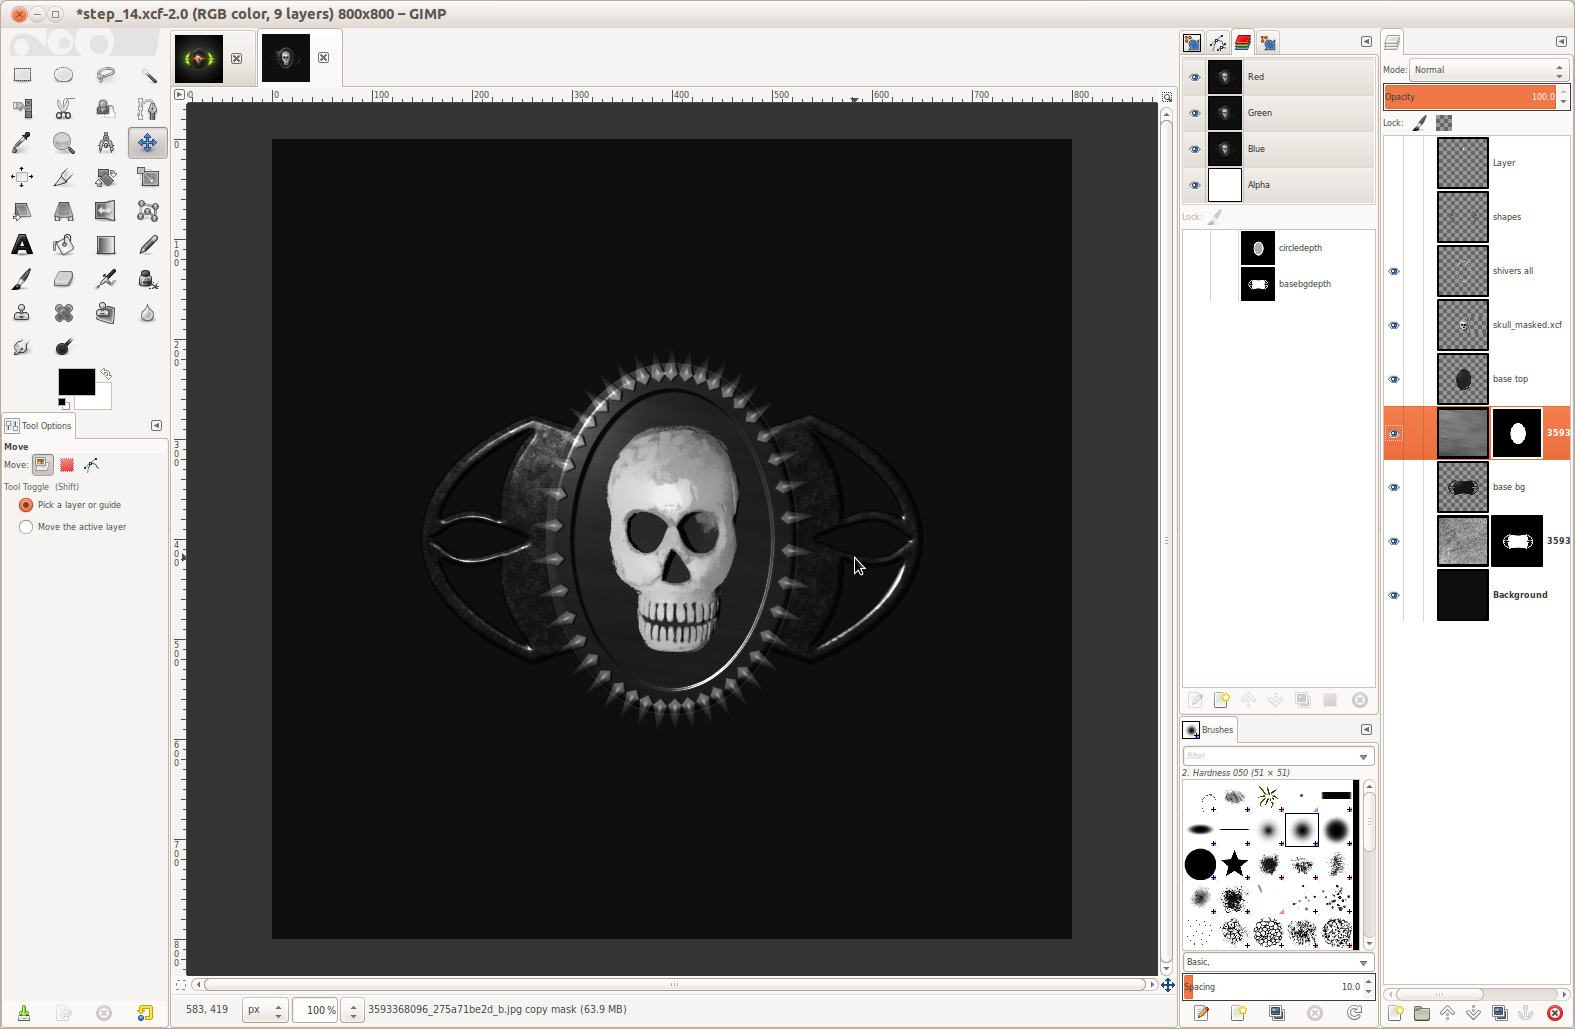
Lets add the skull now. Download the file I prepared and open it as a new layer. Make the skull smaller and place it the middle of the medallion.
-
22
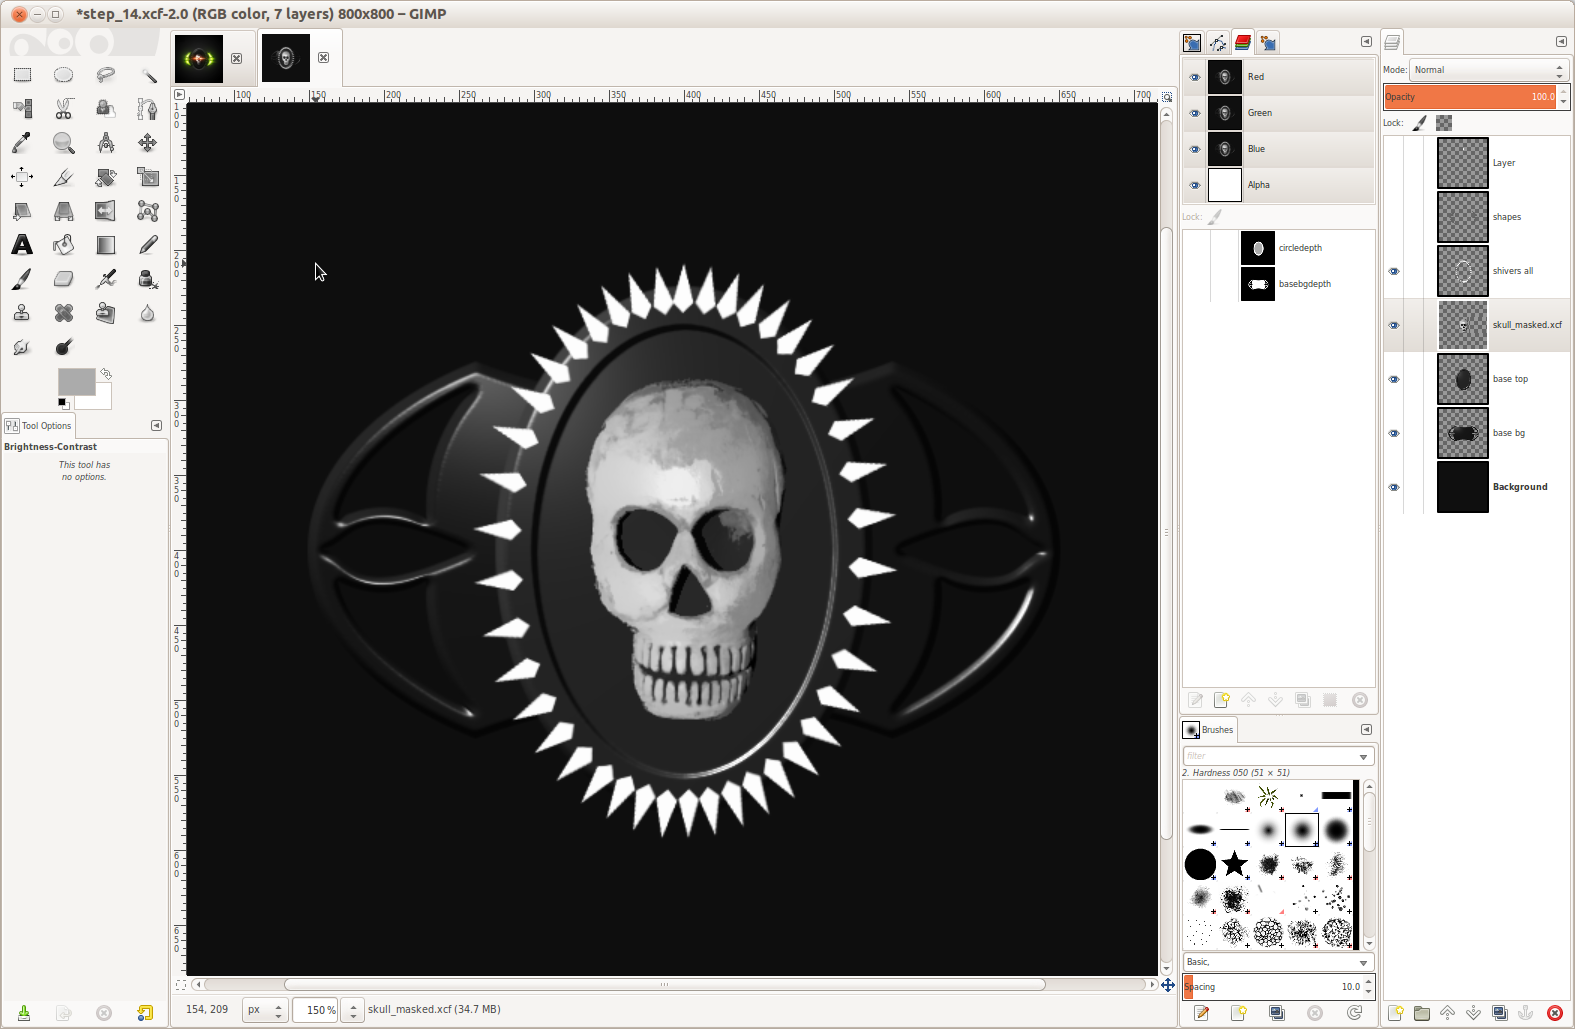
To give the skull a more polished look:
- Colors / Desaturate
- Save the file and install GMIC now if you haven’t already.
- Filters / GMIC / Enhancements / Smooth (bilateral). Standard values (but use 3 instead of 2 iterations) This converts easpecially the diffuse gray inside the skulls eyes to a homogene gray area.
-
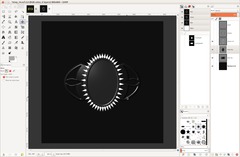
23
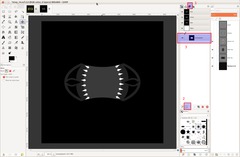
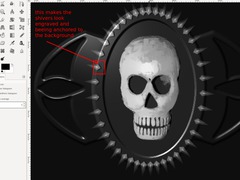
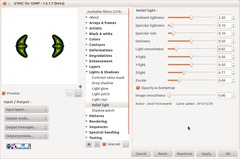
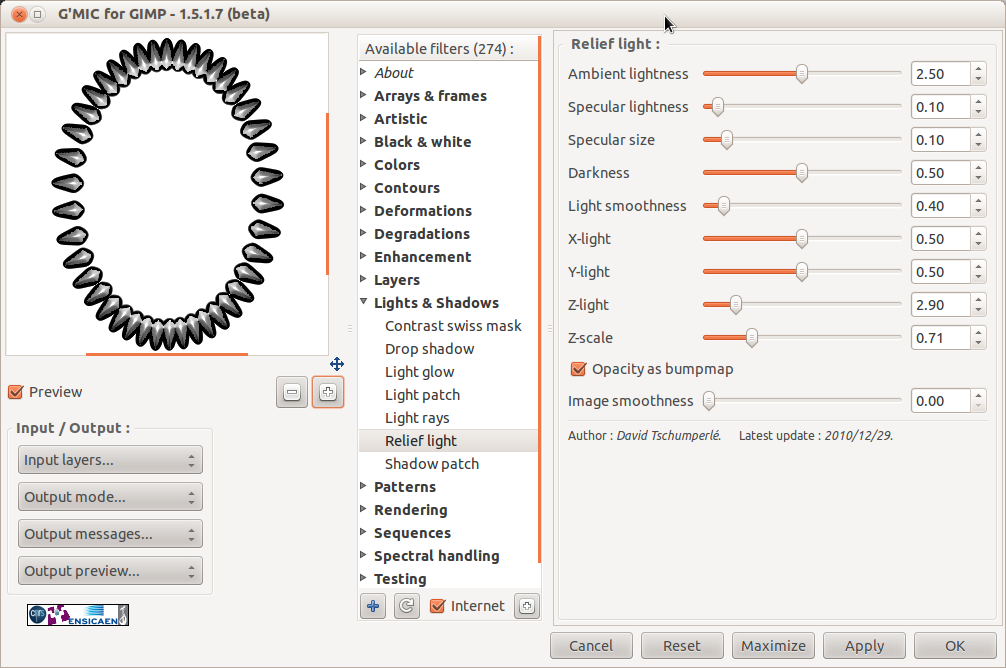
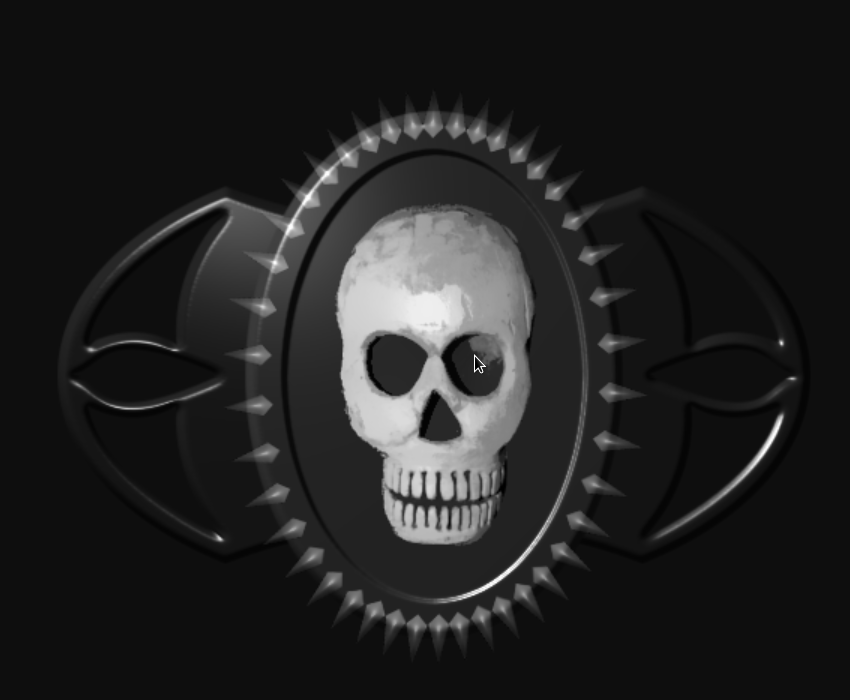
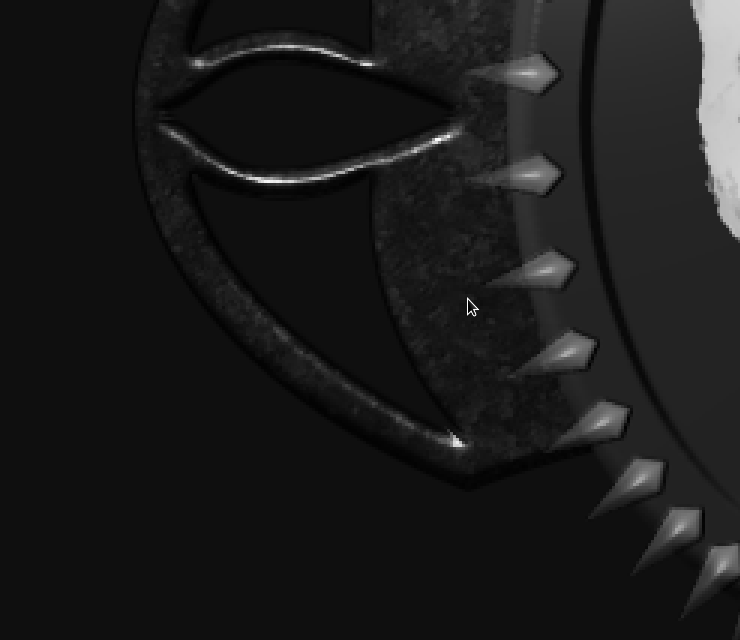
Now lets make the glassy shivers around the skull.
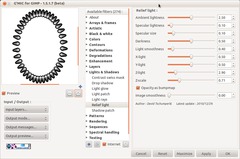
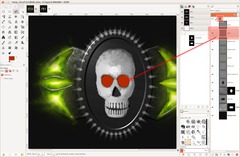
For these I needed a auto-generated bump map that gets some detail and structure in them. GMIC has a nice filter for this kind of stuff named Relief Light – it is found under Lights & Shadows. Please read the details from the image! It is important that you use “opacity as bum-map”.
Be sure to lock the layers alpha channel (this is found right belkow the setting where you set the opacity of a alayer in the layers dialog).
-
24

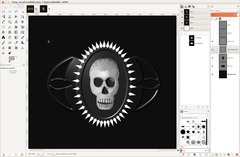
To get a more glassy feeling set the layers mode to “Grain merge”. Then use any color tool you like to make the shiver a little brighter.
-
25
To make the shiver more engraved to the background select the “base top” layer and go to Filters / Render / Map / Bump map. There choose the shivers-layer in the drop down.
-
26
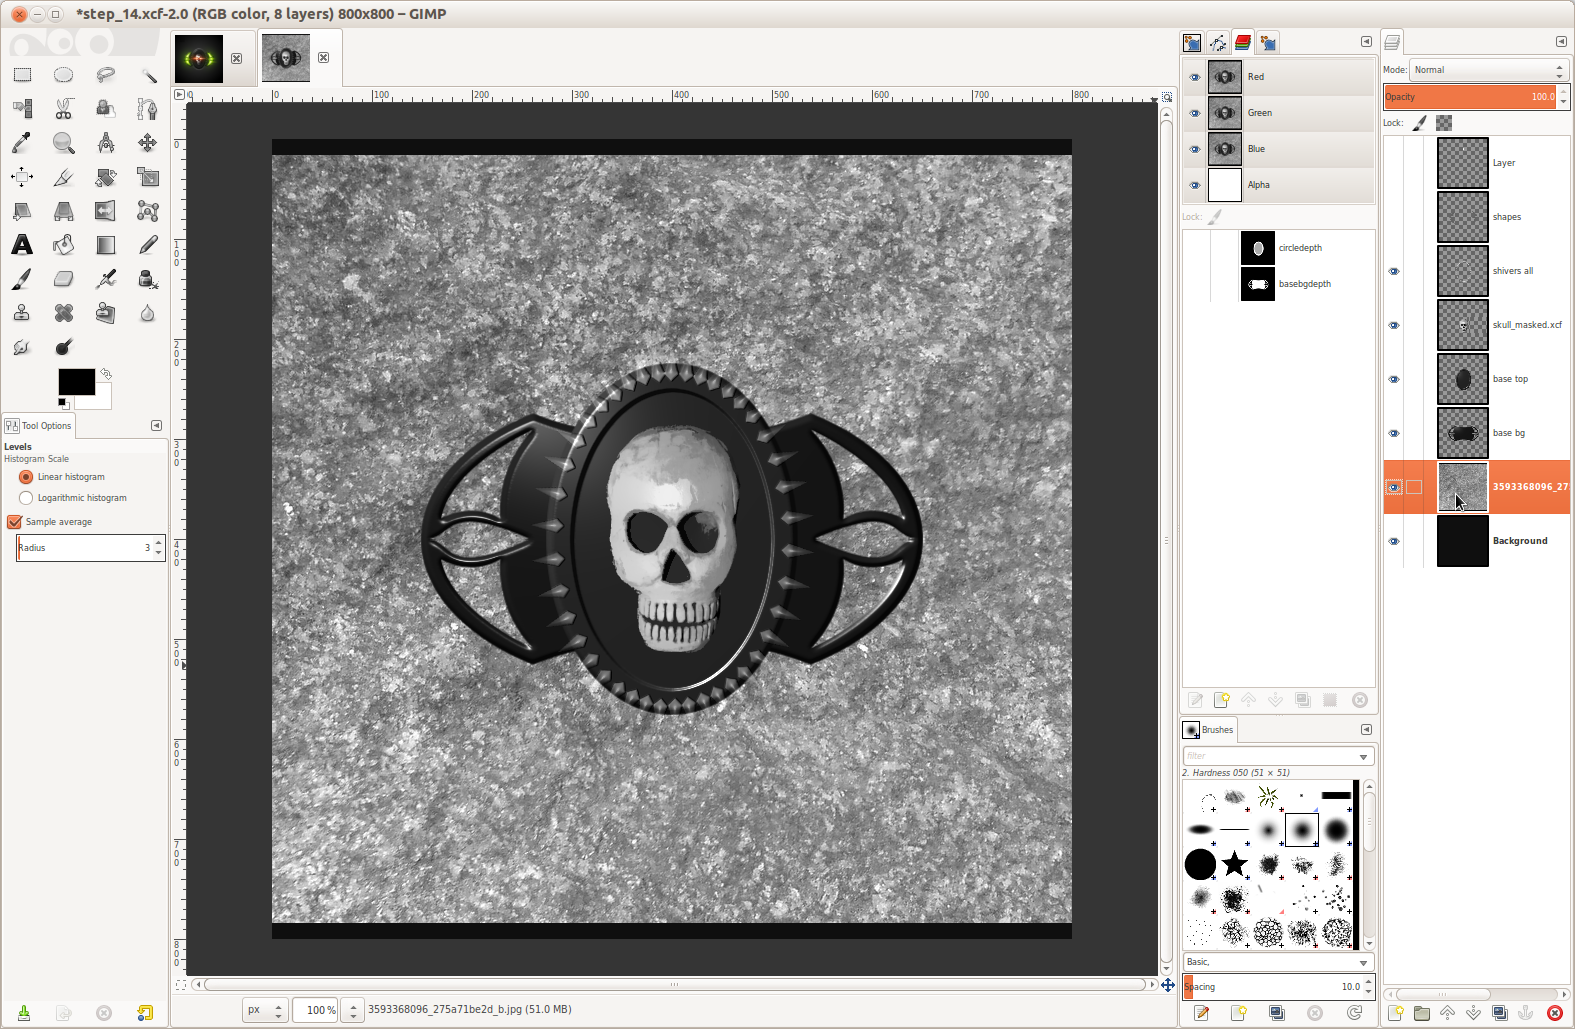
 3593368096_275a71be2d_b.jpg
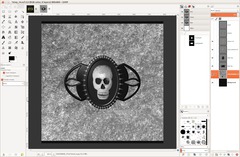
Lets add some texture to the backgrounds:
Open up the file I attached to this step (stone_texture) as a new layer and place it right above the background layer.
-
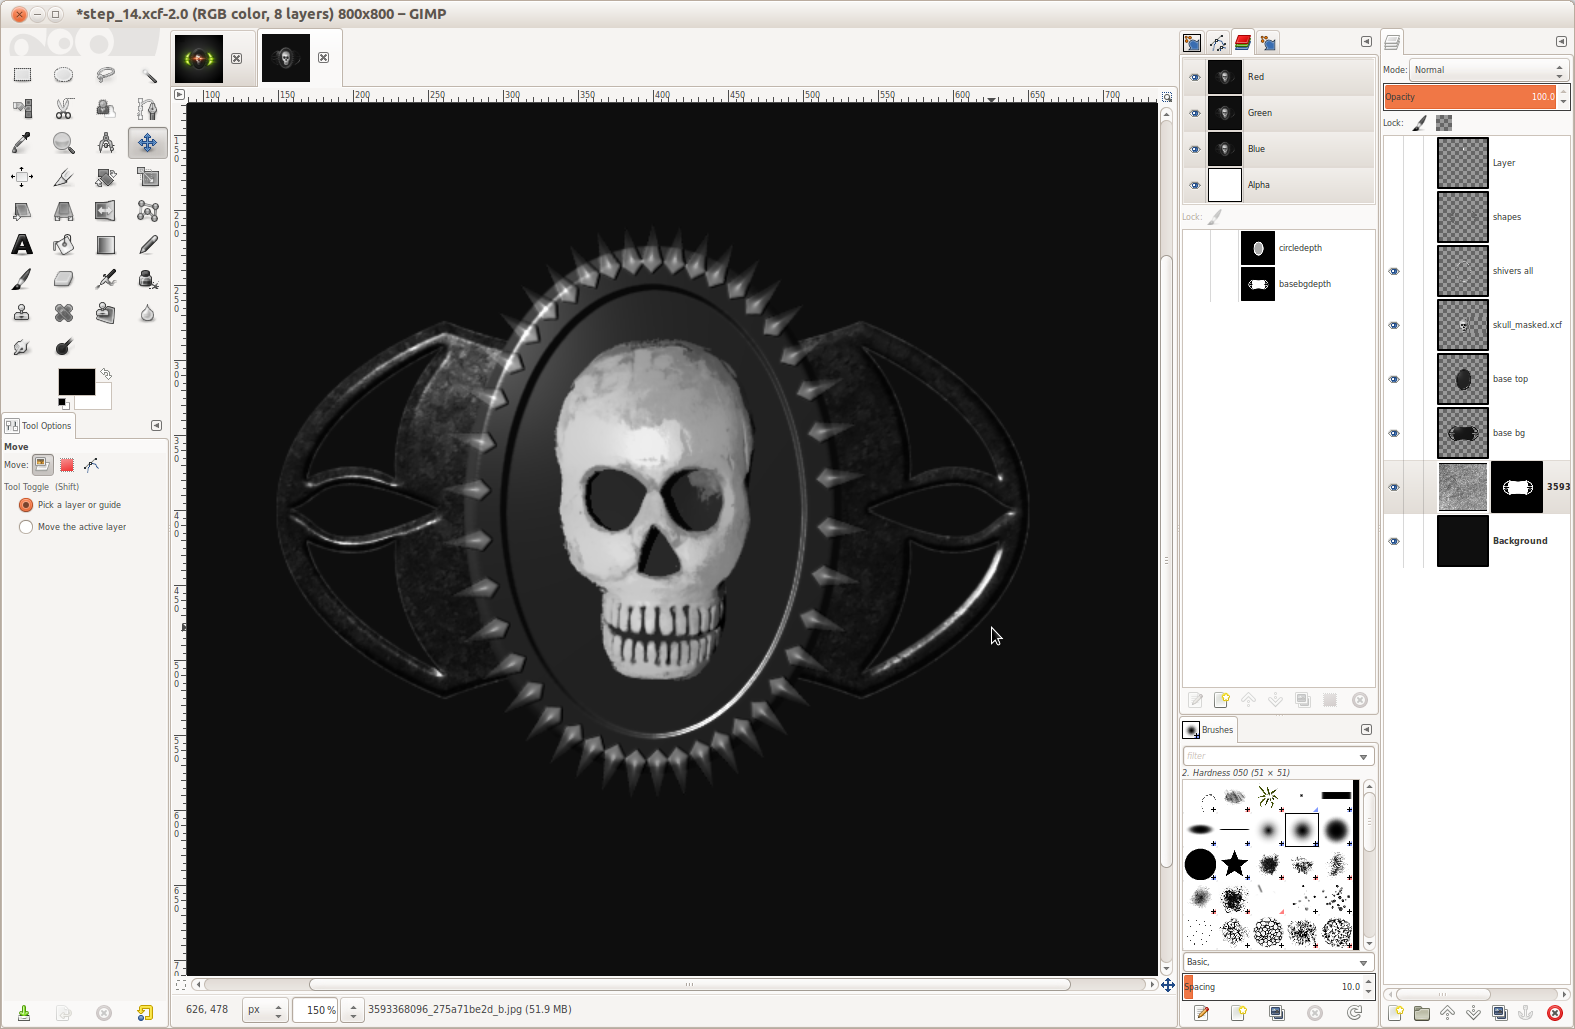
27
Get the selection from the alpha channel of the “base bg” layer. Make sure the texture layer is active and add a layer mask (right click the layer in the layers dialog) based on the “selection” you just got from the alpha channel. Then set the layer mode of the “base bg” layer to “hard light”.
-
28

There maybe is a small bright outline visible around the layer. To get rid of this select the layer mask and use Filters / Generic / Erode to shrink the white (visible) area on the layer mask automatically by 1 Pixel.
-
29
Import the stone texture again, move it below the “bg top layer” and do a strong (>200) Filter / Blur / Motion Blur (linear) with any angle you like.
Then set the layer above to layer mode “hard light”.
-
30
Choose the selection from alpha channel from the “top bg” layer, switch to the texture layer and add a layer mask by selection.
-
31
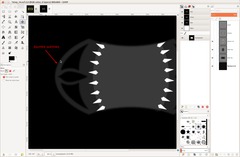
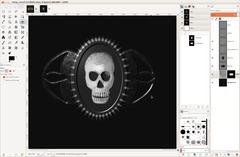
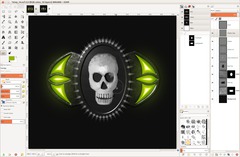
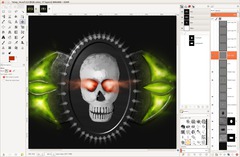
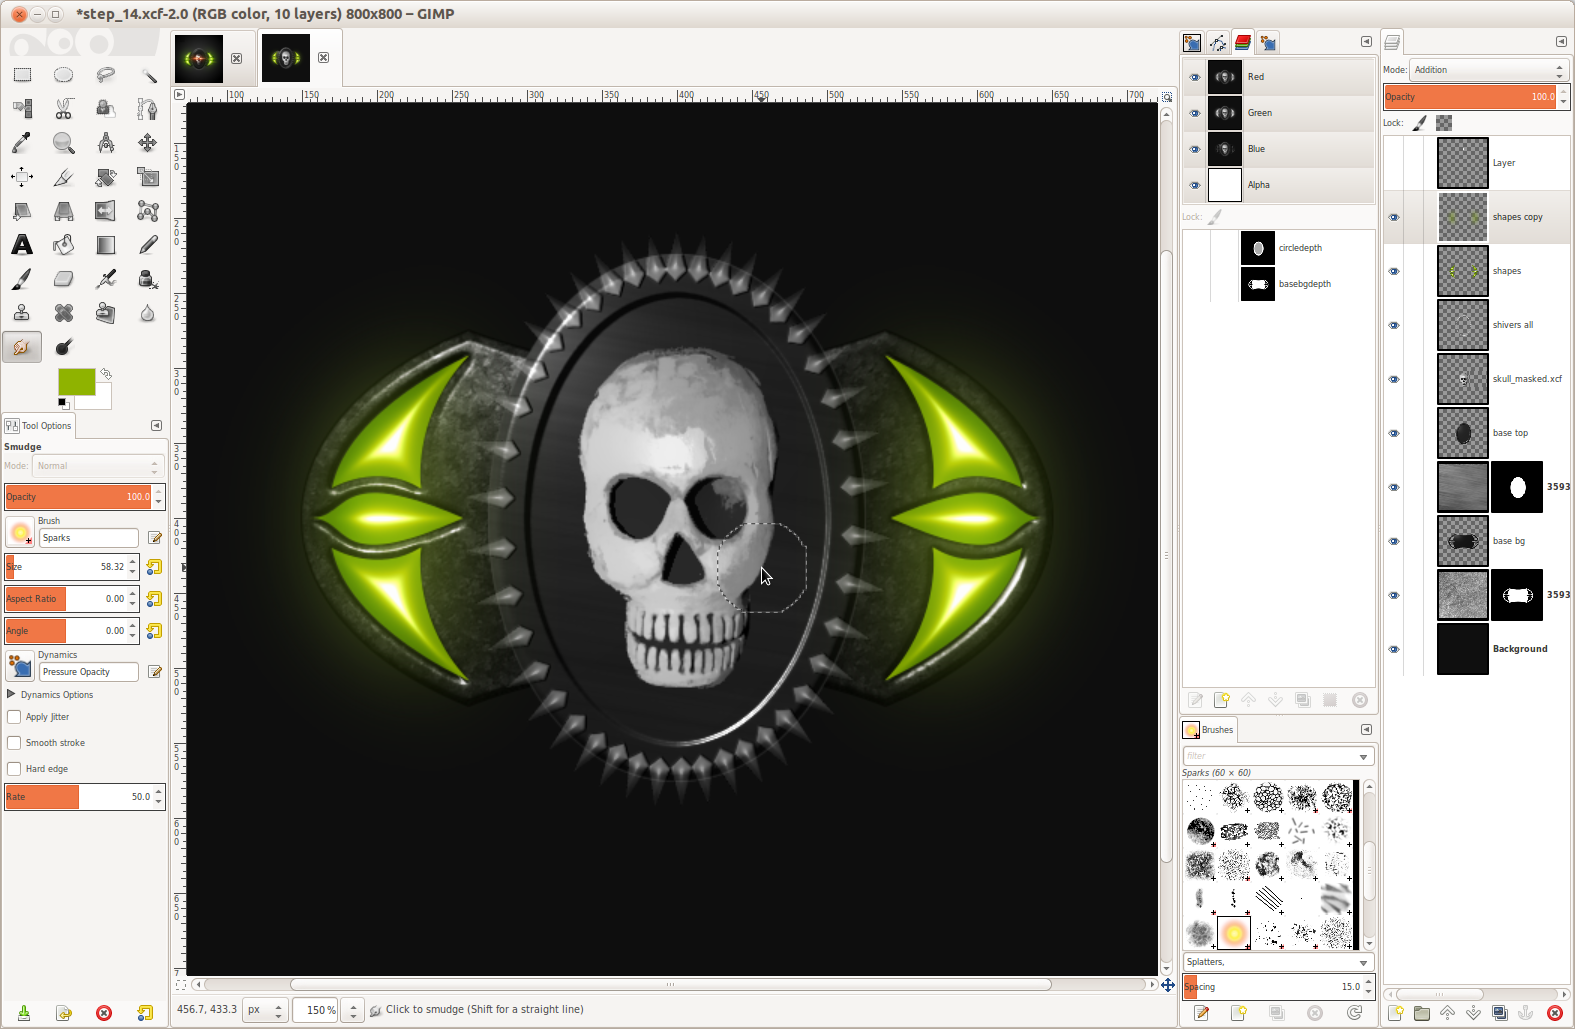
Now lets get to the pretty cool part – the glowing eyes and lights on the sides.
GMIC comes into play again.
Make the shapes layer visible and lock the alpha channel. Choose #8fb300 as new color (a dark saturated green – but choose any color you want ;))
- Use Filters / GMIC / Lights & Shadows / Relief Light again. Just use the same values as before but set a higher light smoothness value.
-
32
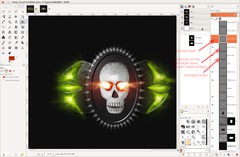
Creating the base glow:
- Unlock the “Lock transparency” option in the layer dialog.
- Duplicate the layer
- Filter / Blur / Gaussian: 80px.
- Layer mode to “Addition”.
-
33

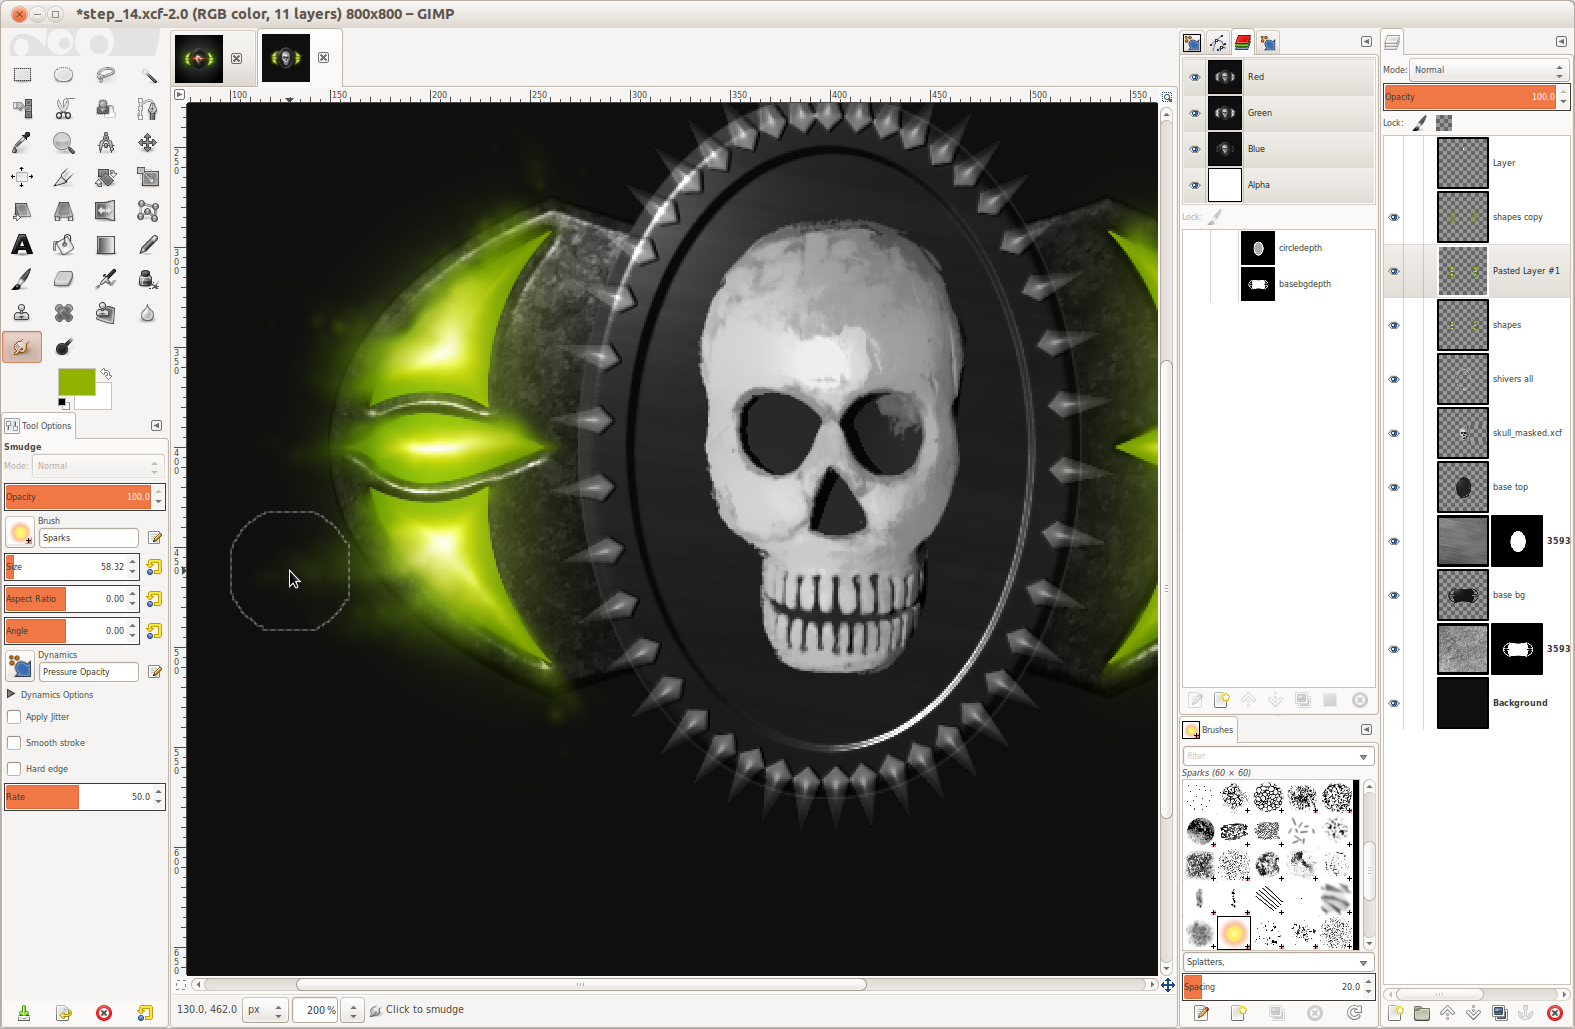
Now copy the shapes layer once. Choose the Smudge tool and select the “Sparks” brush (size ~50). Set the spacing of the brush to 10.
On the copy start in the white light and smear outwards to create the feeling of soft dusty smoke.
-
34
Then I uses the Burn/Dodge tool to get more contrast and detail on some areas of the light.
-
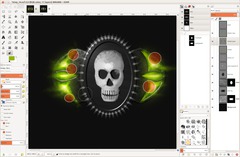
35
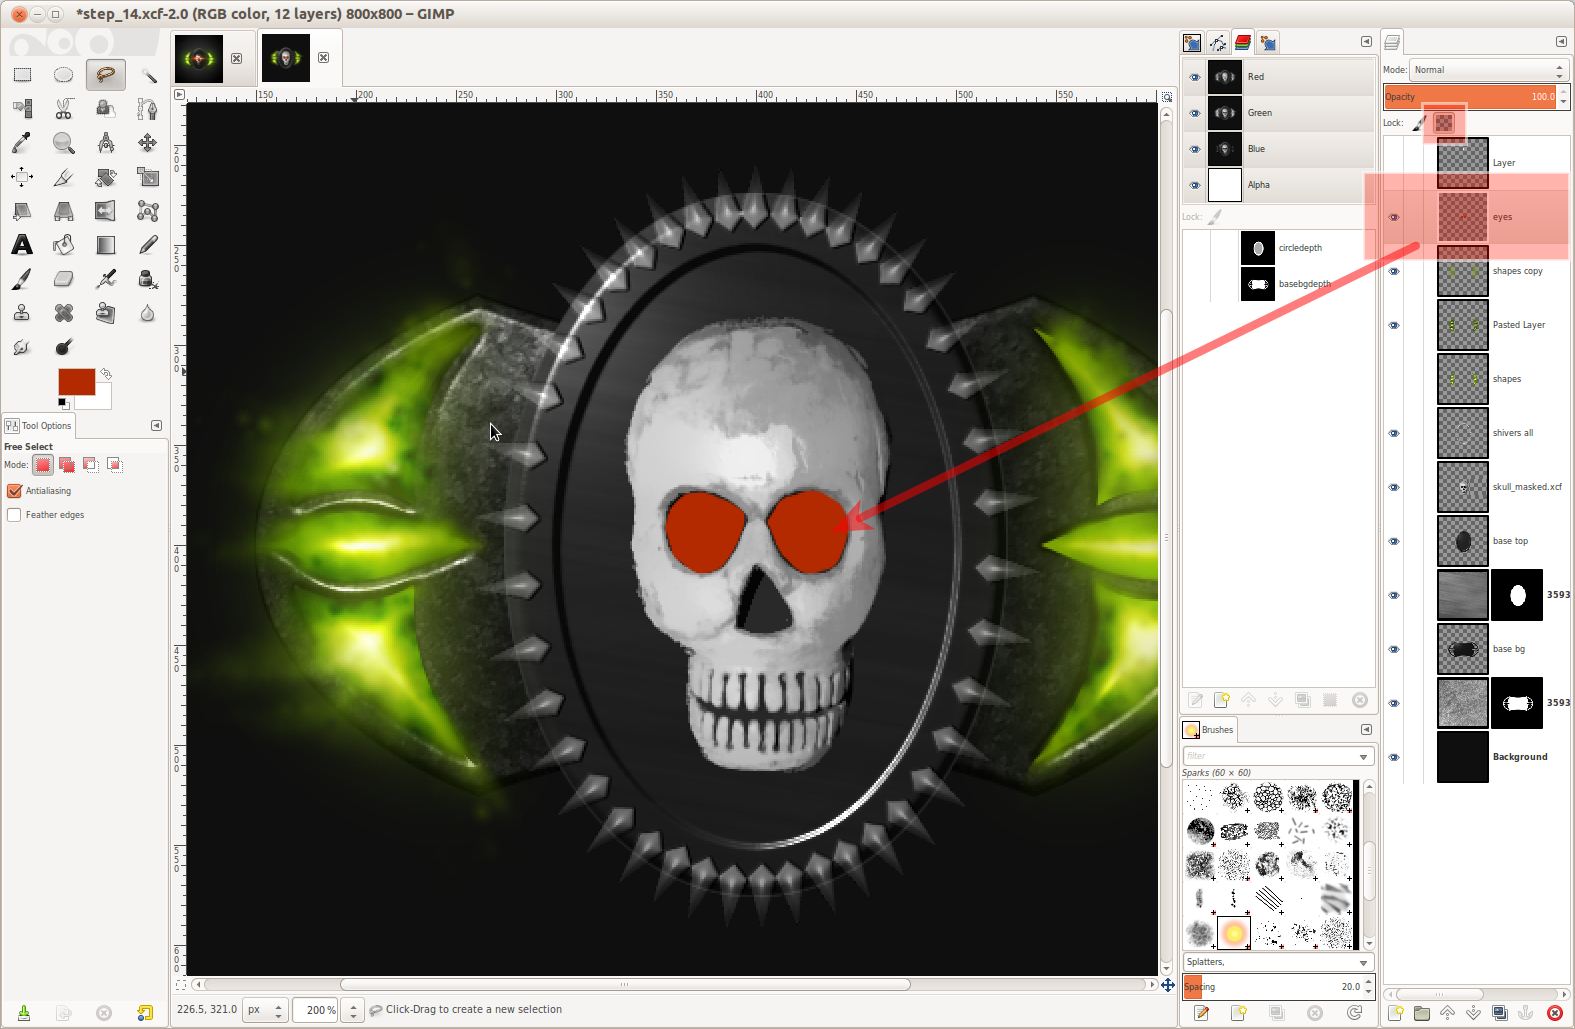
The eyes are done in the same way. I used the free select tool so make a selection for the eyes. On a new layer i filled it with #b32a00 (a red color) – then I used GMICs Relief light again.
Lock the transparency afterwards.
-
36
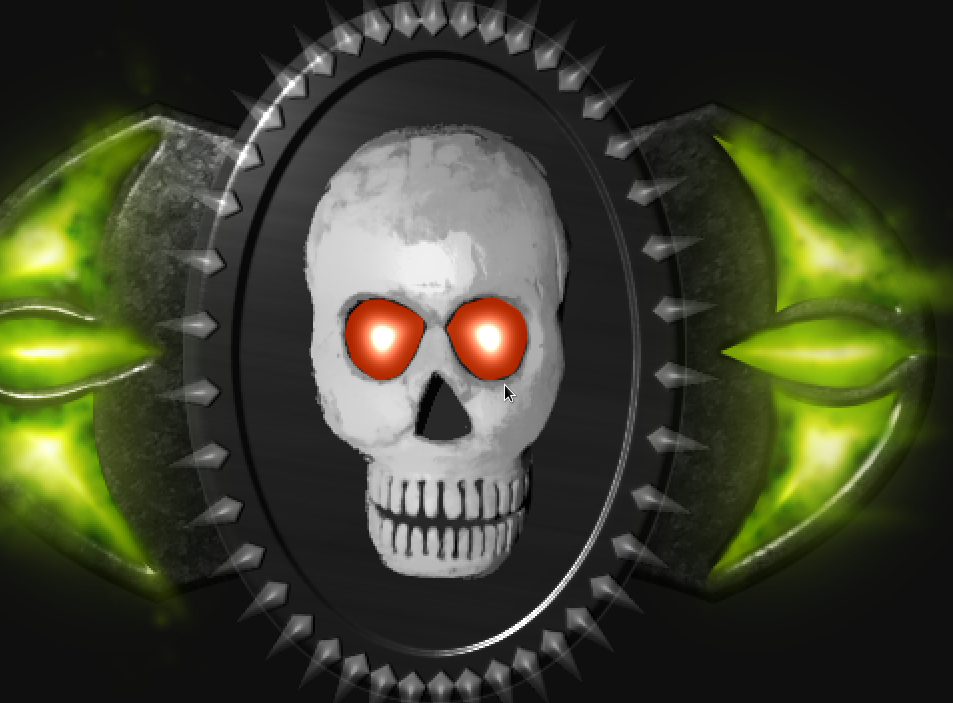
After GMICs Relief light:
-
37
After the same procedure that I did on the sides:
-
38
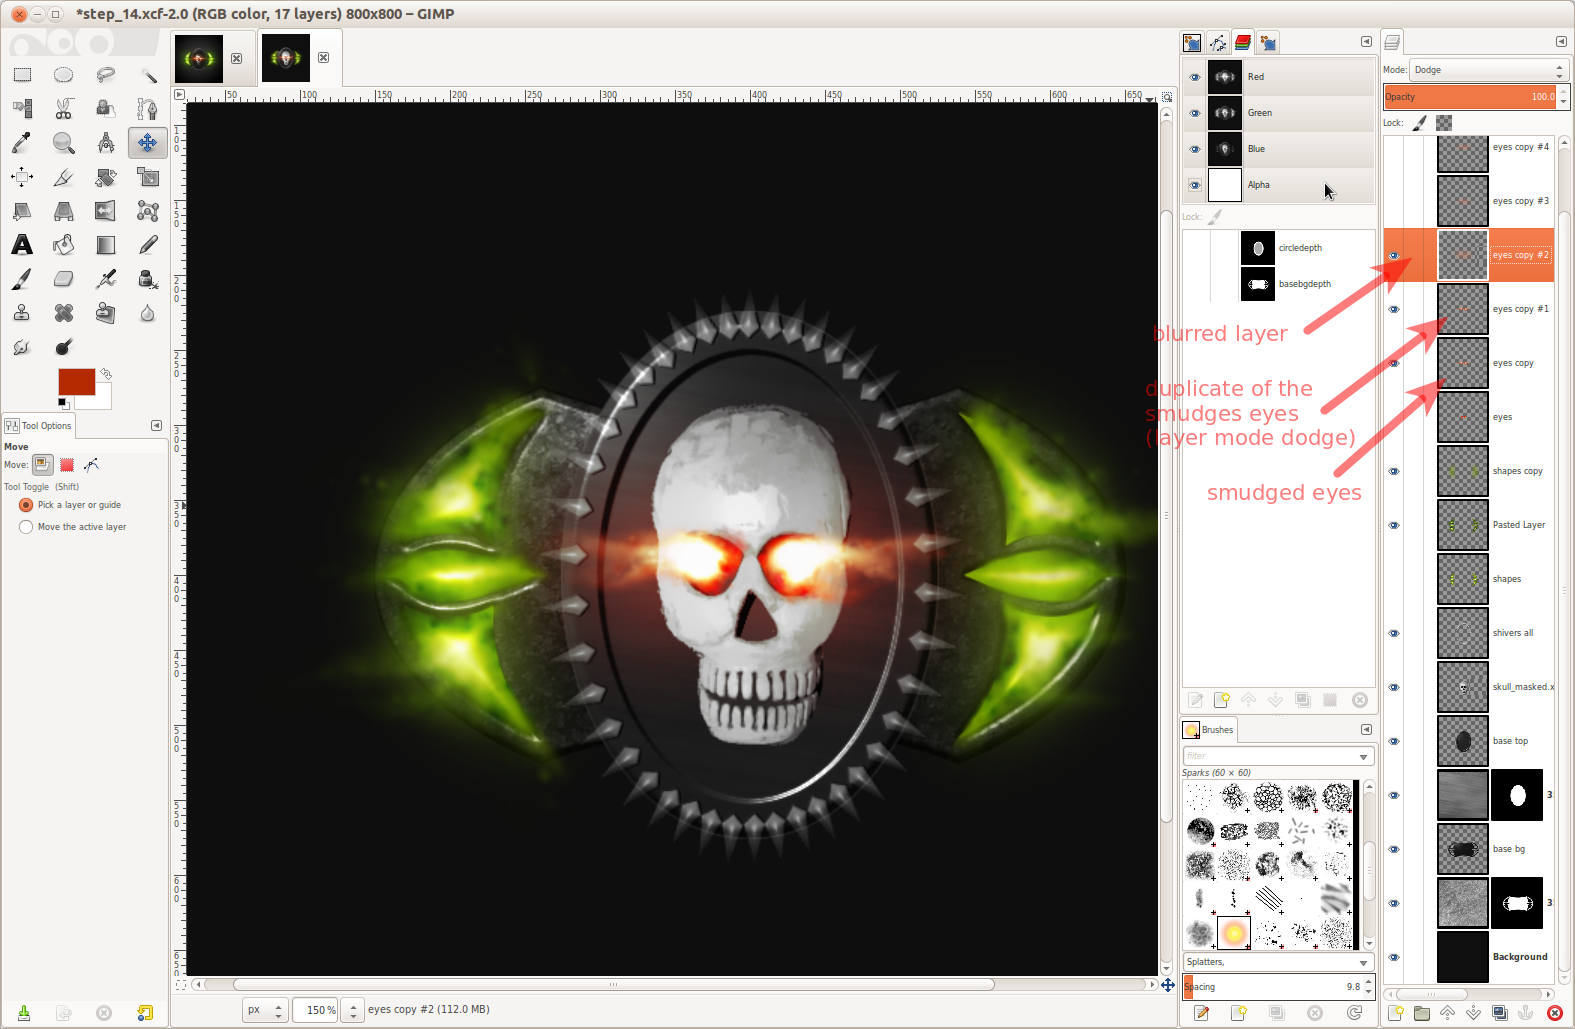
Then I duplicated the smudges eyes and set the layers mode to “Dodge”. I created another duplicate and blurred it with 80px.
-
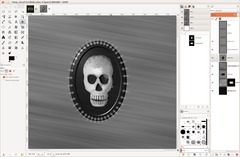
39
I then darkened the skull using Colors / Brightness & Contrast. After that I also darkened the top bg layer to make the glowing eyes more impressive.
-
40
Choose the blend tool, use the radial shape and black & a very dark gray as foreground and background color to drag a radial gradient from the middle to the side on the background layer.
After that I created a copy of all visible stuff on a seperate layer and sharpened it a little bit.
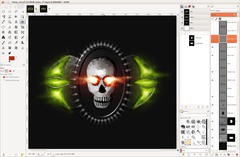
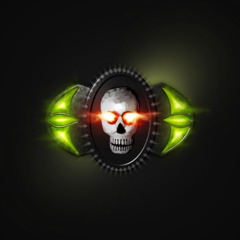
Well, that was how I did it ;) Hope some of you readers learned something new – I’m pretty sure for many of you at least something was new, because there are so many techniques / workflows in this tutorial!
I’d be glad if you attach your own medallions to your comment.
-
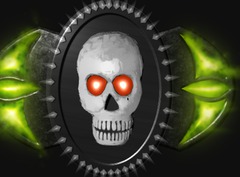
41
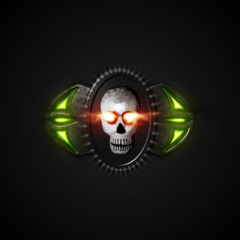
Here is another version where I set the layers mode of the green light/dust layer to “burn” – It looks more like plasma ;)
_800x800_%E2%80%93_GIMP_001-original.png)
_800x800_%E2%80%93_GIMP_002-original.png)
_800x800_%E2%80%93_GIMP_003-original.png)
_800x800_%E2%80%93_GIMP_004-original.png)
_800x800_%E2%80%93_GIMP_005-original.png)
_800x800_%E2%80%93_GIMP_006-original.png)
_800x800_%E2%80%93_GIMP_007-original.png)
_800x800_%E2%80%93_GIMP_008-original.png)
_800x800_%E2%80%93_GIMP_009-original.png)
_800x800_%E2%80%93_GIMP_010-original.png)
_800x800_%E2%80%93_GIMP_011-original.png)
_800x800_%E2%80%93_GIMP_012-original.png)
_800x800_%E2%80%93_GIMP_013-original.png)
_800x800_%E2%80%93_GIMP_014-original.png)


Comments
Post your own comments, questions or hints here. The author and other users will see your posting and can reply to it.
Of course, you can also ask in the chat.
Subscription management
Please log in to manage your subscriptions.
User rating
This topic (Designing a cool fantasy skull medallion) has been rated 3.0/5.0.
New comments are disabled because of spam.