


global color changes
This discussion is connected to the gimp-user-list.gnome.org mailing list which is provided by the GIMP developers and not related to gimpusers.com.
This is a read-only list on gimpusers.com so this discussion thread is read-only, too.
| global color changes | whburling | 18 Nov 15:49 |
| global color changes | rich404 | 18 Nov 20:38 |
| global color changes | whburling | 19 Nov 20:35 |
| global color changes | whburling | 20 Nov 18:32 |
| global color changes | rich404 | 20 Nov 20:16 |
| global color changes | rich404 | 20 Nov 20:34 |
| global color changes | whburling | 20 Nov 20:49 |
| global color changes | whburling | 20 Nov 20:50 |

- postings
- 5
global color changes
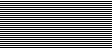
I am creating test images for an electronic sign.
The image was created in GIMP 2.10.8 and was declared an RGB image upon startup.
It consists of 24 pairs of rows, one pixel in height and 112 pixels long. Each pair consists of a black row and a color row.
THE PROBLEM: How to make a single test pattern and then change the color row color with a simple step(s) to make multiple test images.
I created the original image using a white background upon which I drew black foreground lines with a pencil..
When sent to the LED sign, the test image should turn on every other pixel so that Red and Green and Blue LEDs produce white if the pixel is on. Otherwise the pixel is off.
Now i would like to create another test pattern replacing white with some other color.
I could select each white row and change its color using a bucket fill, but there must be a better way that reduces making all those selections. Since I am using only the foreground color and background color I thought maybe I could change the background color and all the spatial regions that were the original background color would automatically change. However that did not work.
In looking around it seems some people use "color to alpha plugin". The only problem is I can not find such a plugin....not even a grayed out plugin.
So FIRST....Am i pursuing the most appropriate method of changing the white background (that is how the white originally was formed) to another color by using the color to alpha plugin. IF not please offer an alternative approach.
if so, please help me gain access to the color to alpha plugin. As mentioned earlier, I declared the image mode as RGB before I drew a single line.
One last request....It would be nice if I could reverse the black lines and make them white lines and repeat the above changes. That would enable me to test the pixels are not tested in the above test pattern.
Thank you for any input you can offer me.
Respectfully, bil
-
Global Color Changes test pattern
TeamSign_TestImage_HorizontalLines_R0_B_C0_W.xcf (13 KB)
global color changes
First turn off the active selection: Select -> None With such a tiny image, the chequer "transparency" pattern gets in the way. Add a layer underneath and fill with a colour. You want that anyway for a new background.
In looking around it seems some people use "color to alpha plugin". The only problem is I can not find such a plugin....not even a grayed out plugin.
It is there if you look. Probably you saw some Gimp 2.8 examples, Gimp 2.10 requires the user to set transparency first. White is the default colour.
Layer -> Transparency -> Add Alpha channel then Color -> Color to Alpha. That menu entry is down toward the bottom.
One last request....It would be nice if I could reverse the black lines and make them white lines and repeat the above changes. That would enable me to test the pixels are not tested in the above test pattern.
Black lines to white lines in the layers once they have transparency. Use Color -> Invert
some screenshot examples, https://i.imgur.com/U1hKYRa.jpg sorry this is a bit terse, but I am packing in for the day.
rich: www.gimp-forum.net
- postings
- 5
global color changes
First turn off the active selection: Select -> None With such a tiny image, the chequer "transparency" pattern gets in the way. Add a layer underneath and fill with a colour. You want that anyway for a new background.
It is there if you look. Probably you saw some Gimp 2.8 examples, Gimp 2.10 requires the user to set transparency first. White is the default colour.Layer -> Transparency -> Add Alpha channel then Color -> Color to Alpha. That menu entry is down toward the bottom. Black lines to white lines in the layers once they have transparency. Use Color -> Invert
some screenshot examples, https://i.imgur.com/U1hKYRa.jpg sorry this is a bit terse, but I am packing in for the day.
rich: www.gimp-forum.net
Rich,
First and foremost. Thank you for taking your valuable time to respond.
Your answer really gave me the clue I was approaching the problem in an inappropriate way. I revised my approach and made huge inroads.
I need to spend time getting ready for a hip operation. As soon as I am done with that I will convey what stopped me on my new approach. I has to do with not being able to use rectangular selection on a transparent layer.
thank you once again. a HUGE amount of thank you. bil
- postings
- 5
global color changes
First turn off the active selection: Select -> None With such a tiny image, the chequer "transparency" pattern gets in the way. Add a layer underneath and fill with a colour. You want that anyway for a new background.
It is there if you look. Probably you saw some Gimp 2.8 examples, Gimp 2.10 requires the user to set transparency first. White is the default colour.Layer -> Transparency -> Add Alpha channel then Color -> Color to Alpha. That menu entry is down toward the bottom. Black lines to white lines in the layers once they have transparency. Use Color -> Invert
some screenshot examples, https://i.imgur.com/U1hKYRa.jpg sorry this is a bit terse, but I am packing in for the day.
rich: www.gimp-forum.net
Rich....I have attempted to implement what I thought was your suggestion. I have stated it below. In trying to make my mask....I encountered a problem. I could not select a portion of my mask pattern to repeat by pasting and anchoring. Can you tell me what I might be doing incorrectly?
Goal Create a test pattern of 24 pairs of vertical lines (one black, one of four colors) for an electronic sign 112 pixels wide and 48 pixels high. The color lines of the pair are Red or Green or Blue, or White.
If I can achieve this goal, I can then make other repetitive test pattern
Strategy
Create four base layers each one of the four colors.
Create a layer, whose use is as a mask, which can be imposed over the above base layers creating the test pattern. I am not using a predefined GIMP “mask” as masks are associated with a single image layer. By using a layer whose use is as a mask, one such layer can be a mask for all base layers
Somehow flatten a base layer and mask to create a test pattern that can be saved as a file for each test pattern. I am not sure how to preserve the base layers and mask in achieving the above. Perhaps I save four additional copies of the file with the base layer and mask. Each of the four additional copes can then be flattened and the flattened file saved as the file name and type that can be sent to the sign controller as a test pattern.
Methodology
Create a canvas
Initialize
Define foreground color as Magenta
File -> new -> canvas size
Width = 114 (2 pixels wider than sign display area)
` height = 50 (2 pixels higher than sign display area)
Units: px
Advanced Options
Color space RGB
Spatial resolution 0.05 pixels/mm
Fill with foreground color
Note: “layer used to detect errors”
Implicit (settings I did not explicitly set)
Label of layer predefined by application as “Background”
Layer is in view (eye icon showing)
Create view of canvas
View->zoom->fit image in window
Begin Image Construction
Initialize
Define “foreground” color Red (implicitly defining paint in bucket),
Create a base layer,
create a new layer.
From new layer dialog box, select “fill with foreground color”.
Select bucket fill tool.
select entire layer(implicitly already done),
click in layer (activating bucket fill tool) thus filling layer with Red.
Right click layer
Select edit layer attribute
Select switch that locks pixels
Label layer as “Red On-Pixels”
Repeat for all four colors (R,G,B,W) with the correct color in label
Create a mask Do NOT use the predefined GIMP mask as such masks are associated with a specific image layer. Instead create a single mask that can be used with all base layers. This is achieved by creating a new transparent layer and with a pencil make black vertical lines one pixel wide. The black lines define the off pixels. The transparent region allows the underlying Base layer to define the color of the on pixels.
PROBLEM: To create the above layer, I want to draw with a pencil a few vertical lines with a pencil using black as the pencil color, then select the few lines , copy, paste, and anchor. Then repeat the process with a larger set of lines until I finally have an entire layer filled with vertical lines
I can draw the pencil lines. I can’t select and then paste them into the layer. The error message: “Cannot intersect with an empty selection”.
I do not know how to interpret that error message and hence have no idea what to do differently.
My attempt to understand the above error message is that the black lines I put on the transparent layer are not interpreted as having any physical reality.
global color changes
Rich....I have attempted to implement what I thought was your suggestion.
I have stated it below. In trying to make my mask....I encountered a problem.
I could not select a portion of my mask pattern to repeat by pasting and anchoring.
Can you tell me what I might be doing incorrectly?Goal Create a test pattern of 24 pairs of vertical lines (one black, one of four colors) for an electronic sign 112 pixels wide and 48 pixels high. The color lines of the pair are Red or Green or Blue, or White.
You only asked about color-to-alpha and swapping black/white. However
First the arithmetic does not work with Gimp. 112 pixels in 24 (pairs) = 4.66 pixels. You can not split pixels.
Assuming you sort that out, I think you are over-complicating things.
You can use Filters -> Render -> Pattern -> Grid to generate vertical black and white stripes 1 pair = 4 pix (2 + 2 )
I put up a set of guides = 28 to indicate the lack of match. example: https://i.imgur.com/5lAgF7f.jpg
note the guides fall on pixel boundaries so are not all equal width.
Sets of black/red , black/green , black/blue most easily done by adding coloured layers with those layers in 'multiply mode'
Turn visibility on or off for colour, export as png's for individual images. example: https://i.imgur.com/A5ARfHj.jpg
attached the xcf to play with.
-
 example
rgb-b-w-stripes.xcf (17.6 KB)
global color changes
Ahh. appologies, it has been a long day. My vertical is your horizontal.
So you want settings like this, https://i.imgur.com/kHgM4js.jpg
Note to swap black and white positions just adjust the offset
revised xcf attached
rich: www.gimp-forum.net
-
 another example
rgb-b-w-stripes.xcf (2.28 KB)
- postings
- 5
global color changes
Ahh. appologies, it has been a long day. My vertical is your horizontal.
So you want settings like this, https://i.imgur.com/kHgM4js.jpg
Note to swap black and white positions just adjust the offset
revised xcf attached
rich: www.gimp-forum.net
PIXELS
I apologize for not being more clear.
The sign is 112 pixels by 48 pixels. It is a low resolution sign.
My test pattern consists of parallel lines, each one pixel wide. The test patten consists of pairs of parallel lines. thus there are 24 horizontal pairs of lines and 56 pairs of vertical lines.
- postings
- 5
global color changes
Ahh. appologies, it has been a long day. My vertical is your horizontal.
So you want settings like this, https://i.imgur.com/kHgM4js.jpg
Note to swap black and white positions just adjust the offset
revised xcf attached
rich: www.gimp-forum.net
YES!!! I loved the offset...worked great....thank you so much


