RSS/Atom feed Twitter
Site is read-only, email is disabled

Tutorial: Creating a bloody splatter texture
Written by · Created on Jun 15, 2007, last updated about 13 years ago CC BY-NC License
Creating a bloody splatter texture

Motivation

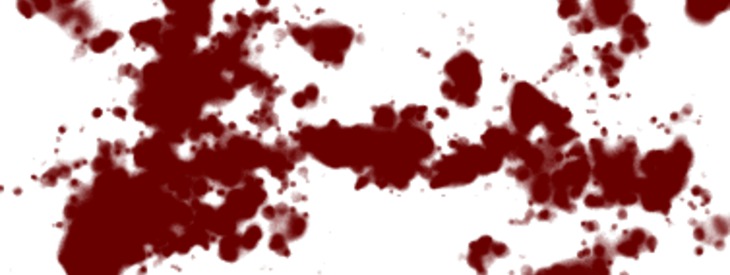
Today we will create a cool bloody texture that should look as there were random splatter all over the place.

Tutorial details

  1. 1

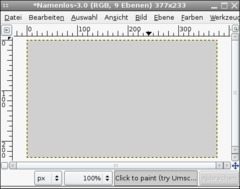
    Open a new file, any size. I used 377 × 233 px. Fill the background with #d0d0d0.

  2. 2

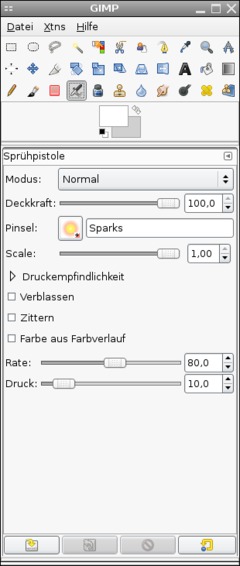
    Use the Airbrush-Tool and use the brush named “Sparks”. It is the yeloow one.

  3. 3

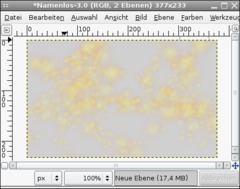
    Add a new empty layer and paint around randomly. It is important that the sparks overlay each other sometimes.

  4. 4

    Now click the “lock transparency” icon in the layers dialog. This option is found right above the transparency-changer.

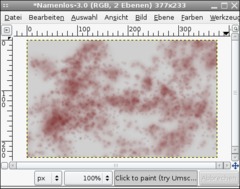
    Choose a new color as foreground-color: #680000.
    - Edit / Fill FG-Color.

    Everything should now be in a slight dark red.

  5. 5

    Now please deactivate the “lock transparency”-option again.

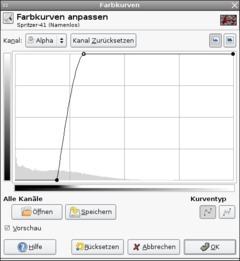
    Go to Colors / Curves, choose “Alpha” as channel (top left). Apply the curve as seen on the picture.

  6. 6

    After that you’re done ;)

    Easy, right?

Comments

Post your own comments, questions or hints here. The author and other users will see your posting and can reply to it.

Of course, you can also ask in the chat.

Subscription management

Please log in to manage your subscriptions.

New comments are disabled because of spam.

RL
almost 13 years ago

That was pretty damn awesome. Thanks a lot!

Montek
over 13 years ago

It's so great! Looks really good and it's easy. :)

:-D
about 14 years ago

http://i8.photobucket.com/albums/a47/Authiel/bloodspatterattempt2.png

Bandit
over 14 years ago

I just wanted to say this tutorial was great!

I ended up making http://i29.tinypic.com/n4ebli.jpg and http://i32.tinypic.com/iqy2k6.jpg using bloody textures I made with this tutorial

gimpygirl
over 14 years ago

um, what was the curve you used? mine looks a bit different thean yours.

bobdotexe member for almost 15 years bobdotexe 1 comment
almost 15 years ago

this is cool, I used it on a sword I made!

Nott
about 15 years ago

Last spampost, sorry!
I think if you use sparks, and have your red color ready, you can go to "Brush Dynamics" in the toolbox and check everything on "Velocity". Not as compeltely blood-like, but ok for me.

......I have 2.0
Must be why nothing works. >.>

Nott
about 15 years ago

Ok, the alpha thing is making me angry. No matter what I do, it has NO effect!
-30 seconds later...-
OH, you have to set it to the sparks layer, at least the way I do it (new layer, red, "hue").
I still can't do the fill-with-fg-color like you do.

Nott
about 15 years ago

Absolutely nothing suggested is working, my image still fills with red.
However, I did get around that by making a white layer in the back, putting a filled red layer above, and setting the red layer to "Hue". To be honest, it still looks like fine spray instead of splatter.
I don't understand the Alpha Curves thing. I tried to get it clsoe to that picture, and when I hit OK nothing happened.

ño
about 15 years ago

thank u! great tutorial ^^

gallinula member for over 16 years gallinula 2 comments
over 15 years ago

Michael, look on the layers tab (CTRL-L if you can't find it).
Just above the list of layers you will find the lock transparency button. (Its a checkbox actually but we all love semantics).
This technique really does work if you get to the end.
Happy splattering.

Michael
over 15 years ago

This is bogus, There is NO lock transparency button, Im on GIMP 2.6, help?

jleaf
over 15 years ago

Nice tutorial. worked like a charm. I did the splatter in blue though, and it looked just as good- not that it looked like blood then, but it was for something i was doing. Anyways for all you people who keep having trouble, you need to create a new layer for the sun thing, then fill it with FG. When you need to "lock the transparency just lock the alpha (its a little block with a square next to it.) It's actually very easy and effective- and it doesn't really matter what size or backround color you have it: i had a white backround with a 450x100 size frame. Still worked like a charm.

Ticerot
over 15 years ago

Thank you, excellent tutorial.

gallinula
over 15 years ago

If the alpha channel is still locked while using the curves tool there will be no visible effect. Make sure that the layer is unlocked before applying the curve tool. I keep forgetting this myself.

Mike Mire
over 15 years ago

Well I did everything by the step by step guide but when I do the curves and click Ok, the image stays the same...

Yes the curve is done on the alpha channel and yes I used the right curve...I don't know whats wrong..

devvv member for over 17 years devvv 1475 comments
almost 16 years ago

did you make sure that you're working on the layer that contains the yellow sparks?

it is very important to have the "lock transparency" option activated. it is found right besinde the ruler that lets you change the opacity of the layer (in the layers dialog - below the layer modes drop down menu)

mothergoose member for almost 16 years mothergoose 1 comment
almost 16 years ago

just like everyone else's problem i've been following the instructions perfectly (so i think) then once i have to fill in FG color it just makes the whole layer completely red. i need help. please!

Thebeaner1
almost 16 years ago

Nice tut man, easy, sipmle, and looks great!

zac
almost 16 years ago

IVe Copied It step by step so far.

But When I click Fill Fg Colour Everything goes Red..

I've got lock and chain on..

Please Help

ur mother
almost 16 years ago

ur mother

ales
about 16 years ago

and how to lock transparency?? please!!!!!

ales
about 16 years ago

can u tell me how to change the background to #d0d0d0 ??????

Jommie
over 16 years ago

Opps I made a mistake.
For the lock transparency part. It's not the chain link like I said previously. It's the "Lock alpha channel" just under the Opacity slider. (I had both selected.)
Also you don't need to mouse over the air brush splatter, the lock takes care of it.
And again this description is for Windows users.
I forgot to say thanks for this nice short guide!

Jommi
over 16 years ago

Just some notes that weren't immediately obvious to a new user like myself.

For 2.4.0 Windows users:
When he says empty layer, he means transparent.
When you are ready to fill with FG color,mouse over the the air brushed splatter, then try right click edit>Fill with FG.
For the Lock transparency, in the layer window, click on your transparent layer, then mouse over to the left and click the empty box next to the eye. You'll see a chain link.
And to get the curve to bend like he shows, click on it and stretch it.

Mergh
over 16 years ago

I have the same problem,, it fills the whole screen with RED. Not Th Sparks. The Transparency is also locked.

Amyk13 member for over 16 years Amyk13 5 comments
over 16 years ago

Wow!!! I love it! It's very cool!!

Sarah
over 16 years ago

Wow, that's really cool. I'm a first time GIMP user and I had trouble finding my curve tool because I didn't have it activated yet. ^_^'

devvv member for over 17 years devvv 1475 comments
over 16 years ago

wow nice ;) what was the hard part for you or what was the difficulty. maybe i can add this to the tutorial then. that would help other users!

corban member for over 16 years corban 2 comments
over 16 years ago

omg got it to work thank you thank you thank you

corban member for over 16 years corban 2 comments
over 16 years ago

i updated to the version u are using, but now even when i click lock transparecny, the edit fill fg color, it fills it all with fg color

corban
over 16 years ago

does it say keep transparency, i tried that, doesn't work

also i clicked on fill WITH fg color, not fill fg color

devvv member for over 17 years devvv 1475 comments
over 16 years ago

if you look at the layers dialog, look above all layers. ther is a little checkbox - this is the option to lock transparency

corban
over 16 years ago

please help, i can't find how to lock transparency

gallinula member for over 16 years gallinula 2 comments
over 16 years ago

Great technique. I've been looking for an effective way to create splatter for some time. This is brilliant. Thank you.

Peter Grosse
almost 17 years ago

Wow, very nice tutorial, here is my resualt
I made a screen saver size one....
http://img513.imageshack.us/img513/4356/bloodpenguinwk1.png