


Multiple Resizing, Oval Cropping and Watermarking
This discussion is connected to the gimp-user-list.gnome.org mailing list which is provided by the GIMP developers and not related to gimpusers.com.
This is a read-only list on gimpusers.com so this discussion thread is read-only, too.
| Multiple Resizing, Oval Cropping and Watermarking | ermns | 28 Sep 18:34 |
| Multiple Resizing, Oval Cropping and Watermarking | Partha Bagchi | 28 Sep 18:47 |
| Multiple Resizing, Oval Cropping and Watermarking | Steve Kinney | 28 Sep 20:31 |
| Multiple Resizing, Oval Cropping and Watermarking | Partha Bagchi | 28 Sep 20:46 |
| Multiple Resizing, Oval Cropping and Watermarking | Partha Bagchi | 28 Sep 20:47 |
| Multiple Resizing, Oval Cropping and Watermarking | ermns | 29 Sep 13:47 |
| Multiple Resizing, Oval Cropping and Watermarking | ermns | 29 Sep 06:40 |

- postings
- 3
Multiple Resizing, Oval Cropping and Watermarking
Hello everyone :-)
I am a very new user to Gimp for Linux. I do understand computers but I have not extensive knowledge of photo editing. So this is what I would like help with.
I have a bunch of photos that I would like to resize and Watermark.
1. Is there a way I could resize all photos in a folder, or the ones I choose to a certain width, height etc.?
2. I am trying to Watermark with text and a photo these photos. I have used two scripts which work pretty well.
I have found these scripts here :
http://www.skipser.com/p/2/p/how-to-watermark-photos-using-gimp.html
I have managed to make them watermark just fine.
If someone knows of a way to watermark multiple photos that would be great. I have found this software http://www.daanav.com/watermark-software-for-linux/ but it does not do the job I need.
3. I have a problem with cropping in an oval shape the photo I want.
I took a photo and used the oval selection tool. Then cropped to selection but it does not select only the oval shape, but the whole rectangle. Then I choose Image - Grayscale and I export.
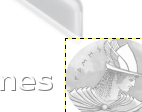
The problems I have are two: When I watermark with that picture, I see the rectangle and not the oval shape, and most importantly I see the selection saved with the photo.
What you see in the picture is what I get after I watermark. It is the photo which is cropped in an oval shape, but it seems that when I saved it, it saved the rectangle selection as well. Also if the background is not white, then I can see the white rectangle as well...
Could someone please help me?
Thanks
-
Selection is saved and rectangle shows
Screenshot_from_2014-09-28_21_12_15.png (11.2 KB)
Multiple Resizing, Oval Cropping and Watermarking
Your distribution probably has imagemagick. Use imagemagick to batch convert and watermark.
Take a look at this: http://www.imagemagick.org/Usage/annotating/
HTH, Partha
On Sun, Sep 28, 2014 at 2:34 PM, ermns wrote:
Hello everyone :-)
I am a very new user to Gimp for Linux. I do understand computers but I have not extensive knowledge of photo editing. So this is what I would like help with.
I have a bunch of photos that I would like to resize and Watermark.
1. Is there a way I could resize all photos in a folder, or the ones I choose to a certain width, height etc.?
2. I am trying to Watermark with text and a photo these photos. I have used two scripts which work pretty well.
I have found these scripts here :
http://www.skipser.com/p/2/p/how-to-watermark-photos-using-gimp.htmlI have managed to make them watermark just fine.
If someone knows of a way to watermark multiple photos that would be great. I have found this software http://www.daanav.com/watermark-software-for-linux/ but it does not do the job I need.
3. I have a problem with cropping in an oval shape the photo I want.
I took a photo and used the oval selection tool. Then cropped to selection but it does not select only the oval shape, but the whole rectangle.
Then I choose Image - Grayscale and I export.The problems I have are two: When I watermark with that picture, I see the rectangle and not the oval shape, and most importantly I see the selection saved with the photo.
What you see in the picture is what I get after I watermark. It is the photo which is cropped in an oval shape, but it seems that when I saved it, it saved the rectangle selection as well. Also if the background is not white, then I can see the white rectangle as well...
Could someone please help me?
Thanks
Attachments: * http://www.gimpusers.com/system/attachments/155/original/Screenshot_from_2014-09-28_21_12_15.png
-- ermns (via www.gimpusers.com/forums) _______________________________________________ gimp-user-list mailing list
List address: gimp-user-list@gnome.org List membership: https://mail.gnome.org/mailman/listinfo/gimp-user-list List archives: https://mail.gnome.org/archives/gimp-user-list
Multiple Resizing, Oval Cropping and Watermarking
-----BEGIN PGP SIGNED MESSAGE----- Hash: SHA1
On 09/28/2014 02:47 PM, Partha Bagchi wrote:
Your distribution probably has imagemagick. Use imagemagick to batch convert and watermark.
Take a look at this: http://www.imagemagick.org/Usage/annotating/
Yes to that: imagemagick is the right tool for resizing lots of images at once and/or adding watermarks to them. Still, if you are going to edit each image individually in the GIMP to get that oval, it might be just as convenient to make the watermark on an otherwise transparent layer, save that as a file of its own, and drag+drop to add it to each image before saving.
In re cropping, I think what you probably want to do is make your oval selection, and do Image > Crop To Selection. That gives you the rectangle. Then do Select > Invert followed by Edit > Delete to delete everything in the rectangle except your oval.
(The usual keyboard shortcut for invert selection is control+i, for delete is control+x.)
You can choose the color of the "deleted" area by setting it as the background color in your color selector tool, if the image / layer you are working on does not have an alpha channel. The alpha channel in a layer or image enables transparency; with no alpha channel, anything you delete will turn into the background color.
If the image / layer you are working on has an alpha channel, you will get a transparent background instead. This is a frequently used option for non-rectangular image content that will be displayed on websites.
To add or remove the alpha channel from your image or layer, right click on the thumbnail in the Layers dialog and select "Add alpha channel" or "Remove alpha channel". To preserve a transparent background in your finished image, export the finished image in PNG format. Saving as JPG (for instance) will turn the transparent areas into the background color that is set at the time, as JPG does not support transparency.
:o)
Steve
-----BEGIN PGP SIGNATURE----- Version: GnuPG v1.4.14 (GNU/Linux)
iQIcBAEBAgAGBQJUKHAXAAoJEDZ0Gg87KR0LcU8QAOjNHfiBZZn3gan/GruobDtu
NfXMJZNdfgjkPEGgUk4q+c1wxW04qO2eFTKdXmiEcEhZDdlLEjf9cz3CXHtd5lMz
mCJC0XMcOAZ32iBedxjPST8okMpEX2kCpvmMtXYvWoqyzbehaN+zCtctuZsey704
44+BohzAHVSLH9bhu5iB2v9ku1e2/zNHz7ld8+nT2791rPGNGh0MDFn58lxlA5Gz
cRUDPMqSQ1vQ2KLbW21n6d0egrbGlJiDcIApyTJDX9GQ2NvEDhojidZeBZnIqqED
Dn+DbLMdxtiVND0L7EfqWulj+mK0uP+WTvM0Xw85Dmcqpu9f5XkTvPHVKqpxCn6k
E6RZG7NBZTYkqCb8GT3YQbOGPnRPPLFh6KfHEpr9GGJYW+8Jt2HTRoPeAt2GXSHw
0wrySRDcynhwRbkAAMtbjfjowcUM6Whhh89eK9D9bH+8w4Jm4OLkW0ekJsmKLP3l
dbkaxIZt6APqRQZdKgvV0xpmWmgcjpmFeKhuUosxSTjRoXvRg6NV0AU/w3gGIDc+
hMEKgIIPH45kZEB7PM9AYdilLvRGjatzkRv3azi74zI1ApUr/+yWovDx/NED5GK6
9pTifYnOv9kMdMjF6uMkWfruCX8OMy/rNqNcU0TzVkmpOx6oIJkYWg5EJjBQGVuq
tP5c0mX9iH/4aRYzFmvh
=lrRu
-----END PGP SIGNATURE-----
Multiple Resizing, Oval Cropping and Watermarking
If the shape can be defined apriori then you can achieve the oval shape during the convert process.
On Sun, Sep 28, 2014 at 4:31 PM, Steve Kinney wrote:
-----BEGIN PGP SIGNED MESSAGE----- Hash: SHA1
On 09/28/2014 02:47 PM, Partha Bagchi wrote:
Your distribution probably has imagemagick. Use imagemagick to batch convert and watermark.
Take a look at this: http://www.imagemagick.org/Usage/annotating/
Yes to that: imagemagick is the right tool for resizing lots of images at once and/or adding watermarks to them. Still, if you are going to edit each image individually in the GIMP to get that oval, it might be just as convenient to make the watermark on an otherwise transparent layer, save that as a file of its own, and drag+drop to add it to each image before saving.
In re cropping, I think what you probably want to do is make your oval selection, and do Image > Crop To Selection. That gives you the rectangle. Then do Select > Invert followed by Edit > Delete to delete everything in the rectangle except your oval.
(The usual keyboard shortcut for invert selection is control+i, for delete is control+x.)
You can choose the color of the "deleted" area by setting it as the background color in your color selector tool, if the image / layer you are working on does not have an alpha channel. The alpha channel in a layer or image enables transparency; with no alpha channel, anything you delete will turn into the background color.
If the image / layer you are working on has an alpha channel, you will get a transparent background instead. This is a frequently used option for non-rectangular image content that will be displayed on websites.
To add or remove the alpha channel from your image or layer, right click on the thumbnail in the Layers dialog and select "Add alpha channel" or "Remove alpha channel". To preserve a transparent background in your finished image, export the finished image in PNG format. Saving as JPG (for instance) will turn the transparent areas into the background color that is set at the time, as JPG does not support transparency.
:o)
Steve
-----BEGIN PGP SIGNATURE----- Version: GnuPG v1.4.14 (GNU/Linux)
iQIcBAEBAgAGBQJUKHAXAAoJEDZ0Gg87KR0LcU8QAOjNHfiBZZn3gan/GruobDtu NfXMJZNdfgjkPEGgUk4q+c1wxW04qO2eFTKdXmiEcEhZDdlLEjf9cz3CXHtd5lMz mCJC0XMcOAZ32iBedxjPST8okMpEX2kCpvmMtXYvWoqyzbehaN+zCtctuZsey704 44+BohzAHVSLH9bhu5iB2v9ku1e2/zNHz7ld8+nT2791rPGNGh0MDFn58lxlA5Gz cRUDPMqSQ1vQ2KLbW21n6d0egrbGlJiDcIApyTJDX9GQ2NvEDhojidZeBZnIqqED Dn+DbLMdxtiVND0L7EfqWulj+mK0uP+WTvM0Xw85Dmcqpu9f5XkTvPHVKqpxCn6k E6RZG7NBZTYkqCb8GT3YQbOGPnRPPLFh6KfHEpr9GGJYW+8Jt2HTRoPeAt2GXSHw 0wrySRDcynhwRbkAAMtbjfjowcUM6Whhh89eK9D9bH+8w4Jm4OLkW0ekJsmKLP3l dbkaxIZt6APqRQZdKgvV0xpmWmgcjpmFeKhuUosxSTjRoXvRg6NV0AU/w3gGIDc+ hMEKgIIPH45kZEB7PM9AYdilLvRGjatzkRv3azi74zI1ApUr/+yWovDx/NED5GK6 9pTifYnOv9kMdMjF6uMkWfruCX8OMy/rNqNcU0TzVkmpOx6oIJkYWg5EJjBQGVuq tP5c0mX9iH/4aRYzFmvh
=lrRu
-----END PGP SIGNATURE-----
_______________________________________________ gimp-user-list mailing list
List address: gimp-user-list@gnome.org List membership: https://mail.gnome.org/mailman/listinfo/gimp-user-list List archives: https://mail.gnome.org/archives/gimp-user-list
Multiple Resizing, Oval Cropping and Watermarking
And if you really only want to use Gimp, then look at dbp (Dave's batch processing) or BIMP.
On Sun, Sep 28, 2014 at 4:46 PM, Partha Bagchi wrote:
If the shape can be defined apriori then you can achieve the oval shape during the convert process.
On Sun, Sep 28, 2014 at 4:31 PM, Steve Kinney wrote:
-----BEGIN PGP SIGNED MESSAGE----- Hash: SHA1
On 09/28/2014 02:47 PM, Partha Bagchi wrote:
Your distribution probably has imagemagick. Use imagemagick to batch convert and watermark.
Take a look at this: http://www.imagemagick.org/Usage/annotating/
Yes to that: imagemagick is the right tool for resizing lots of images at once and/or adding watermarks to them. Still, if you are going to edit each image individually in the GIMP to get that oval, it might be just as convenient to make the watermark on an otherwise transparent layer, save that as a file of its own, and drag+drop to add it to each image before saving.
In re cropping, I think what you probably want to do is make your oval selection, and do Image > Crop To Selection. That gives you the rectangle. Then do Select > Invert followed by Edit > Delete to delete everything in the rectangle except your oval.
(The usual keyboard shortcut for invert selection is control+i, for delete is control+x.)
You can choose the color of the "deleted" area by setting it as the background color in your color selector tool, if the image / layer you are working on does not have an alpha channel. The alpha channel in a layer or image enables transparency; with no alpha channel, anything you delete will turn into the background color.
If the image / layer you are working on has an alpha channel, you will get a transparent background instead. This is a frequently used option for non-rectangular image content that will be displayed on websites.
To add or remove the alpha channel from your image or layer, right click on the thumbnail in the Layers dialog and select "Add alpha channel" or "Remove alpha channel". To preserve a transparent background in your finished image, export the finished image in PNG format. Saving as JPG (for instance) will turn the transparent areas into the background color that is set at the time, as JPG does not support transparency.
:o)
Steve
-----BEGIN PGP SIGNATURE----- Version: GnuPG v1.4.14 (GNU/Linux)
iQIcBAEBAgAGBQJUKHAXAAoJEDZ0Gg87KR0LcU8QAOjNHfiBZZn3gan/GruobDtu NfXMJZNdfgjkPEGgUk4q+c1wxW04qO2eFTKdXmiEcEhZDdlLEjf9cz3CXHtd5lMz mCJC0XMcOAZ32iBedxjPST8okMpEX2kCpvmMtXYvWoqyzbehaN+zCtctuZsey704 44+BohzAHVSLH9bhu5iB2v9ku1e2/zNHz7ld8+nT2791rPGNGh0MDFn58lxlA5Gz cRUDPMqSQ1vQ2KLbW21n6d0egrbGlJiDcIApyTJDX9GQ2NvEDhojidZeBZnIqqED Dn+DbLMdxtiVND0L7EfqWulj+mK0uP+WTvM0Xw85Dmcqpu9f5XkTvPHVKqpxCn6k E6RZG7NBZTYkqCb8GT3YQbOGPnRPPLFh6KfHEpr9GGJYW+8Jt2HTRoPeAt2GXSHw 0wrySRDcynhwRbkAAMtbjfjowcUM6Whhh89eK9D9bH+8w4Jm4OLkW0ekJsmKLP3l dbkaxIZt6APqRQZdKgvV0xpmWmgcjpmFeKhuUosxSTjRoXvRg6NV0AU/w3gGIDc+ hMEKgIIPH45kZEB7PM9AYdilLvRGjatzkRv3azi74zI1ApUr/+yWovDx/NED5GK6 9pTifYnOv9kMdMjF6uMkWfruCX8OMy/rNqNcU0TzVkmpOx6oIJkYWg5EJjBQGVuq tP5c0mX9iH/4aRYzFmvh
=lrRu
-----END PGP SIGNATURE-----
_______________________________________________ gimp-user-list mailing list
List address: gimp-user-list@gnome.org List membership: https://mail.gnome.org/mailman/listinfo/gimp-user-list List archives: https://mail.gnome.org/archives/gimp-user-list
- postings
- 3
Multiple Resizing, Oval Cropping and Watermarking
Your distribution probably has imagemagick. Use imagemagick to batch convert and watermark.
Take a look at this: http://www.imagemagick.org/Usage/annotating/
HTH, Partha
Thank you for your suggestion.
I have latest Ubuntu and indeed there was Image Magick in the repositories.
Loaded it, played around with it, and it crashed my computer.
Deleted it, ( I didn't like the GUI at all anyway)...
I will stick with Gimp, or some other solution.
- postings
- 3
Multiple Resizing, Oval Cropping and Watermarking
-----BEGIN PGP SIGNED MESSAGE----- Hash: SHA1
Yes to that: imagemagick is the right tool for resizing lots of images at once and/or adding watermarks to them. Still, if you are going to edit each image individually in the GIMP to get that oval, it might be just as convenient to make the watermark on an otherwise transparent layer, save that as a file of its own, and drag+drop to add it to each image before saving.In re cropping, I think what you probably want to do is make your oval selection, and do Image > Crop To Selection. That gives you the rectangle. Then do Select > Invert followed by Edit > Delete to delete everything in the rectangle except your oval.
(The usual keyboard shortcut for invert selection is control+i, for delete is control+x.)
You can choose the color of the "deleted" area by setting it as the background color in your color selector tool, if the image / layer you are working on does not have an alpha channel. The alpha channel in a layer or image enables transparency; with no alpha channel, anything you delete will turn into the background color.
If the image / layer you are working on has an alpha channel, you will get a transparent background instead. This is a frequently used option for non-rectangular image content that will be displayed on websites.
To add or remove the alpha channel from your image or layer, right click on the thumbnail in the Layers dialog and select "Add alpha channel" or "Remove alpha channel". To preserve a transparent background in your finished image, export the finished image in PNG format. Saving as JPG (for instance) will turn the transparent areas into the background color that is set at the time, as JPG does not support transparency.
:o)
Steve
-----BEGIN PGP SIGNATURE----- Version: GnuPG v1.4.14 (GNU/Linux)
iQIcBAEBAgAGBQJUKHAXAAoJEDZ0Gg87KR0LcU8QAOjNHfiBZZn3gan/GruobDtu NfXMJZNdfgjkPEGgUk4q+c1wxW04qO2eFTKdXmiEcEhZDdlLEjf9cz3CXHtd5lMz mCJC0XMcOAZ32iBedxjPST8okMpEX2kCpvmMtXYvWoqyzbehaN+zCtctuZsey704 44+BohzAHVSLH9bhu5iB2v9ku1e2/zNHz7ld8+nT2791rPGNGh0MDFn58lxlA5Gz cRUDPMqSQ1vQ2KLbW21n6d0egrbGlJiDcIApyTJDX9GQ2NvEDhojidZeBZnIqqED Dn+DbLMdxtiVND0L7EfqWulj+mK0uP+WTvM0Xw85Dmcqpu9f5XkTvPHVKqpxCn6k E6RZG7NBZTYkqCb8GT3YQbOGPnRPPLFh6KfHEpr9GGJYW+8Jt2HTRoPeAt2GXSHw 0wrySRDcynhwRbkAAMtbjfjowcUM6Whhh89eK9D9bH+8w4Jm4OLkW0ekJsmKLP3l dbkaxIZt6APqRQZdKgvV0xpmWmgcjpmFeKhuUosxSTjRoXvRg6NV0AU/w3gGIDc+ hMEKgIIPH45kZEB7PM9AYdilLvRGjatzkRv3azi74zI1ApUr/+yWovDx/NED5GK6 9pTifYnOv9kMdMjF6uMkWfruCX8OMy/rNqNcU0TzVkmpOx6oIJkYWg5EJjBQGVuq tP5c0mX9iH/4aRYzFmvh
=lrRu
-----END PGP SIGNATURE-----
Steve you've helped enormously in showing me how to put the transparency and the oval shape!! Thank you !!

