


Strugglign with Smooth Edges
This discussion is connected to the gimp-user-list.gnome.org mailing list which is provided by the GIMP developers and not related to gimpusers.com.
This is a read-only list on gimpusers.com so this discussion thread is read-only, too.

- postings
- 17
Strugglign with Smooth Edges
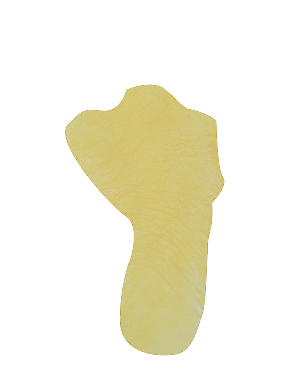
Please, can anyone give me a really simple step by step to achieve smooth edges on an image in GIMP? I've tried the tutorials I can find online, but I must be missing something. I just don't understand how to make the edges of my image smooth? This footprint is a prime example of something I want to smooth out around the edges, but it just isn't working whenever I follow instruction I can find online. Can anyone please help me? Thank you so much.
-
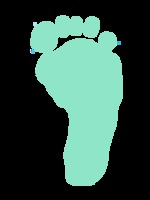 Turquoise Foot
turquoisefoot.png (17 KB)
Strugglign with Smooth Edges
On 03/09/14 18:54, NoWhizzKid wrote:
Please, can anyone give me a really simple step by step to achieve smooth edges on an image in GIMP? I've tried the tutorials I can find online, but I must be missing something. I just don't understand how to make the edges of my image smooth? This footprint is a prime example of something I want to smooth out around the edges, but it just isn't working whenever I follow instruction I can find online. Can anyone please help me? Thank you so much.
Attachments: * http://www.gimpusers.com/system/attachments/148/original/turquoisefoot.png
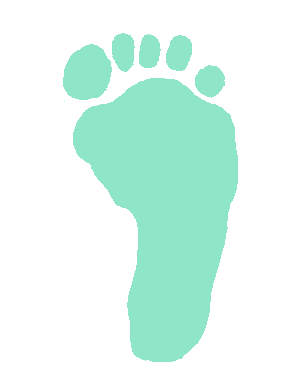
I think we have a question for you: how did you create that? Because it's likely more an error you do than a wrong technique.
If you want smooth outlines, you should create them using the path tool
, then create a selection
from the path (Select>From path) and then bucket-fill the selection.
With the path tool, the smoother lines are those created with the least
nodes, and where the tangent handles on each node are symmetrical.
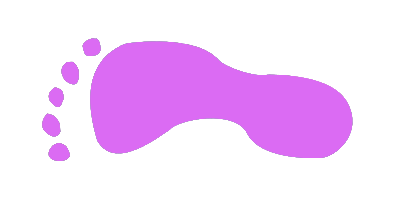
A path done using you existing foot as a guide, then used for a selection and bucket-filled:
- postings
- 17
Strugglign with Smooth Edges
I think we have a question for you: how did you create that? Because it's likely more an error you do than a wrong technique.
If you want smooth outlines, you should create them using the path tool
, then create a
selection
from the path (Select>From path) and then bucket-fill the selection. With the path tool, the smoother lines are those created with the least
nodes, and where the tangent handles on each node are symmetrical.A path done using you existing foot as a guide, then used for a selection and bucket-filled:
Oh lord, lol. I am so grateful for your reply, and the image that you have attached is absolutely perfect - 100% what I am after. But I'm afraid I just don't understand most of what you have explained to me with regards to tangent handles, nodes etc. I am such an amateur!
I will experiment with the path tool, but is there any way you could explain briefly how to start? The image I attached was originally a photograph of a paint footprint. I used the alpha channel to remove the background, then smoothed out the outline as best I could with the eraser and finally colourised the image. I appreciate this isn't the right way of doing things as the image doesn't look good! But I've taught myself how to use GIMP and it's still a struggle as I am a real novice!
Thanks so much again for your reply :)
Strugglign with Smooth Edges
-----BEGIN PGP SIGNED MESSAGE----- Hash: SHA1
On 09/03/2014 01:38 PM, NoWhizzKid wrote:
I think we have a question for you: how did you create that? Because it's likely more an error you do than a wrong technique.
If you want smooth outlines, you should create them using the path tool ,
then create a selection from the path (Select>From path) and then bucket-fill the selection. With the path tool, the smoother lines are those created with the least nodes, and where the tangent handles on each node are symmetrical.A path done using you existing foot as a guide, then used for a selection and bucket-filled:
Oh lord, lol. I am so grateful for your reply, and the image that you have attached is absolutely perfect - 100% what I am after. But I'm afraid I just don't understand most of what you have explained to me with regards to tangent handles, nodes etc. I am such an amateur!
Amateur? Aren't we all! "Professionalism is always faked."
Here's a couple of points on bezier curves (pun intentional):
http://www.gimp.org/tutorials/Bezier_Selections/
https://www.youtube.com/watch?v=Dv9R6tK0Wos
Bezier curves are used all over the place - CAD programs, vector editors like Inkscape, etc. In addition to making precise drawings in a relatively quick and easy way, they are also useful for making selections where/as the shape you are trying to outline is bounded by smooth curves.
:o)
Steve
-----BEGIN PGP SIGNATURE----- Version: GnuPG v1.4.14 (GNU/Linux)
iQIcBAEBAgAGBQJUB2e+AAoJEDZ0Gg87KR0LcDwQAM5SvdhvJx85h7SUW9opvMSj
AHqI3p39QvfBt4SxET7C9yHTBc+szdOZolGmW28Y7RcmOqKpB8Wl78DOJJFf2TwO
WIGtDAwBWVP8L5D8pZJuSLE6DY2xbSYYqxU4K1LHmP0AsbU0KXdSkK/0ERiuOIWI
KrBUleWIqODRmnwnHDByqeVr81GQPYeBCryGplD+PkOC9eLTrj/+UkRo/w8ebUs2
/BLQFuyfEl8hZ3RVyEHYcQd7ZvIcstT28wzOF3HkNaEZVghuqGfjAu+FzR8KlFCq
yl55ahgYvqkgn1z0rMaCdM8J4k/UYZs3K1EjuCAFm+eXSr+vvdfJSdiu/iphYk5T
rNOxcd5EoK63PJ4bs+xmW4DyhOpBS7tFKhzWrishWfeGuHru9ZgwRG7uv/W4XhCI
Iu05veUIwizSrZZMqGoxirNWSQkO/jhH2KdnqTi2RacNEZAX7R9QO9sKqeGC7jb8
ZiDw4D5mHIWWOVmkHrw/Cdpy7PF2NU7FCDPpL4AE1XBDSg51mgFVOLK02YxOXJ+W
Tc0SkxiIOS3KLte1cpDNnJhwP+LC3JAh2KgLrN6MQk323ZnJZ1qMl8zQEd2ULh1p
Ua1pZK/SGNuT+EmIgHV5O92uLbLrB3zVoZBvKkmrbczR0DO6EDUlaOoY6ENJ07dX
TSZJEvW9/jaz9NO04Qc8
=PPtw
-----END PGP SIGNATURE-----
Strugglign with Smooth Edges
On 03/09/14 19:38, NoWhizzKid wrote:
I think we have a question for you: how did you create that? Because it's likely more an error you do than a wrong technique.
If you want smooth outlines, you should create them using the path tool
, then create a
selection
from the path (Select>From path) and then bucket-fill the selection. With the path tool, the smoother lines are those created with the least
nodes, and where the tangent handles on each node are symmetrical.A path done using you existing foot as a guide, then used for a selection and bucket-filled:
Oh lord, lol. I am so grateful for your reply, and the image that you have attached is absolutely perfect - 100% what I am after. But I'm afraid I just don't understand most of what you have explained to me with regards to tangent handles, nodes etc. I am such an amateur!
I will experiment with the path tool, but is there any way you could explain briefly how to start? The image I attached was originally a photograph of a paint footprint. I used the alpha channel to remove the background, then smoothed out the outline as best I could with the eraser and finally colourised the image. I appreciate this isn't the right way of doing things as the image doesn't look good! But I've taught myself how to use GIMP and it's still a struggle as I am a real novice!
Thanks so much again for your reply :)
OK, so now I start t understand what happened to you. To remove the background, I assume that you used the layer mask technique. This can work well if you use a soft brush (ie a round brush with "fuzzy borders"). There are a few in the standard brushes (called "Hardness 100" (very hard), "Hardness 075" (medium hard), "Hardness 050", "Hardness 025"). This produces smooth lines because the edge pixels of the foot print are partially transparent(*). And to colourize the image you applied a selection from the Fuzzy select (magic wand) or the Color select. Unfortunately these tools do an all-or-nothing job. Either the pixel is fully selected or it is not selected at all. So when you apply paint, the pixels that were subtly partially transparent become fully opaque, and there are no anti-aliasing pixels left and your outline becomes jaggy. Instead, you should have used the alpha lock to protect the partial transparency of these pixels.
In other words, your technique is OK if you are careful, and the Path tool isn't necessary in this case (even if in many cases, it can solve the problem in a totally different way, as seen in my first post).
(*) see http://gimpforums.com/thread-proper-subject-extraction-background-removal-and-background-painting
- postings
- 17
Strugglign with Smooth Edges
Thank you!!! I'm slowly getting the hang of it, though not very accurate with my nodes at the minute!!! I'm struggling to fill the image though with an alternative colour? I don't understand where 'bucket fill' is?
Strugglign with Smooth Edges
On 03/09/14 22:56, NoWhizzKid wrote:
Thank you!!! I'm slowly getting the hang of it, though not very accurate with my nodes at the minute!!! I'm struggling to fill the image though with an alternative colour? I don't understand where 'bucket fill' is?
The tilted bucket in the Toolbox palette, the by the menu Tools>Paint tools>Bucket-fill, or with the "Shift-B" keyboard shortcut.
- postings
- 17
Strugglign with Smooth Edges
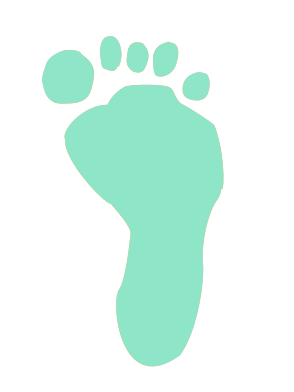
OK, this is my first attempt. It looks dreadful. I used the paths tool and followed this tutorial...
https://www.youtube.com/watch?v=9bMJH6aQwsw
It's so bad though! Where am I going wrong?!
Thanks again for your help - I very much appreciate it :)
-
 Foot Attempt 1
TurquoiseFootFromPath1.png (44.1 KB)
Strugglign with Smooth Edges
On 03/09/14 23:35, NoWhizzKid wrote:
OK, this is my first attempt. It looks dreadful. I used the paths tool and followed this tutorial...
https://www.youtube.com/watch?v=9bMJH6aQwsw
It's so bad though! Where am I going wrong?!
Thanks again for your help - I very much appreciate it :)
Attachments: * http://www.gimpusers.com/system/attachments/149/original/TurquoiseFootFromPath1.png
Why do you have the gray outline? Did you do the bucket fill on a clean layer?
The trick with the path tool is to use as few nodes as possible. The more nodes, the more contrived the curve looks. In my version there are 16 nodes for the main print and 4 or 5 nodes for each toe.The path is also less contrived if the tangents on nodes are symmetrical (this is automatic if you depress the shift key while dragging the tangent handles).
- postings
- 17
Strugglign with Smooth Edges
Why do you have the gray outline? Did you do the bucket fill on a clean
layer?The trick with the path tool is to use as few nodes as possible. The more nodes, the more contrived the curve looks. In my version there are
16 nodes for the main print and 4 or 5 nodes for each toe.The path is also less contrived if the tangents on nodes are symmetrical (this is automatic if you depress the shift key while dragging the tangent handles).
I'm so sorry - I haven't had an email to notify me of your reply, just popped on over to check your advice again! I can't remember what I did with that previous attachment now, sorry. I am getting better with the paths tool at creating smooth lines though - I just need to keep practising I think.
I really don't understand how to bucket fill the image though. Once I have done the mask selection, I don't seem able to change the colour. Any ideas where I might be going wrong?
Thanks again :)
- postings
- 17
Strugglign with Smooth Edges
I'm so sorry - I haven't had an email to notify me of your reply, just popped on over to check your advice again! I can't remember what I did with that previous attachment now, sorry. I am getting better with the paths tool at creating smooth lines though - I just need to keep practising I think.
I really don't understand how to bucket fill the image though. Once I have done the mask selection, I don't seem able to change the colour. Any ideas where I might be going wrong?
Thanks again :)
To be clearer, when I attempt the bucket fill, the image just changes to a semi-transparent version of the original. I have attached so you can see what I mean :)
-
 With Bucket Fill
bucketfill.png (88.5 KB)
Strugglign with Smooth Edges
On 05/09/14 19:18, NoWhizzKid wrote:
I'm so sorry - I haven't had an email to notify me of your reply, just popped on over to check your advice again! I can't remember what I did with that previous attachment now, sorry. I am getting better with the paths tool at creating smooth lines though - I just need to keep practising I think.
I really don't understand how to bucket fill the image though. Once I have done the mask selection, I don't seem able to change the colour. Any ideas where I might be going wrong?
Thanks again :)
To be clearer, when I attempt the bucket fill, the image just changes to a semi-transparent version of the original. I have attached so you can see what I mean :)
Attachments:
* http://www.gimpusers.com/system/attachments/150/original/bucketfill.png
I'd prefer the XCF... hard to tell from the result... but since the alpha is constant (144), it could be that your bucket-fill tool isn't at full opacity.
- postings
- 17
Strugglign with Smooth Edges
I'd prefer the XCF... hard to tell from the result... but since the alpha is constant (144), it could be that your bucket-fill tool isn't at
full opacity.
OK, I'm losing the will to live with this now! I started out with the first attached image - a photograph of a blue paint footprint. I then used the path tool and once I had completed the path of the footprint and toes, I did CTRL+SHIFT+G then pressed ENTER. After this, I did right click - edit - fill with FG colour (pink). Then, I did add alpha channel. The edges are STILL jagged and there is a greyish outline around the image.
I just don't know where I am going wrong! It's like I've mastered how to smooth out the lines using the path tool, but something I do afterwards is making the edges all jagged. I need the image to be .png with transparent background.
Can you tell me where I am going wrong please? It's getting increasingly more urgent and I just don't seem to be getting it no matter how much I practice! Thank you x
-
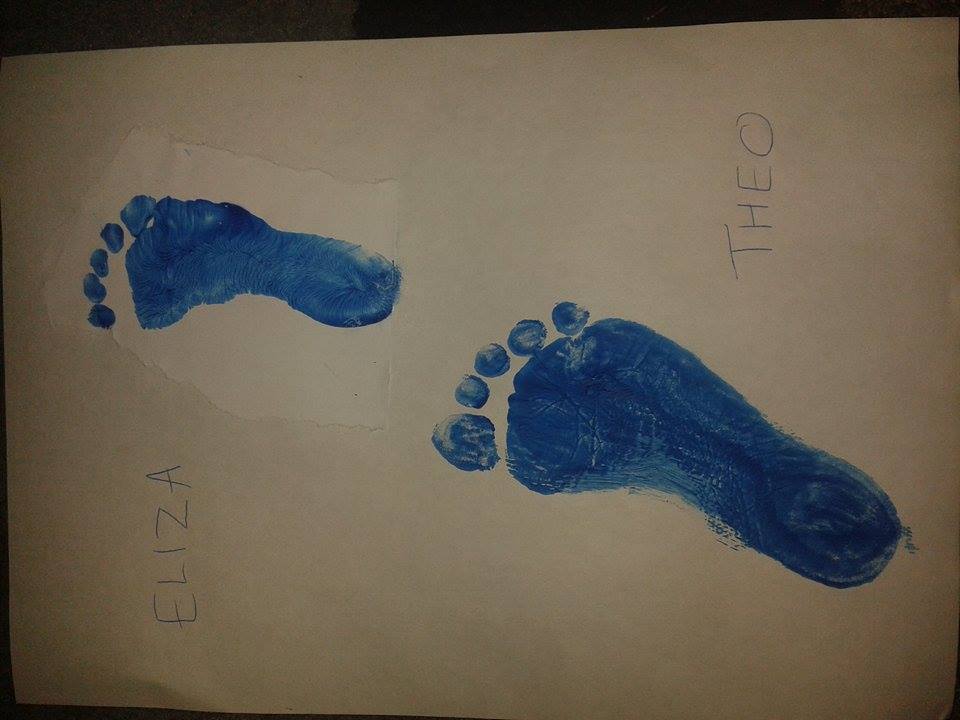
 ORIGINAL FOOTPRINT
Eliza_and_Theo.jpg (55.5 KB) -
 PINK FOOTPRINT FROM PATH
ElizPrintFromPath.png (7.57 KB)

Strugglign with Smooth Edges
-----BEGIN PGP SIGNED MESSAGE----- Hash: SHA1
On 09/07/2014 01:12 PM, NoWhizzKid wrote:
OK, I'm losing the will to live with this now! I started out with the first attached image - a photograph of a blue paint footprint. I then used the path tool and once I had completed the path of the footprint and toes, I did CTRL+SHIFT+G then pressed ENTER. After this, I did right click - edit - fill with FG colour (pink). Then, I did add alpha channel. The edges are STILL jagged and there is a greyish outline around the image.
I just don't know where I am going wrong! It's like I've mastered how to smooth out the lines using the path tool, but something I do afterwards is making the edges all jagged. I need the image to be .png with transparent background.
Can you tell me where I am going wrong please? It's getting increasingly more urgent and I just don't seem to be getting it no matter how much I practice! Thank you x
Attachments: * http://www.gimpusers.com/system/attachments/151/original/Eliza_and_Theo.jpg
*
http://www.gimpusers.com/system/attachments/152/original/ElizPrintFromPath.png
A pixel map a.k.a. raster image is ultimately a grid of squares, and can not represent smooth curves accurately: Aliasing, the "jagged" or stair-step appearance, is inherent in the medium. There are two ways to hide this and fool the eye into seeing smooth edges on curved boundaries: Blur the affected regions so the eye can't tell exactly where one region ends and a contrasting one begins, and/or, make the grid out of smaller squares that the eye and brain will ignore when "seeing" the image.
- From the image provided, it looks like your jagged edges - that's called aliasing, BTW - can be eliminated easily: Start with a larger image, which will give you more pixels per inch when the finished product is displayed at the same size as the version that is giving you problems: The stair-steps will then be small enough, relative to the whole image, for the eye to ignore.
In the case at hand you already have your vector path drawn, and unlike colored-in pixels, it will scale smoothly to any size. So, you can just open the XCF file, save it with another name, and scale it up. I would probably try about 300%.
Then use the eyedropper to pick the fill color you want from the footprint layer. Delete that layer or turn off its visibility. Make a new transparent layer, do Path To Selection in the Paths dockable dialog, then just drag and drop your color straight from the color tool in the main toolbox to the image canvas.
Hopefully this will restore your will to live for at least long enough to finish the project you are working on.
:o)
Steve
-----BEGIN PGP SIGNATURE----- Version: GnuPG v1.4.14 (GNU/Linux)
iQIcBAEBAgAGBQJUDKSNAAoJEDZ0Gg87KR0LQEwP/06E9R46XT2kPoiCecdK7ugN
lhTo5VullGwF/19mFRZ29AtTwIZOpCiMRP2MPSPhlT32Ffard1sXNIyIVsWniejZ
Tra9WQL3Giu/q8IGubJXpj7oX4Lj/Q5BZUOqYEjYvTUQy1bgEhPSJpD9EPWw4d0Y
d49RX4Nfe4bgsRk9PEcpOlr1nt64AQeSi4HAbuCU2AAQGtIM1jWEDLjW5o7JZ70U
q5238Uppi+Rg+bb3ZMgphvrKCZMddErmXyrNaVQhFmMBklwOKz9RvT913/Hnb8eq
1abVJoctjHzXIMhmOxjqqRX81C0yZlaS4fVzd4IJX9Rx424alZEq+07v1JX9MDPl
E8ofWihIgTQnZPDNHrfdzf8c7xVlw51UYA7R7jOKQ7+foEl+0fKHnLmm+UZnXKA6
C+qx4VOsfE4FjRNf6ucF+ptrHGk7vI4obKs+5DBSl5rX/oqNKJCAlHY7IFcuzPMQ
ylMzt0XEuZbU/FtTlRj/9B9BTpZrAmDz80slMh1GVwsQ6H/P4a6U1+q7CQ0HwmlT
TnubdEZmQHgHB9OjTU44cXV6euJC/pHUyVgz707lBakrrWMRg9ayh71780tVDfBK
NKjkb0Z16NpW8RyZVqIzb59NmQrQ1t2dNCRuDVKxSuPZSTufqWLKi5Nvo2SePvb0
Wg6IyRce+A7Hc/cVFLB+
=GfCW
-----END PGP SIGNATURE-----
- postings
- 17
Strugglign with Smooth Edges
-----BEGIN PGP SIGNED MESSAGE----- Hash: SHA1
*
http://www.gimpusers.com/system/attachments/152/original/ElizPrintFromPath.pngA pixel map a.k.a. raster image is ultimately a grid of squares, and can not represent smooth curves accurately: Aliasing, the "jagged" or stair-step appearance, is inherent in the medium. There are two ways to hide this and fool the eye into seeing smooth edges on curved boundaries: Blur the affected regions so the eye can't tell exactly where one region ends and a contrasting one begins, and/or, make the grid out of smaller squares that the eye and brain will ignore when "seeing" the image.
- From the image provided, it looks like your jagged edges - that's called aliasing, BTW - can be eliminated easily: Start with a larger image, which will give you more pixels per inch when the finished product is displayed at the same size as the version that is giving you problems: The stair-steps will then be small enough, relative to the whole image, for the eye to ignore.
In the case at hand you already have your vector path drawn, and unlike colored-in pixels, it will scale smoothly to any size. So, you can just open the XCF file, save it with another name, and scale it up. I would probably try about 300%.
Then use the eyedropper to pick the fill color you want from the footprint layer. Delete that layer or turn off its visibility. Make a new transparent layer, do Path To Selection in the Paths dockable dialog, then just drag and drop your color straight from the color tool in the main toolbox to the image canvas.
Hopefully this will restore your will to live for at least long enough to finish the project you are working on.
:o)
Steve
-----BEGIN PGP SIGNATURE----- Version: GnuPG v1.4.14 (GNU/Linux)
iQIcBAEBAgAGBQJUDKSNAAoJEDZ0Gg87KR0LQEwP/06E9R46XT2kPoiCecdK7ugN lhTo5VullGwF/19mFRZ29AtTwIZOpCiMRP2MPSPhlT32Ffard1sXNIyIVsWniejZ Tra9WQL3Giu/q8IGubJXpj7oX4Lj/Q5BZUOqYEjYvTUQy1bgEhPSJpD9EPWw4d0Y d49RX4Nfe4bgsRk9PEcpOlr1nt64AQeSi4HAbuCU2AAQGtIM1jWEDLjW5o7JZ70U q5238Uppi+Rg+bb3ZMgphvrKCZMddErmXyrNaVQhFmMBklwOKz9RvT913/Hnb8eq 1abVJoctjHzXIMhmOxjqqRX81C0yZlaS4fVzd4IJX9Rx424alZEq+07v1JX9MDPl E8ofWihIgTQnZPDNHrfdzf8c7xVlw51UYA7R7jOKQ7+foEl+0fKHnLmm+UZnXKA6 C+qx4VOsfE4FjRNf6ucF+ptrHGk7vI4obKs+5DBSl5rX/oqNKJCAlHY7IFcuzPMQ ylMzt0XEuZbU/FtTlRj/9B9BTpZrAmDz80slMh1GVwsQ6H/P4a6U1+q7CQ0HwmlT TnubdEZmQHgHB9OjTU44cXV6euJC/pHUyVgz707lBakrrWMRg9ayh71780tVDfBK NKjkb0Z16NpW8RyZVqIzb59NmQrQ1t2dNCRuDVKxSuPZSTufqWLKi5Nvo2SePvb0 Wg6IyRce+A7Hc/cVFLB+
=GfCW
-----END PGP SIGNATURE-----
Thanks :) I'm sorry for being such a novice, but how do I scale the image up? I have opened the image, gone to save as and renamed it but cannot find or see an option to scale up?
- postings
- 17
Strugglign with Smooth Edges
-----BEGIN PGP SIGNED MESSAGE----- Hash: SHA1
In the case at hand you already have your vector path drawn, and unlike colored-in pixels, it will scale smoothly to any size. So, you can just open the XCF file, save it with another name, and scale it up. I would probably try about 300%.
Then use the eyedropper to pick the fill color you want from the footprint layer. Delete that layer or turn off its visibility. Make a new transparent layer, do Path To Selection in the Paths dockable dialog, then just drag and drop your color straight from the color tool in the main toolbox to the image canvas.
-----BEGIN PGP SIGNATURE-----
Version: GnuPG v1.4.14 (GNU/Linux)iQIcBAEBAgAGBQJUDKSNAAoJEDZ0Gg87KR0LQEwP/06E9R46XT2kPoiCecdK7ugN lhTo5VullGwF/19mFRZ29AtTwIZOpCiMRP2MPSPhlT32Ffard1sXNIyIVsWniejZ Tra9WQL3Giu/q8IGubJXpj7oX4Lj/Q5BZUOqYEjYvTUQy1bgEhPSJpD9EPWw4d0Y d49RX4Nfe4bgsRk9PEcpOlr1nt64AQeSi4HAbuCU2AAQGtIM1jWEDLjW5o7JZ70U q5238Uppi+Rg+bb3ZMgphvrKCZMddErmXyrNaVQhFmMBklwOKz9RvT913/Hnb8eq 1abVJoctjHzXIMhmOxjqqRX81C0yZlaS4fVzd4IJX9Rx424alZEq+07v1JX9MDPl E8ofWihIgTQnZPDNHrfdzf8c7xVlw51UYA7R7jOKQ7+foEl+0fKHnLmm+UZnXKA6 C+qx4VOsfE4FjRNf6ucF+ptrHGk7vI4obKs+5DBSl5rX/oqNKJCAlHY7IFcuzPMQ ylMzt0XEuZbU/FtTlRj/9B9BTpZrAmDz80slMh1GVwsQ6H/P4a6U1+q7CQ0HwmlT TnubdEZmQHgHB9OjTU44cXV6euJC/pHUyVgz707lBakrrWMRg9ayh71780tVDfBK NKjkb0Z16NpW8RyZVqIzb59NmQrQ1t2dNCRuDVKxSuPZSTufqWLKi5Nvo2SePvb0 Wg6IyRce+A7Hc/cVFLB+
=GfCW
-----END PGP SIGNATURE-----
I'm sorry, I really am... I just don't understand. I just don't know HOW to do these things. I don't know my way around the menus well enough and/or know the language of the program well enough.
Strugglign with Smooth Edges
Image > Scale
I understand wanting to jump right in and wanting it to work, but if you
don't have a basic understanding of image editing programs in general,
it can be hard to grasp at first. If you aren't the type that learns
from book or manual reading, (I'm not) you might try one a the various
gimp tutorials out there aimed at beginners. I made a 5 part series
myself you might find useful.
https://fanart.tv/tutorials/gimp-from-scratch-part-1/
Try not to get too frustrated. There is very little that gimp can't do, which means it is a very complex piece of software that can take a little time to grasp. Once you do, you will astounded on what you can accomplish.
On Sun, Sep 7, 2014, at 03:53 PM, NoWhizzKid wrote:
-----BEGIN PGP SIGNED MESSAGE----- Hash: SHA1
In the case at hand you already have your vector path drawn, and unlike colored-in pixels, it will scale smoothly to any size. So, you can just open the XCF file, save it with another name, and scale it up. I would probably try about 300%.
Then use the eyedropper to pick the fill color you want from the footprint layer. Delete that layer or turn off its visibility. Make a new transparent layer, do Path To Selection in the Paths dockable dialog, then just drag and drop your color straight from the color tool in the main toolbox to the image canvas.
-----BEGIN PGP SIGNATURE-----
Version: GnuPG v1.4.14 (GNU/Linux)iQIcBAEBAgAGBQJUDKSNAAoJEDZ0Gg87KR0LQEwP/06E9R46XT2kPoiCecdK7ugN lhTo5VullGwF/19mFRZ29AtTwIZOpCiMRP2MPSPhlT32Ffard1sXNIyIVsWniejZ Tra9WQL3Giu/q8IGubJXpj7oX4Lj/Q5BZUOqYEjYvTUQy1bgEhPSJpD9EPWw4d0Y d49RX4Nfe4bgsRk9PEcpOlr1nt64AQeSi4HAbuCU2AAQGtIM1jWEDLjW5o7JZ70U q5238Uppi+Rg+bb3ZMgphvrKCZMddErmXyrNaVQhFmMBklwOKz9RvT913/Hnb8eq 1abVJoctjHzXIMhmOxjqqRX81C0yZlaS4fVzd4IJX9Rx424alZEq+07v1JX9MDPl E8ofWihIgTQnZPDNHrfdzf8c7xVlw51UYA7R7jOKQ7+foEl+0fKHnLmm+UZnXKA6 C+qx4VOsfE4FjRNf6ucF+ptrHGk7vI4obKs+5DBSl5rX/oqNKJCAlHY7IFcuzPMQ ylMzt0XEuZbU/FtTlRj/9B9BTpZrAmDz80slMh1GVwsQ6H/P4a6U1+q7CQ0HwmlT TnubdEZmQHgHB9OjTU44cXV6euJC/pHUyVgz707lBakrrWMRg9ayh71780tVDfBK NKjkb0Z16NpW8RyZVqIzb59NmQrQ1t2dNCRuDVKxSuPZSTufqWLKi5Nvo2SePvb0 Wg6IyRce+A7Hc/cVFLB+
=GfCW
-----END PGP SIGNATURE-----I'm sorry, I really am... I just don't understand. I just don't know HOW to do
these things. I don't know my way around the menus well enough and/or know the
language of the program well enough.-- NoWhizzKid (via www.gimpusers.com/forums) _______________________________________________ gimp-user-list mailing list
List address: gimp-user-list@gnome.org List membership: https://mail.gnome.org/mailman/listinfo/gimp-user-list List archives: https://mail.gnome.org/archives/gimp-user-list
akovia
Strugglign with Smooth Edges
I'm sorry, I really am... I just don't understand. I just don't know HOW to do
these things. I don't know my way around the menus well enough and/or know the
language of the program well enough.
Maybe look at http://www.gimp.org/docs/ and not only peruse the help but do some of the basic tutorials.
Owen
- postings
- 17
Strugglign with Smooth Edges
Maybe look at http://www.gimp.org/docs/ and not only peruse the help but do some of the basic tutorials.
Thanks. I have been using GIMP for a year now, it isn't that I'm just jumping in. This is literally the only thing I need to be able to do and I'm astonished it can be so difficult. to just smooth out the outline of an image without having a 2nd colour there.
I'm afraid time isn't something I have on my hands so will continue to try and figure it out for myself. Thanks for help offered.
Strugglign with Smooth Edges
Sorry you don't have time to explore a little more. Hopefully this will
help with your exact situation.
Cheers
https://dl.dropboxusercontent.com/u/93550827/temp/nowhizzkid.mkv
On Mon, Sep 8, 2014, at 10:10 AM, NoWhizzKid wrote:
Maybe look at http://www.gimp.org/docs/ and not only peruse the help but do some of the basic tutorials.
Thanks. I have been using GIMP for a year now, it isn't that I'm just jumping
in. This is literally the only thing I need to be able to do and I'm astonished
it can be so difficult. to just smooth out the outline of an image without
having a 2nd colour there.I'm afraid time isn't something I have on my hands so will continue to try and
figure it out for myself. Thanks for help offered.-- NoWhizzKid (via www.gimpusers.com/forums) _______________________________________________ gimp-user-list mailing list
List address: gimp-user-list@gnome.org List membership: https://mail.gnome.org/mailman/listinfo/gimp-user-list List archives: https://mail.gnome.org/archives/gimp-user-list
akovia
- postings
- 17
Strugglign with Smooth Edges
Sorry you don't have time to explore a little more. Hopefully this will
help with your exact situation.
Cheers
https://dl.dropboxusercontent.com/u/93550827/temp/nowhizzkid.mkv
Thanks so much for that - my laptop doesn't recognise the file... anything I can do to watch it?
Thanks again :)
Strugglign with Smooth Edges
-----BEGIN PGP SIGNED MESSAGE----- Hash: SHA1
On 09/19/2014 12:34 PM, NoWhizzKid wrote:
Sorry you don't have time to explore a little more. Hopefully this will help with your exact situation. Cheers https://dl.dropboxusercontent.com/u/93550827/temp/nowhizzkid.mkv
Thanks so much for that - my laptop doesn't recognise the file... anything I can do to watch it?
Try VLC; it plays just about everything including mkv files.
Yet another instance where "Free Software is better because..."
:o)
Steve
-----BEGIN PGP SIGNATURE----- Version: GnuPG v1.4.14 (GNU/Linux)
iQIcBAEBAgAGBQJUHI8GAAoJEDZ0Gg87KR0LQZYQAOuVDfy8YLD6FyWXigMv0qQN
USrHb3JhIRUp7aKm5nbG8V3ud8u7S21Nr6GxtzTIPzMTn4GxQCQ2Qu+3usKA+Beh
sxRFNJqz0LX8TWNEEkeyqPQt8e6UdjnGq42L9V13m7jReuWGA8pbG6vIJtjPG2Wf
h4rVesnMPcD/OJzVmtI4jGnt6vaMNaOV8UbzYH7HQhRYn+jXxDKEx5/EcsGg3gKV
ae2mP9H8nUUoRHZRBT9zZZ+ExEeo7tzJyR5JMsQF64kHSdmNrgnZq28Hw9dOjYyq
RLuNb2N1f/76umKeMhuEiZGI2vIgiis6p5fU5B/+rpOQsX+MAlU1UXMmbovfZSp2
0PZzZA/TPTeRqtBU7p9ZGlWCg0U4o0a5c90lT8mbjqX2oCbFOtHEyEu0JUiKNn2i
ty/HzEnic/5DlpTbXIaOY5UmCGiMFsv/LeIBj/gCByFZ0sLXb/X6N4sMxLBr4Z0N
vHzG/Qbwx92/cWVaR3Juo6Ovr+wMPk5hrwXuF9a3IRSNJdGtjssTy6Zdw85O4J81
D5GDSpzhsWb4smEfwTDb+eK0UFJOs8KK/KH2y6NEt0pLaAC332bU1fHFTRIlPaRW
bF1mOgns1tIA93DXfRbIVNr8wp83Y6d0lmHKY4Oyl+lx8TpLc/j5FEgpW2CViw0w
Ermx9f/NZOvPrpsEZzhB
=IbGD
-----END PGP SIGNATURE-----
- postings
- 17
Strugglign with Smooth Edges
Sorry you don't have time to explore a little more. Hopefully this will
help with your exact situation.
Cheers
https://dl.dropboxusercontent.com/u/93550827/temp/nowhizzkid.mkv
I can't thank you enough!!! I see sooooo many reasons where/why I was going wrong now!!! Thank you, thank you, thank you!!! It'll take a while but I know where I'm heading now and how to get there. You're so kind for putting that little video together for me. Thanks a million times over!
- postings
- 17
Strugglign with Smooth Edges
I can't thank you enough!!! I see sooooo many reasons where/why I was going wrong now!!! Thank you, thank you, thank you!!! It'll take a while but I know where I'm heading now and how to get there. You're so kind for putting that little video together for me. Thanks a million times over!
Me again! OK, I've got to grips with everything, right up until I've finished my path. Once my path is finished, I struggle to get the path and take it to a new layer. I'm getting it wrong every time. I am trying to make a screen video to show you what I mean but if anyone can suggest how to do this in the meantime, I'd be really grateful.
I do appreciate I'm being a bit of a nightmare... thanks for your help so far!
- postings
- 17
Strugglign with Smooth Edges
Me again! OK, I've got to grips with everything, right up until I've finished my path. Once my path is finished, I struggle to get the path and take it to a new layer. I'm getting it wrong every time. I am trying to make a screen video to show you what I mean but if anyone can suggest how to do this in the meantime, I'd be really grateful.
I do appreciate I'm being a bit of a nightmare... thanks for your help so far!
My video won't upload as it is too big. However, I understand how to use the path tool better and get a lovely curved footprint, but once I have my path selected and my footprint filled with the colour of my choice, I struggle understanding how to remove the background and to select just the footprint. Can anyone help? Thanks :)
Strugglign with Smooth Edges
Hi again,
Sorry I haven't responded sooner but my main computer took a dump and am
just checking my mail from my laptop.
I'm not exactly sure what you are having trouble with, but it kinda
sounds like you are not understanding how paths work.
The path you created is available to use on any layer. They are completely separate from your regular layers. So say you wanted to create your footprint on a transparent background. You would just create a new layer in your layers menu, and choose transparent. (either click the new layer icon at the bottom of the layers menu, or Layer > New Layer from the main menu.)
Select that new layer and then go to the paths menu to select the path you just made. (You don't have to turn the visibility on for the path, just make sure that the path layer is highlighted.) Then use the path to selection button like I showed in the video to make your marching ants. Now go back to the layers menu and fill the marching ants with whatever color you want.
Of course you can also make a new layer with any colored background you like and do the same thing. You can have as many layers as you like with footprints on all of them in all kinds of different color combinations. When you find something you like, just turn off the visibility of every other layer except the one you like, and then export that image. Make sure you save the image as a .png file if you are using transparency. Otherwise, you will probably want to export as a jpg.
I hope that's what what you were having trouble with. If not, try to explain again and I'll do my best to help.
Cheers.
On Sat, Sep 20, 2014, at 11:45 AM, NoWhizzKid wrote:
Me again! OK, I've got to grips with everything, right up until I've finished my path. Once my path is finished, I struggle to get the path and take it to a new layer. I'm getting it wrong every time. I am trying to make a screen video to show you what I mean but if anyone main menu. can suggest how to do this in the meantime, I'd be really grateful.
I do appreciate I'm being a bit of a nightmare... thanks for your help so far!
My video won't upload as it is too big. However, I understand how to use the
path tool better and get a lovely curved footprint, but once I have my path
selected and my footprint filled with the colour of my choice, I struggle understanding how to remove the background and to select just the footprint. Can
anyone help? Thanks :)--
NoWhizzKid (via www.gimpusers.com/forums) _______________________________________________ gimp-user-list mailing list
List address: gimp-user-list@gnome.org List membership: https://mail.gnome.org/mailman/listinfo/gimp-user-list List archives: https://mail.gnome.org/archives/gimp-user-list
akovia
Strugglign with Smooth Edges
On 20/09/14 17:45, NoWhizzKid wrote:
Me again! OK, I've got to grips with everything, right up until I've finished my path. Once my path is finished, I struggle to get the path and take it to a new layer. I'm getting it wrong every time. I am trying to make a screen video to show you what I mean but if anyone can suggest how to do this in the meantime, I'd be really grateful.
I do appreciate I'm being a bit of a nightmare... thanks for your help so far!
My video won't upload as it is too big. However, I understand how to use the path tool better and get a lovely curved footprint, but once I have my path selected and my footprint filled with the colour of my choice, I struggle understanding how to remove the background and to select just the footprint. Can anyone help? Thanks :)
Add a new transparent layer and fill the footprint on it, and then hide/discard the initial layer which is just used as a guide to create the path. This way you don't have to remove anything since you start with a clean layer.
- postings
- 17
Strugglign with Smooth Edges
Add a new transparent layer and fill the footprint on it, and then hide/discard the initial layer which is just used as a guide to create the path. This way you don't have to remove anything since you start with a clean layer.
Oh my giddy aunt, I think I may have FINALLY done it! Ignore my jolted lines - I need to practice my path skills to get a more curved finish, but I know how to do it now!
You all have the patience of a saint! Thank you so, so, so much! You have no idea how much I needed to do this. Thank you xxx
-
 Done
Done
Ava_Print_Edited_Path.png (65.7 KB)


