RSS/Atom feed Twitter
Site is read-only, email is disabled

Tutorial: Hot text on flames / fire

Written by · Created on Jun 15, 2007, last updated about 11 years ago CC BY-NC License
Hot text on flames / fire

Motivation

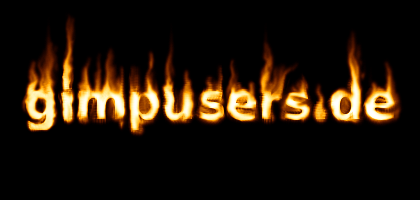
There are many ways to create fire text, but believe me, no other text is looking that cool and real as this one ;) Of course it maybe a lil' more effort to get it. I will show you how to create such a hot flames text with GIMP.

Tutorial details

  1. 1

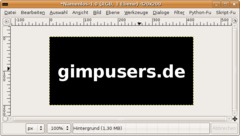
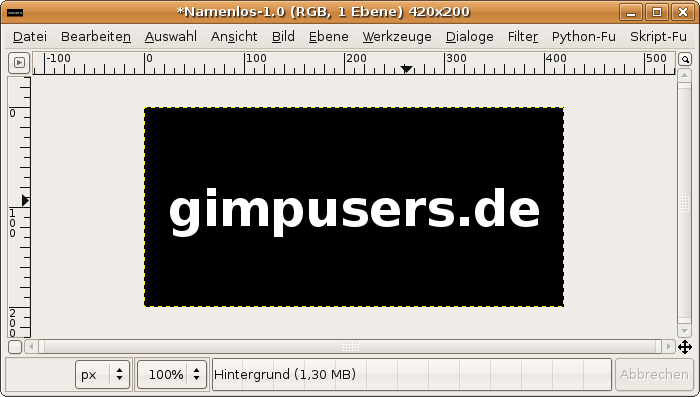
    Create a new File of any size. I chose 420 × 200px. As BG-Color choose black. Done so write some white text to a new layer (bold text, white color, size: 50).

  2. 2

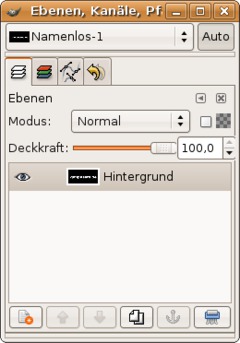
    Right click the text-layer in the layers dialog and choose “merge down”. You should only have one single layer now.
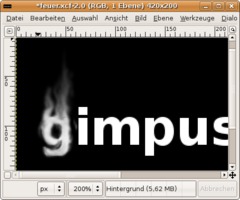
  3. 3

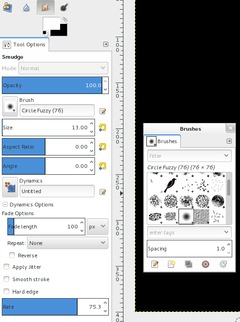
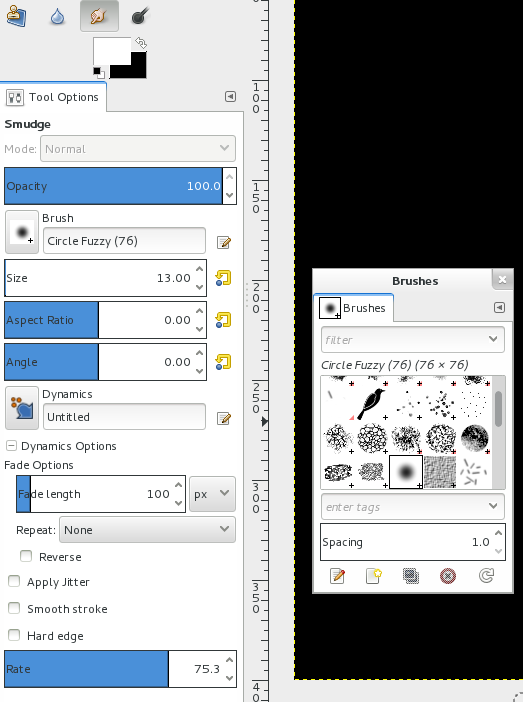
    Now, that we have all one one single layer, we create our flames. Use the Smudge-Tool to do so and choose the values that are shown on the picture. Also set the spacing of the brush to 1, by doing that you’ll get a much smoother outcome when smudging.

  4. 4

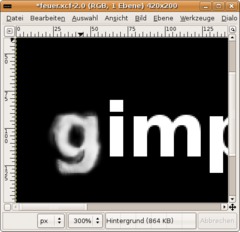
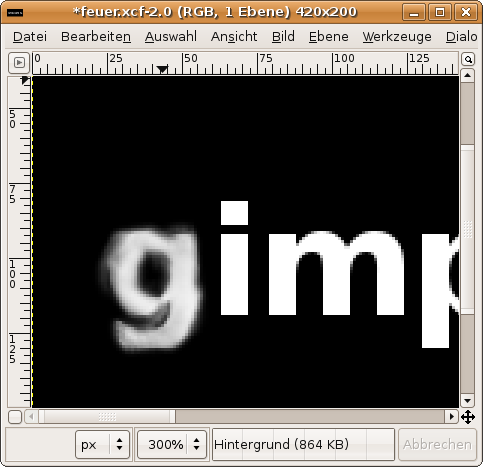
    Zoom in to 200%. Now start at the first letter of your text: Hold down your left mouse button and smear around the border of this single letter to make it somehow gray as seen in the picture. It should look real so it must not be perfect. If you watch flames you will see the natural chaos ;)

    It is important to change the super white into gray tones.

  5. 5

    After that make some flame-like movements to the top.

  6. 6

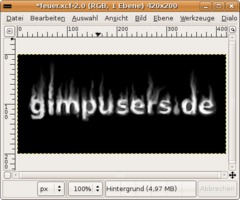
    Let your creativity come out and do this with all the letters now.

  7. 7

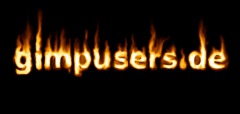
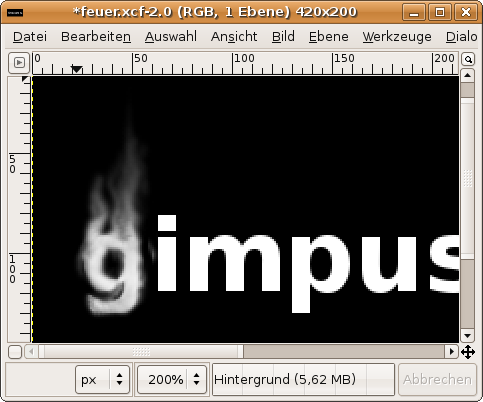
    Well, we are almost done already. Now we simply have to add the correct colors of fire.

    Choose from the menu: Colors / Color Balance:

    Shadows
    -————-
    +100
    +30
    -30

    Midtones
    -————-
    +100
    +30
    -30

    Highlights
    -————-
    +100
    0
    -100

Comments

Post your own comments, questions or hints here. The author and other users will see your posting and can reply to it.

Of course, you can also ask in the chat.

Subscription management

Please log in to manage your subscriptions.

User rating

This topic (Hot text on flames / fire) has been rated 4.5/5.0.

New comments are disabled because of spam.

Lennart Palm
about 5 years ago

Finns någon manual (handbok) på svenska, så fall vad kostar den?

mystal member for over 10 years mystal 1 comment rated this topic with 5/5
about 5 years ago

Great tutorial! Is there a way to do this effect on a transparent background. I tried but the text is uneffected when trying to change the color balance

Matt Doug
almost 6 years ago

Very straightforward tutorial. Make sure to merge the layers. Also, it helps if their is some black on the edges of the drawing. Side Note: Time heavily depends on the amount of text you are turning into flames. Also, edit the color if you don't like it (using curves or value).

Cheri
almost 9 years ago

That was a great straight forward tutorial, thank you so much.
I'd like to add that if you want a transparent background do this first:
Click Layer, Transparency, Colour to Alpha, ok.

StandardToaster
about 10 years ago

Thanks! This was really helpful! I needed to make a logo for someone and they asked me to make it look like it was on fire! I will definately use this method a lot! Also, if I need more help, I'll look at your tutorials!

devvv member for over 17 years devvv 1475 comments
over 10 years ago

Did you merge the textlayer with the black background layer? (step 1+2)

Also make sure your image color mode (Image / Mode) is set to RGB!

Anmol
over 10 years ago

Thanks. That was a great tutorial but have you left any step in between because it is still in grey scale after color balancing.

Me0203
over 10 years ago

Thanks, mate! As all of your tutorials are, this was super helpful. I'm just starting to learn GIMP, and even I can understand these steps. Made this tiny little thingy with it:

http://i40.tinypic.com/2llhms1.jpg

devvv member for over 17 years devvv 1475 comments
about 11 years ago

I've updated the tutorial to fit GIMP 2.8 now.

3. Verblassen is found in the Dynamics Options: "Fade lenght"
7. Before GIMP 2.4 the menus were different. It's found in Colors / Color Balance now.

toxicstar
about 11 years ago

Love the tutorial. A few things here. 3. What is Verblassen? and 7..I don't understand this either. I do not see layers in Color Balance. There is no way to do that. Hopefully, you can explain this tutorial better.

MAGIK
over 11 years ago

BEAUTIFUL!
Thanks for the tutorial!

GYMBOY
over 11 years ago

THIS IS AWESOME AND COMPLETELY LEGIT!!!!!!!!!!!!!!

Mitch
over 11 years ago

Whoa. The end result of my very first attempt looks amazing.. thanks so much for this :D

NR
over 11 years ago

All the dialog boxes are in, I'm guessing, Danish! It's really hard to decipher the parameters here!!

ONAD
over 11 years ago

thank you ! :))

Kaii member for almost 12 years Kaii 4 comments
almost 12 years ago

thanks ^_^

bambang
about 12 years ago

terima kasih atas tutorial yg diberikan

lylejk
over 12 years ago

David (G'MIC)created a cool flame preset that helps a lot in creating flame effects. Click link below for the Flickr thread. :)

http://www.flickr.com/groups/gmic/discuss/72157627133627074/

darling_presley
almost 13 years ago

@Laporbo

Just delete the black background layer.....the rest of the flame layers already have alpha chanels so if you go into EDIT, select COPY VISIBLE then go back into EDIT and choose PASTE AS NEW IMAGE....it will take the finished image (minus the black) and put it as a flat merged new image which you can then save as a TGA and bring it in as a layer over other images :) Hope thats clear, if not, poke me again and i will try to explain better....Lisa :)

Helped
almost 13 years ago

My colours came out different then turned out yellow.

abdo
over 13 years ago

messi

Laporbo member for over 14 years Laporbo 1 comment rated this topic with 4/5
over 13 years ago

Cool but how would someone do this if they wanted the flame text on a transparent background so they could put it over pictures?

Oh, and Kylee, Colors is its own menu now. Right next to Layer.

Kylee
almost 14 years ago

I can't find the colors from layer.
help me

n00b member for about 14 years n00b 3 comments rated this topic with 5/5
about 14 years ago

Very easy, I played with the coloring and then when finished I used the fuzzy select tool to delete the background. This is what I came up with.

devvv member for over 17 years devvv 1475 comments
about 14 years ago

@Alex: The technique you describe is a fast flame-text, but you dont get nice flames with it - the flames with the wave are too euqal to look real ;)

Alex rated this topic with 4/5
about 14 years ago

It seems like a lot of work. So I Gaussian Blurred it and and distorted it with the Wave effect. THEN I applied the smudging. It didn't look to shabby. :)

ASIF
over 14 years ago

gdfdfdzd

ASIF
over 14 years ago

fhsg

glibwort member for over 14 years glibwort 1 comment
over 14 years ago

try duplicating the finished layerand playing around with the blend tool

Thiago's photoshop
over 14 years ago

heyy its so cool!
F:\Untitled.jpg

mahvin
over 14 years ago

Good tutorial, thanks Bernhard!

Darlingpresley member for over 14 years Darlingpresley 9 comments
over 14 years ago

I duplicated the finished layer, and colourised it more towards the red spectrum...I then overlayed the red text layer onto the original layer but took the opacity down to about 50%

Got red hot flames lol

maaaaaan I love these tutorials :)

Darlingpresley member for over 14 years Darlingpresley 9 comments
over 14 years ago

fabulous! easy to follow and excellent results!!!!

xx

Pauldb
over 14 years ago

Very easy tutorial, for a newbie, i understand everything.. Thanks man !

bobdotexe
about 15 years ago

some one should make a ScriptFU for this...

Bownz
over 15 years ago

http://i367.photobucket.com/albums/oo113/Benownz/Bownz.png

my outcome!

xXx
over 15 years ago

this is what i got

Anonymous
over 15 years ago

Wow! Great tutorial! I used the extra steps and it worked great! I duplicated the blueish color to make it stronger on my black background. It looks awesome. It was easy, thanks!

LALALA
over 15 years ago

AMAZINGGG TUTORIAL. thanks. :D

bAck
almost 16 years ago

thx, easy tut and nice made

debbie
almost 16 years ago

sexy

bob
almost 16 years ago

LOL another (FAST) way is just to download it from cooltext.com

cooool boy 23
almost 16 years ago

this is qwesome

stingerman
about 16 years ago

Awesome thanks for that!

Ynpfoi
over 16 years ago

WOW!
This was so helpful!
Thank you for taking the time!

Adam_R
over 16 years ago

Nice thanks for this

jay
over 16 years ago

Excellent tutorial! Thank you very much.

Here are a few things that I did at the end to make the flames look even better (it may look like a lot of steps but they are all very simple):

1. In the layers dialog, click on the "New layer" button and select Layer fill type as White. Move this layer to the bottom.
2. Right click on the top layer and click on "Duplicate layer". Move the duplicate between the original and the white layers.
3. Select middle layer. Go to Filters -> Blur -> Gaussian blur. Choose IIR and set both Horizontal and Vertical blur to 15.
4. Select the top layer. Go to Layer -> Transparency -> Color to Alpha. Set black color to be converted to alpha. Repeat this for the middle layer.

At this point, the figure should appear like the letters have a glow around them and are on a white background.

5. Now select the bottom layer. Choose the Fill tool (Shift+B) and fill in the bottom layer with the color of your choice. I prefer a dark red color :)
6. You can also choose the middle layer and do Layer -> Colors -> Invert to get a cool blue glow around the flames!

Jon
over 16 years ago

Yeah, that worked really well. Thanks! Something else you can do after making the flames is use the same smear tool on the bottom of the text with the rate setting at 100 to make it look like the letters are dripping/melted!

Chris_C
over 16 years ago

Thanks so much for taking the time to make this!

razie92
over 16 years ago

Thanks for the tut! Now I can impress my friends lol

d0gzer0
over 16 years ago

Fantastic tutorial. Thank you very much!

Ruby
over 16 years ago

Great tutorial, thanks!

Stick Slaughter
over 16 years ago

This is extremely easy, and fun to make. This is an excellent tutorial.

Nano
over 16 years ago

this tut is great simply amazing results

inam
over 16 years ago

excellent and easier to follow for new users.
Thanks a lot.