Sign up now! · Forgot password?
gimpusers.com RSS feed
58 @ identi.ca
819 @ Twitter

Tutorial: Create cool rifts with translucent lights!

Written by · Created on Nov 21, 2010, last updated 8 months ago

Motivation

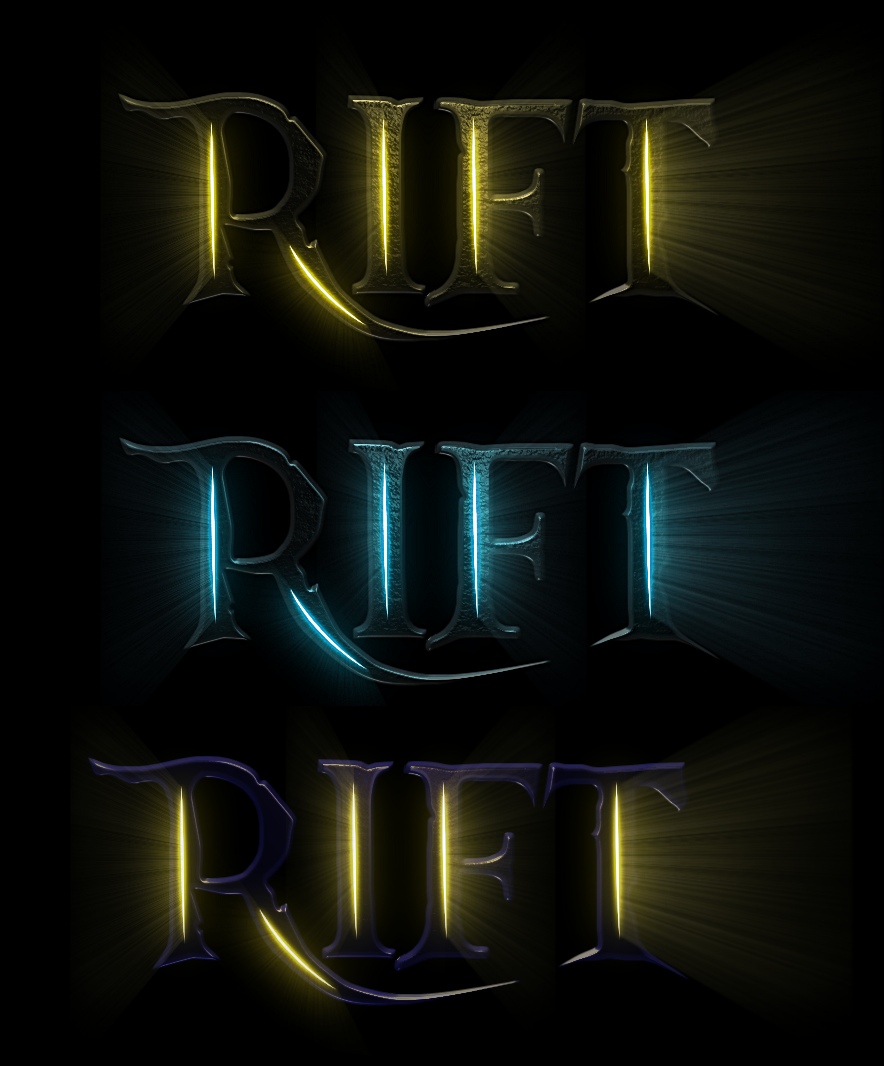
I'm a big fan of Trion Worlds great new MMORPG named "Rift". So I just took the time to create a logo similar to the "RIFT - Planes of Telara"-logo that has some cracks and rifts and also shining light through these rifts. Enjoy!

Tutorial details

Creative Commons License
This work by Bernhard Stockmann is licensed under the Attribution-NonCommercial 3.0 Unported terms.
  1. 1 Pieces of Eight.ttf

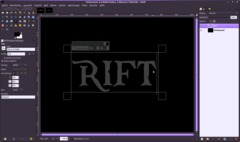
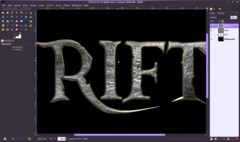
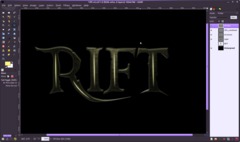
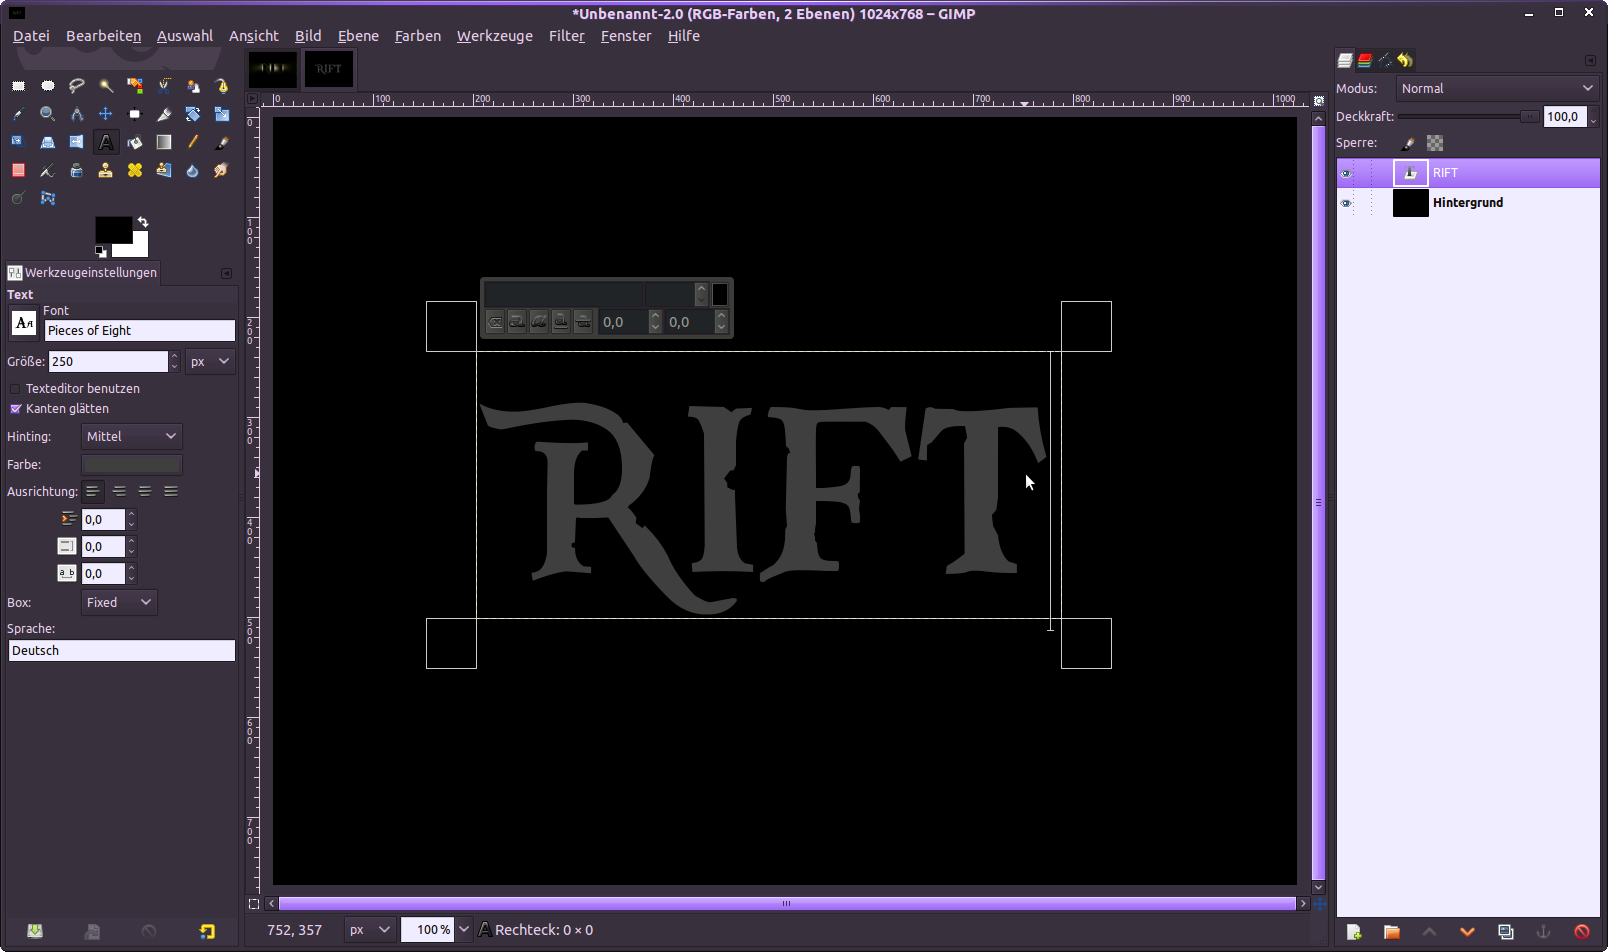
    Create a new image – any size is possible – I took 1024×768 px. Set the background to black and then type any text you want into the middle of the canvas using #3f3f3f as text color and 250px for size.

    You can use my font if you want – It’s some kind of gothic/fantasy style (downloaded it from dafont.com). The name of the font is “Pieces of Eight”. I attached it to this step for direct download.

  2. 2

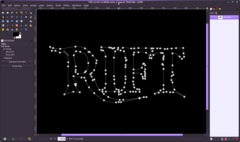
    Next I want to give the text more special look – you can skip step 2 (this current one) and step 3 if you’re fine with the standard characters of the font otherwise do the following:

    - turn the visibility off for the text layer you just created
    - right click the text layer and choose Alpha to Selection
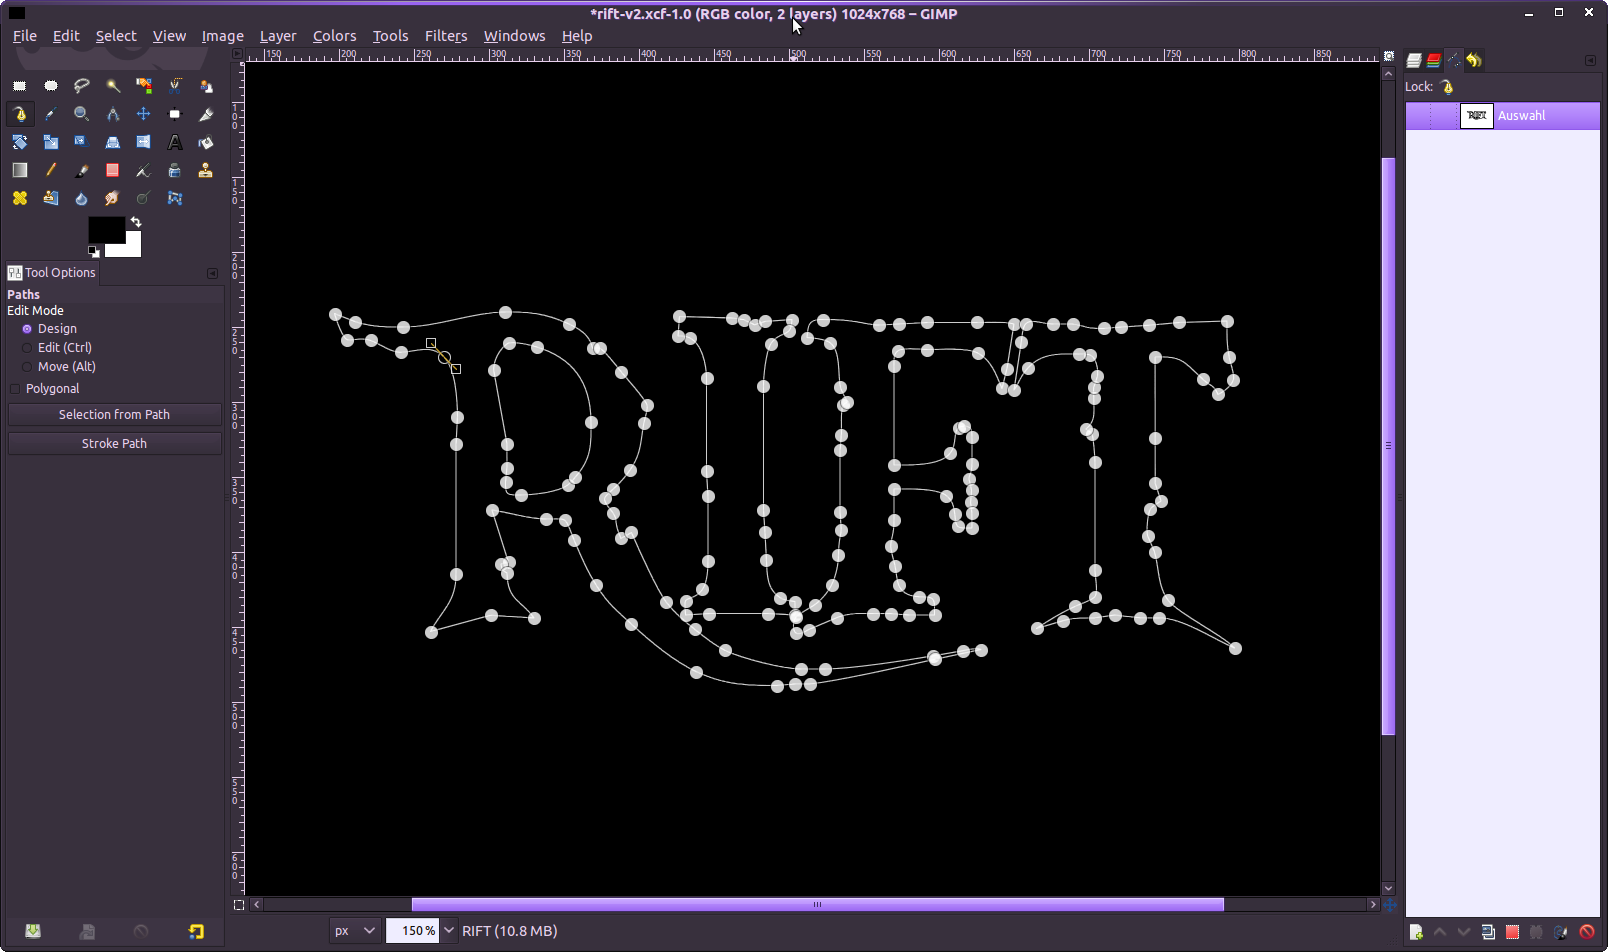
    - with this active selection go to Select / Selection to Path.
    - Select / None

    Now switch to the paths tab and double click the created selection to activate it.

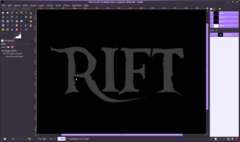
    If you’re familiar with the paths tool move the points to change the shape of the text. I did it like shown in the image. This can take some time – just give the text your own style.

  3. 3

    Now hit Enter to create a selection of the path that you just worked on. Switch back to the layers tab and create a new layer. Fill the selection with #3f3f3f and hit CTRL+SHIFT+A to deactivate the selection.

  4. 4

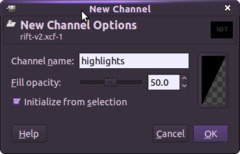
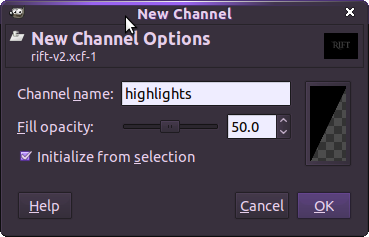
    Now we’re going to give our plain gray text a more interesting look. We’re going to make use of the Lighting effects filter, therefore we need a channel to get nice highlights for the text afterwards.

    - right click the layer in the layers dialogue where your visible text is shown and choose Alpha to Selection.
    - Switch to the channels tab
    - Create a new channel by clicking the little create button and choose Initialize from selection. Name it i.e. “highlights”

  5. 5

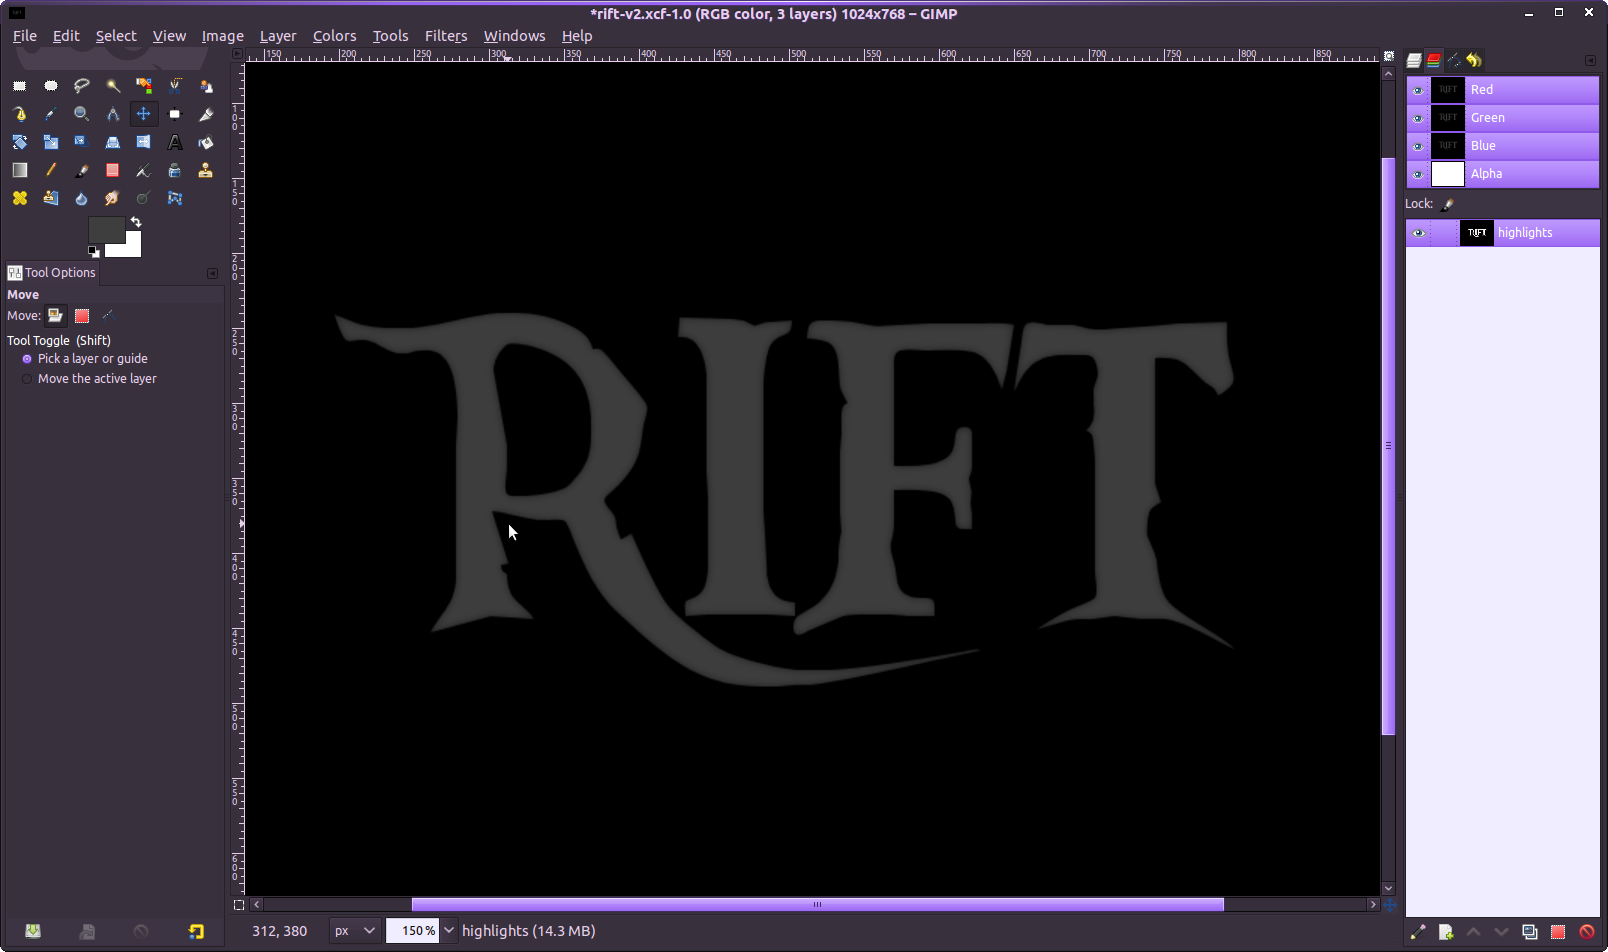
    The text selection was turned white, everything else in the channel is black currently.

    Now turn off the selection by pressing CTRL+SHIFT+A.

    Click the just created channel to select it. Now we need to apply a gaussian blur to it.
    - Filter / Blur / Gaussian Blur: 6px.
    This will add gray color tones to the channel which is curretly only black and white. The gray tones come from the blurring of the hard white and black color.

  6. 6

    Turn the visibility of the channel off by clicking the eye icon – then switch back to the layers tab and click the text layer to select it.

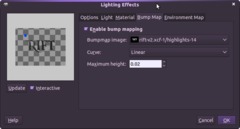
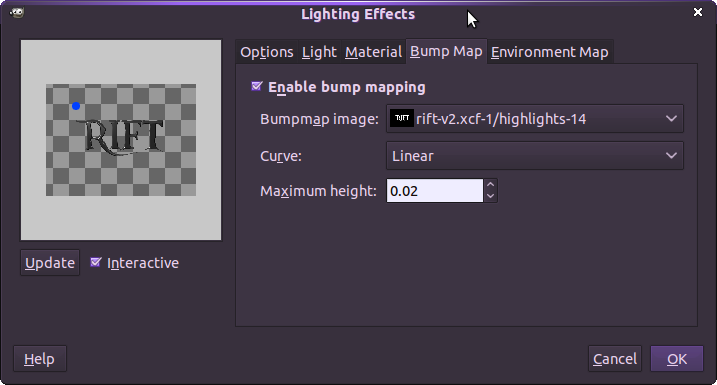
    Now go to Filter / Lights and Shadow / Lighting Effects.

    In the popup dialogue switch to the Bump Map tab and choose the “highlights” channel we just created. Set the height to 0.02.

    DON’T click OK yet.

  7. 7 lighting_presets_rift_lights

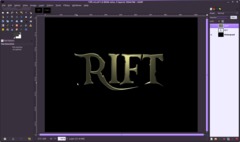
    Switch to the “Light” tab and open my attached lights file. (Right click and save as – the file has no file ending – thats ok)

    I’m using 3 different lights to create interesting highlights and outlines. The first is a spot light giving the ceter of the text a little more focus. the 2nd and 3rd light is adirectional light that comes directly from top and from bottom to give the shape nice highlight at top and on the bottom outlines.

    Apply the lights.

  8. 8

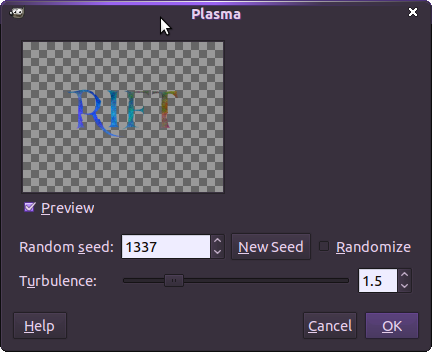
    Now we’re going to add a soft stoney texture to the text.

    - right click the text layer in the layers dialogue and choose Alpha to selection
    - Then go to Select / shrink: 4 px.
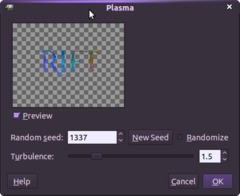
    - Filter / Render / Clouds / Plasma (details from the image)

  9. 9

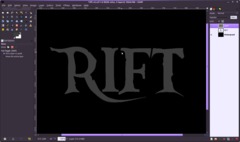
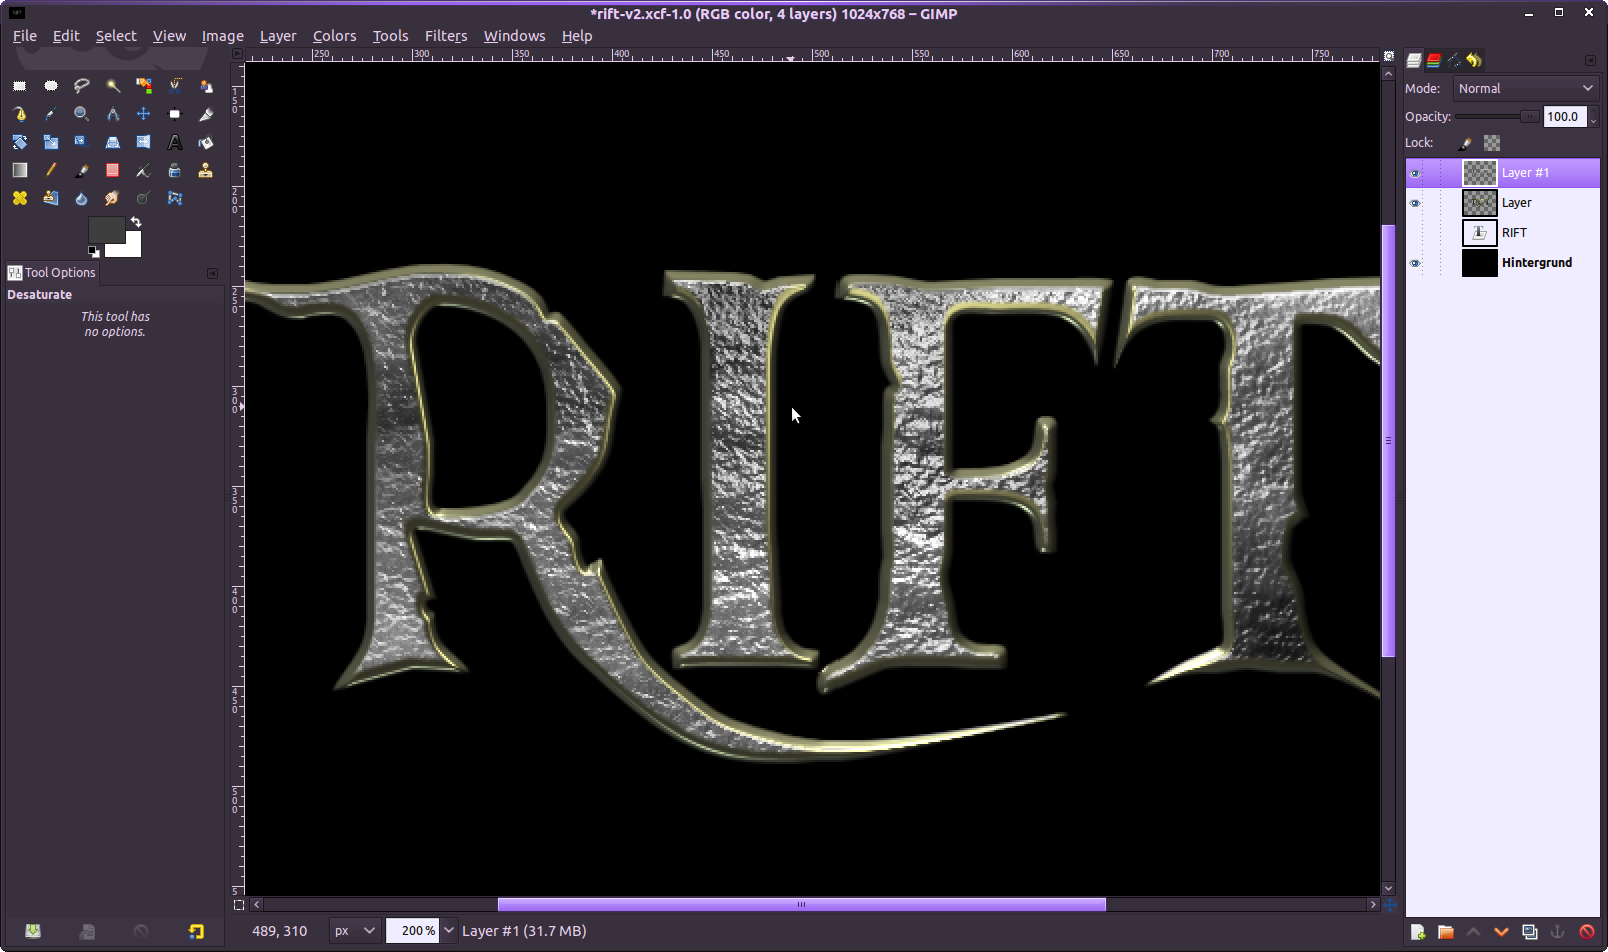
    Next deselect the selection and apply the Lighting Effects filter again. As bump map choose the new plasma layer.

    Now we’ve got a more structured surface. Go to Color / Desaturate.
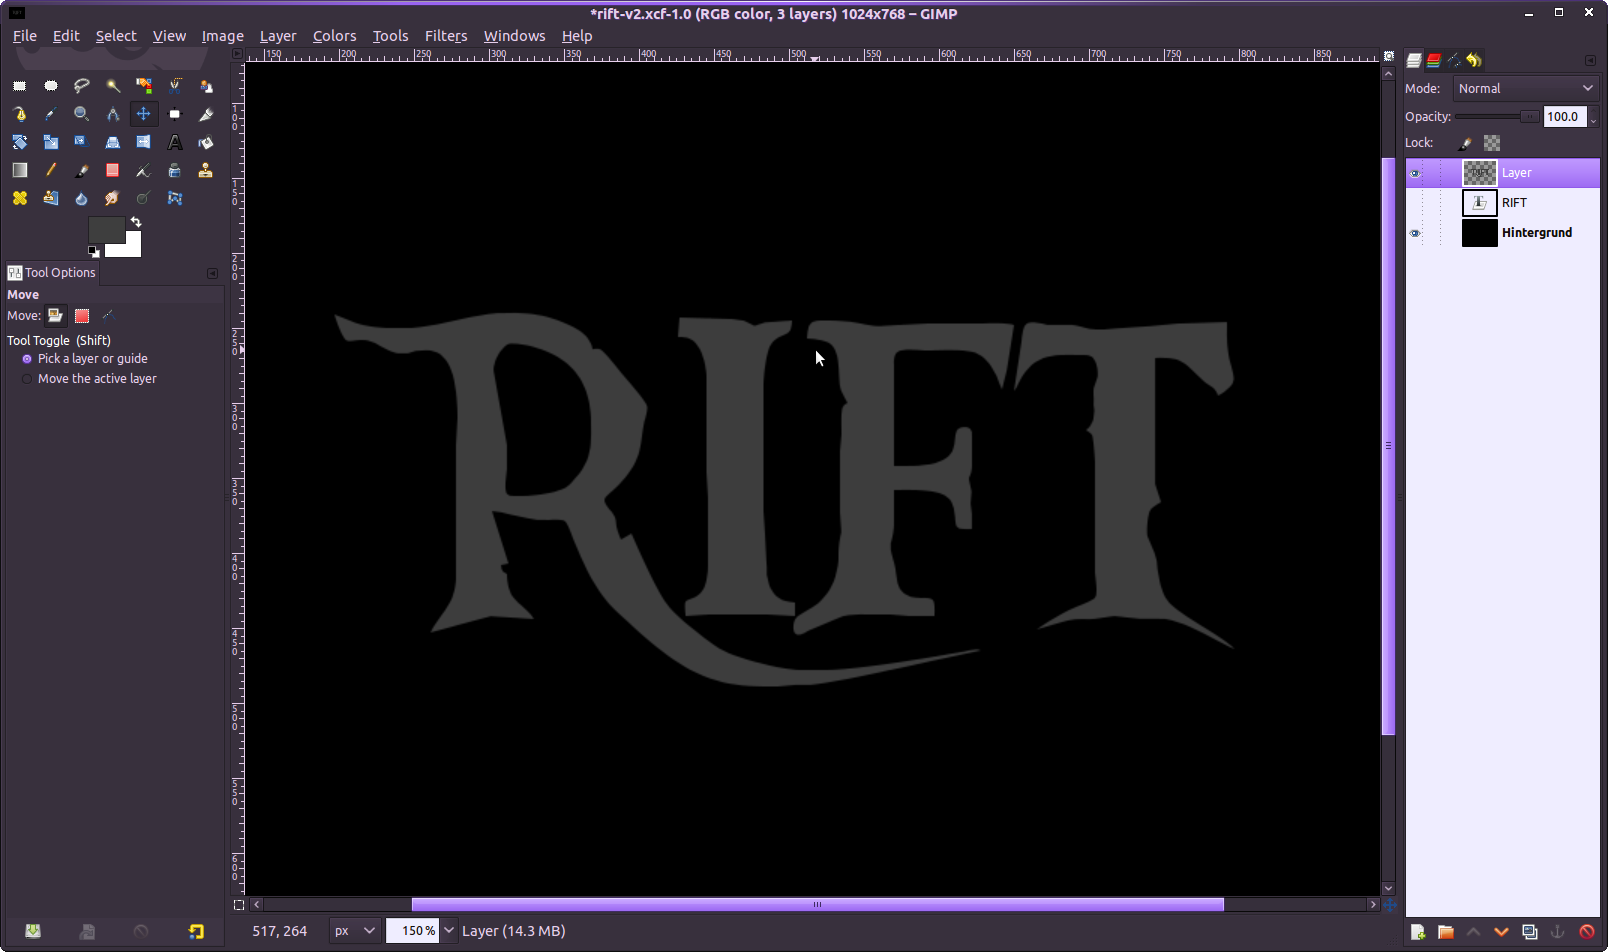
  10. 10

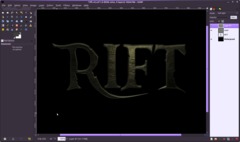
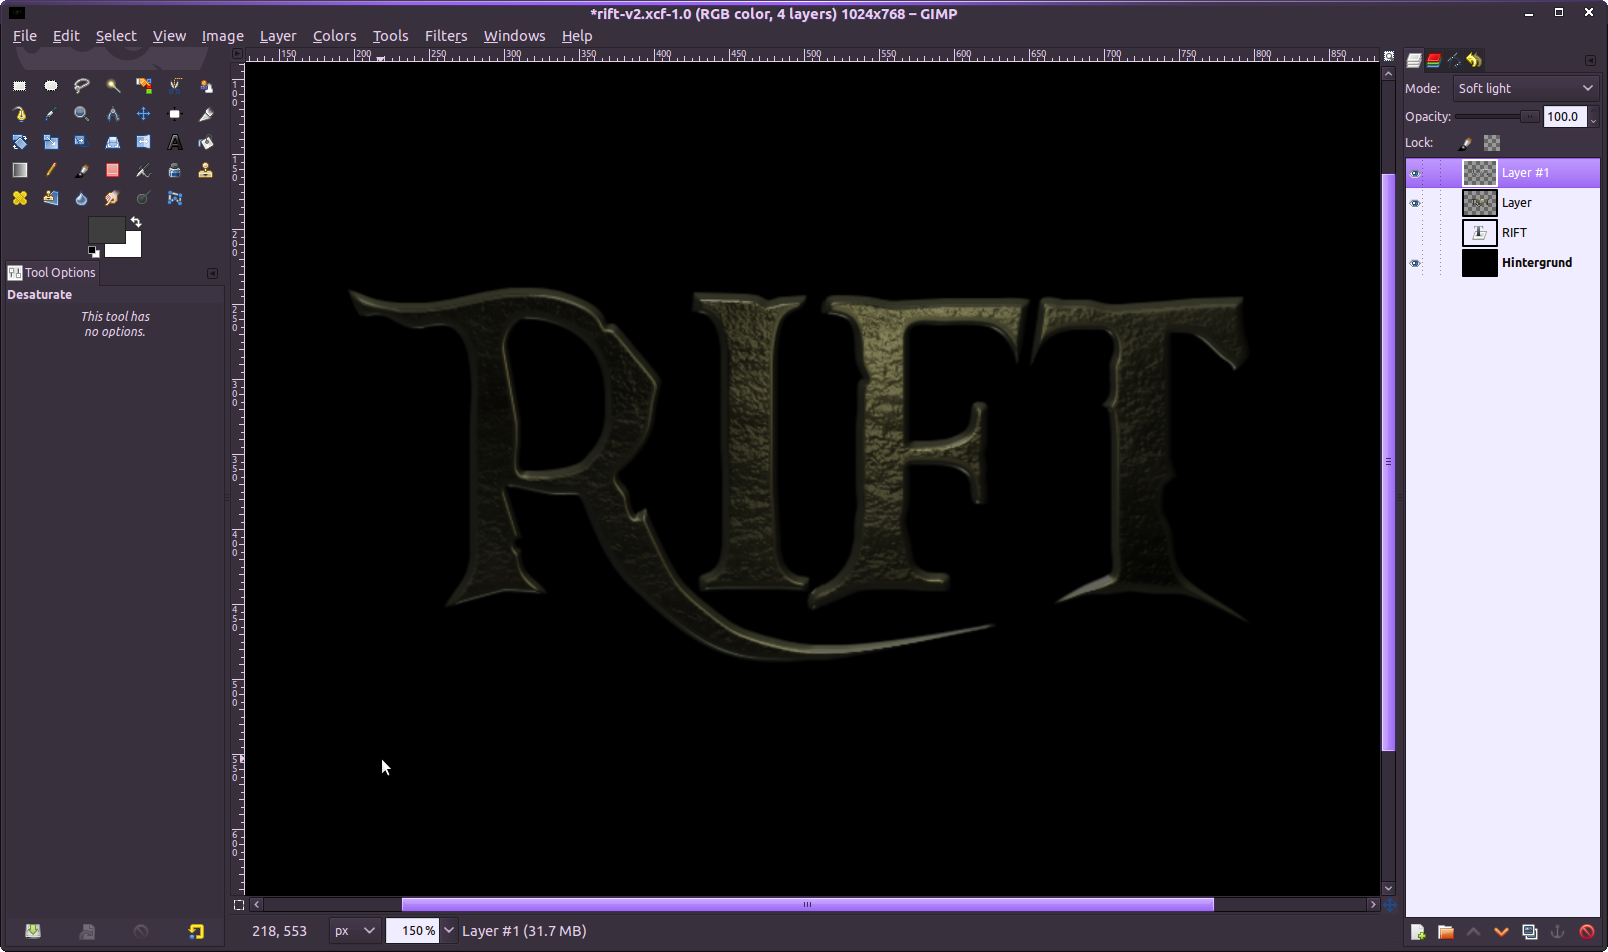
    Set the opacity of the text layer (the layer below the “structure” layer) to 40%. Then set the layers mode of the structure layer to soft light.

  11. 11

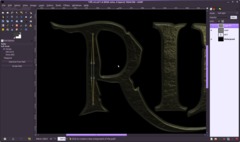
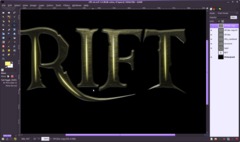
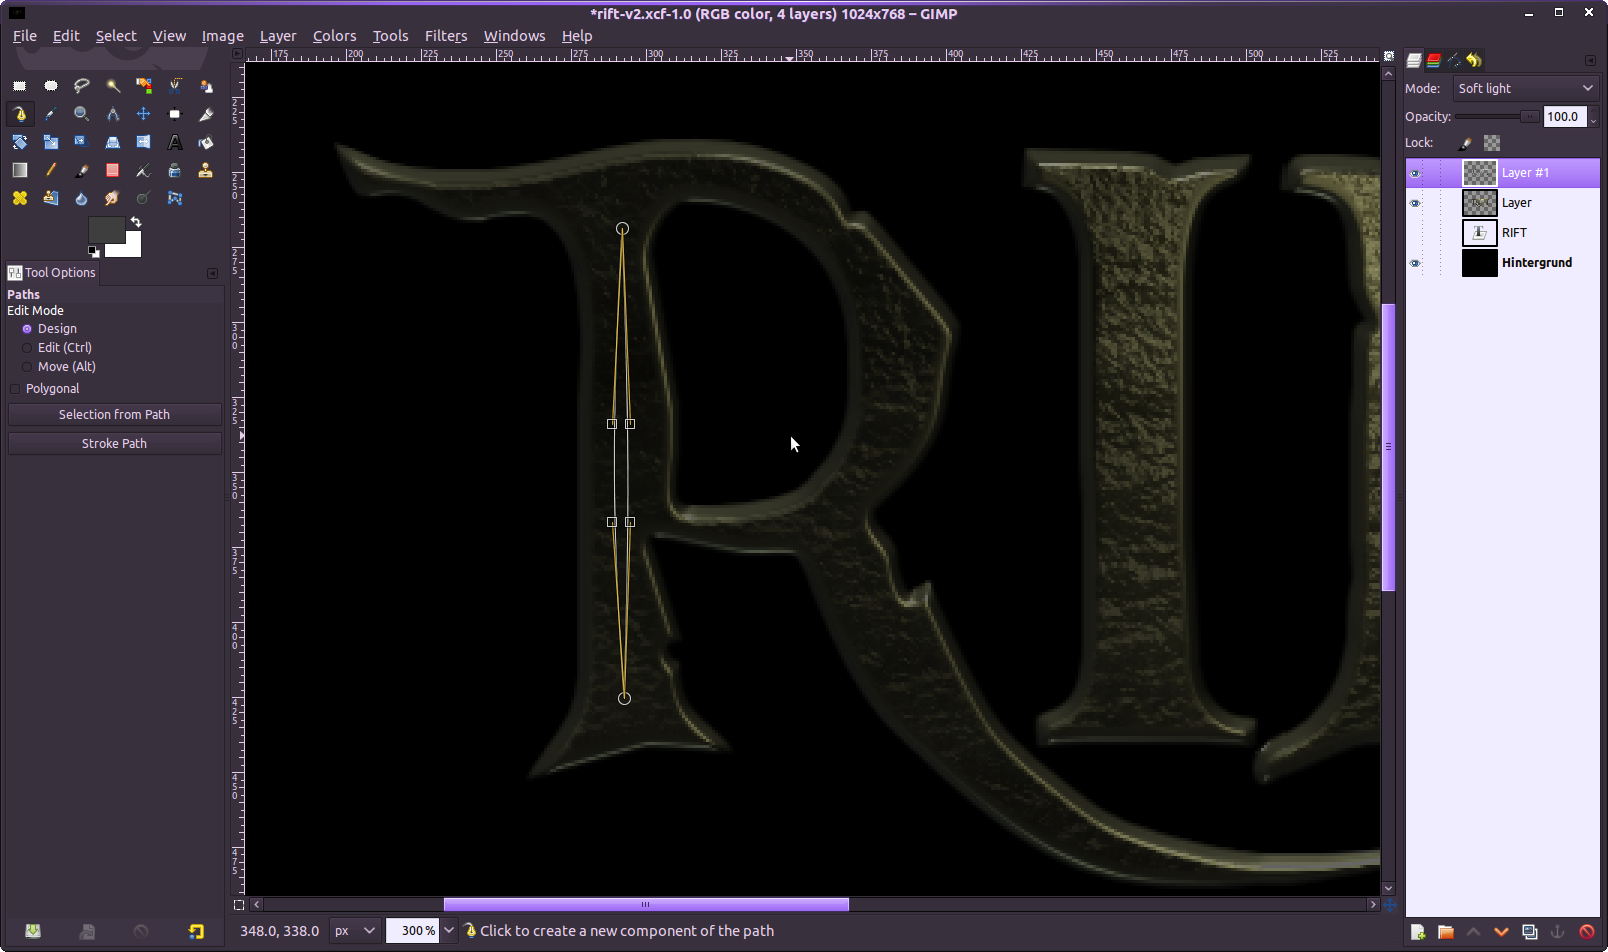
    Now we’re getting to the rifts and the shining through light. Thats what you probably waitet for ;)

    Use the paths tool and create a shape as shown in the image. You need to make 2 points with the paths tool – after placing the second one drag the paths line to the left by taking it in the middle of the two points and move the line to the left which will create a nice curve. After that hold SHIFT while clicking the first point (this action deselects the point). Then hold CTRL on your keyboard, click the other point to connect the second one with the first one. Now a second line (another curve) will appear. Drag the lines as shown in the image to get that kind of shape.

  12. 12

    Create a selection from the path and fill it with plain white. Then duplicate the “rift” 3 times and place it to the other characters of the text.

    Then create another shape using the paths tool in the same way as the described in step #11 for the special “R”. It should finally look like this:

  13. 13

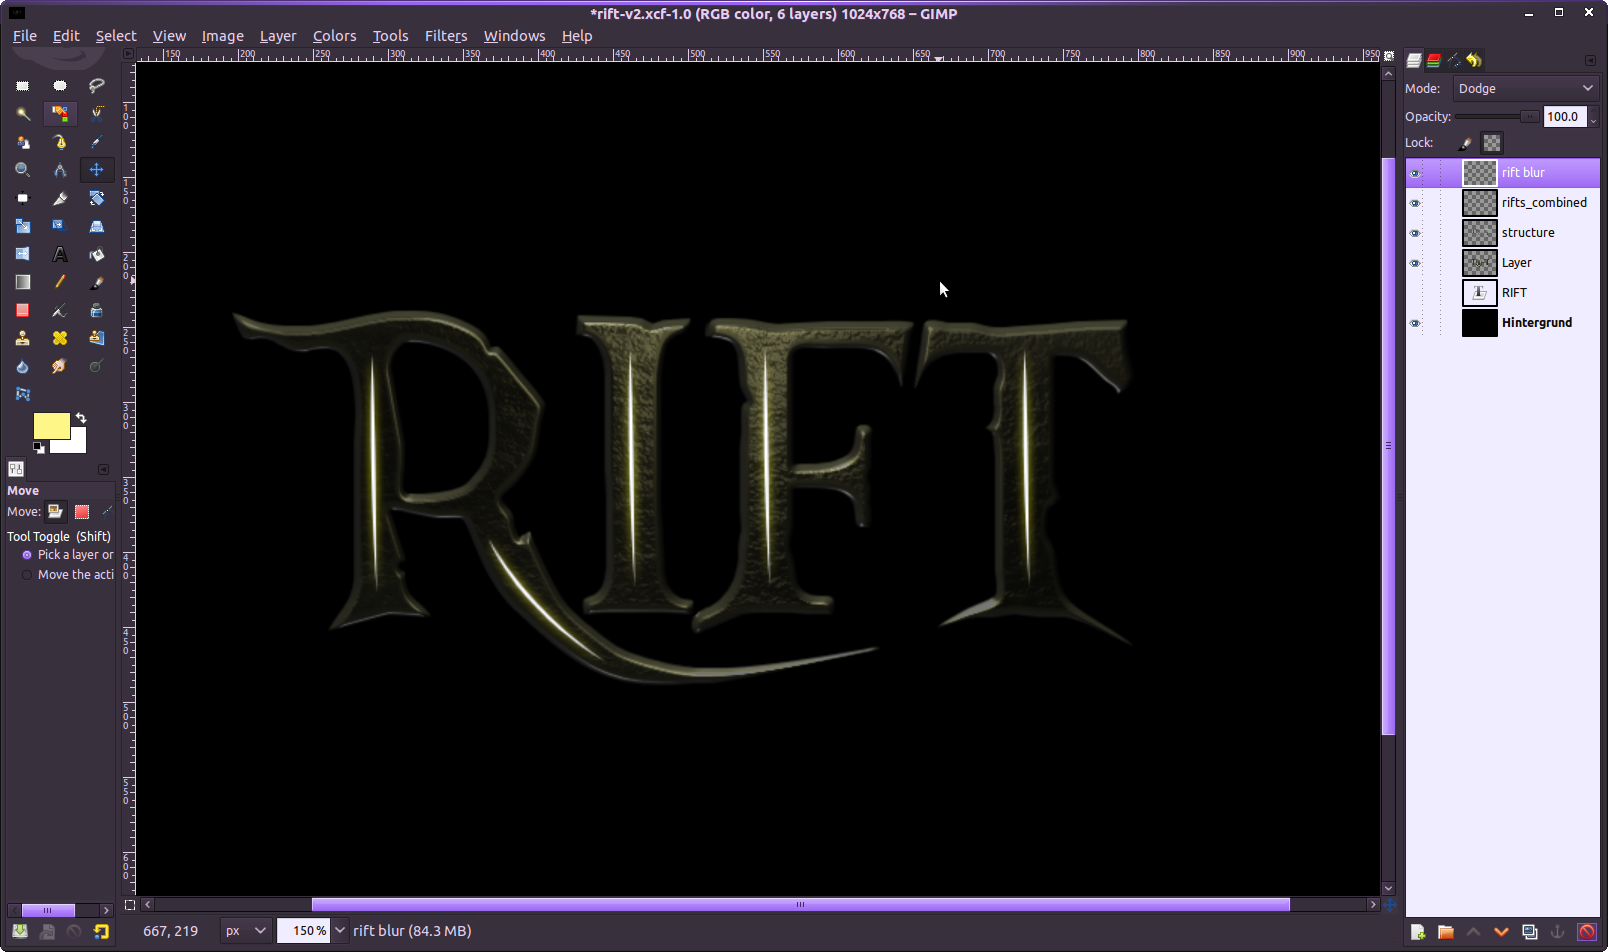
    for easier use now merge the rifts onto a single layer. You can do this by right clicking the top rift-layer in the layers dialoge and use merge down for all the of the rift layers.

    Duplicate the merged single rifts layer and choose Filter / Blur / Gaussian: 9px.

    Then click the “transparency lock”-icon (found righht besides the opacity rule of the layers dialoge).

    Choose #fff588 as Foreground-Color and press CTRL+, (or EDIT / Fill FG-Color). Then set the layer mode to dodge.

  14. 14

    Duplicate the blurred layer 2 times. For the most top layer unset the *Lock Alpha Channel" option and apply a gaussian blur with 35px. The layers mode of this layer please set to Grain merge.

  15. 15

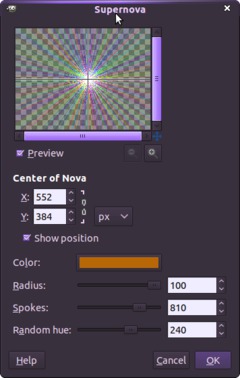
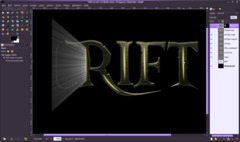
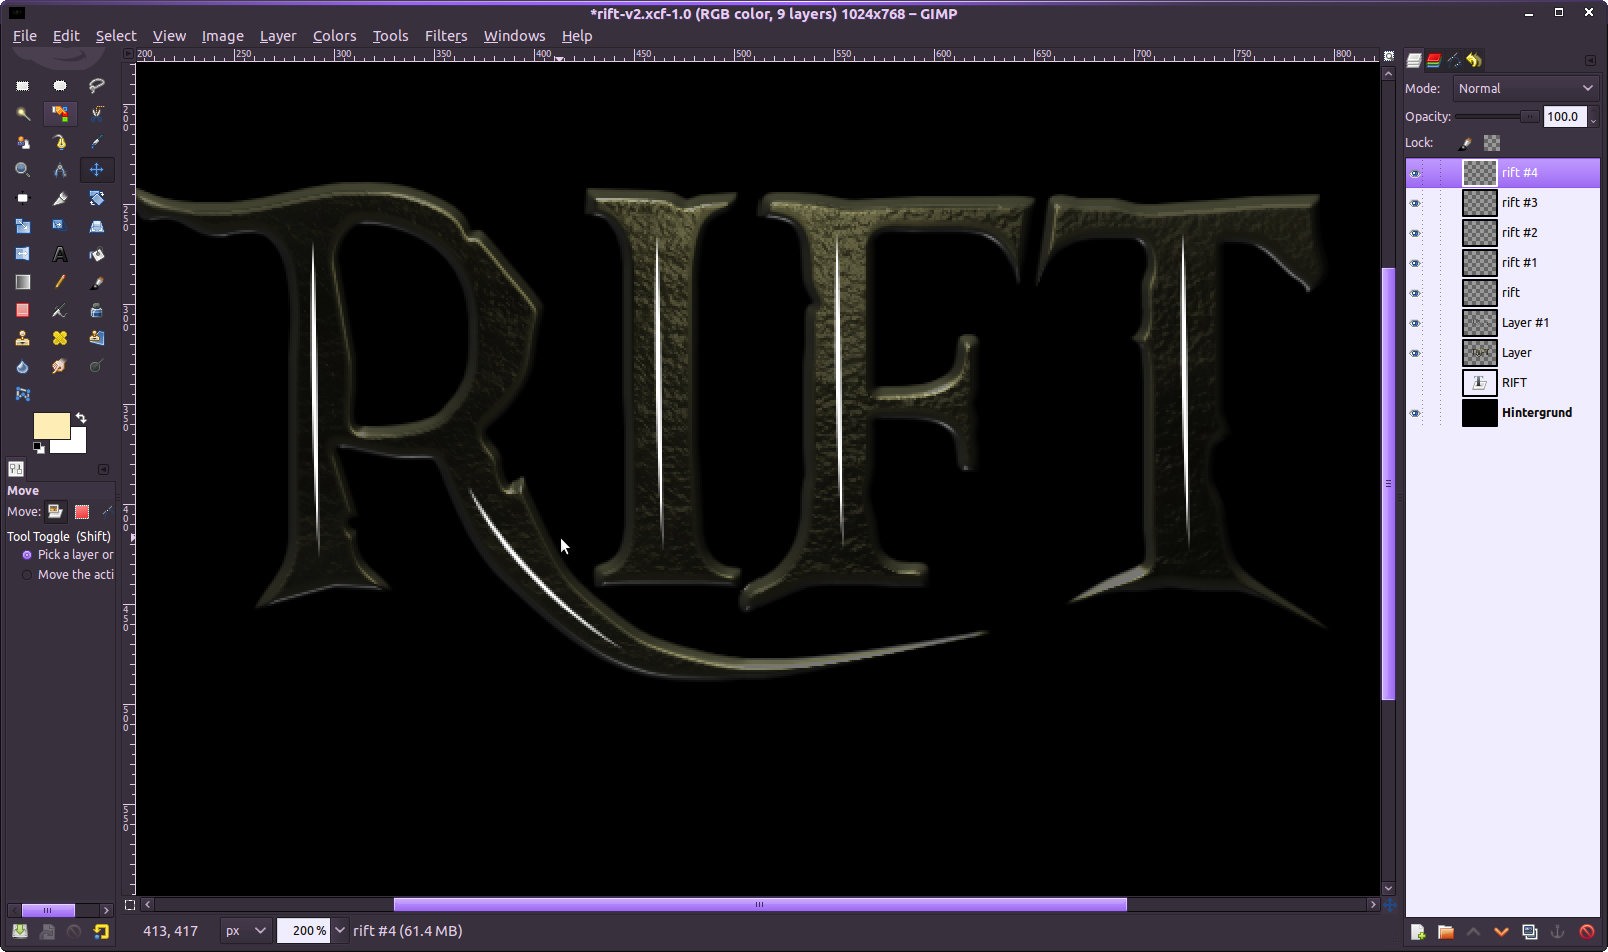
    Now lets get some rays into our image!

    Create a new layer – on the new one go to
    Filter / Light & Shadow / Supernova

  16. 16

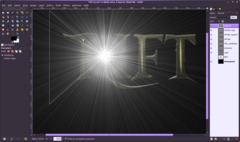
    Now desaturate via Colors / Desaturate.

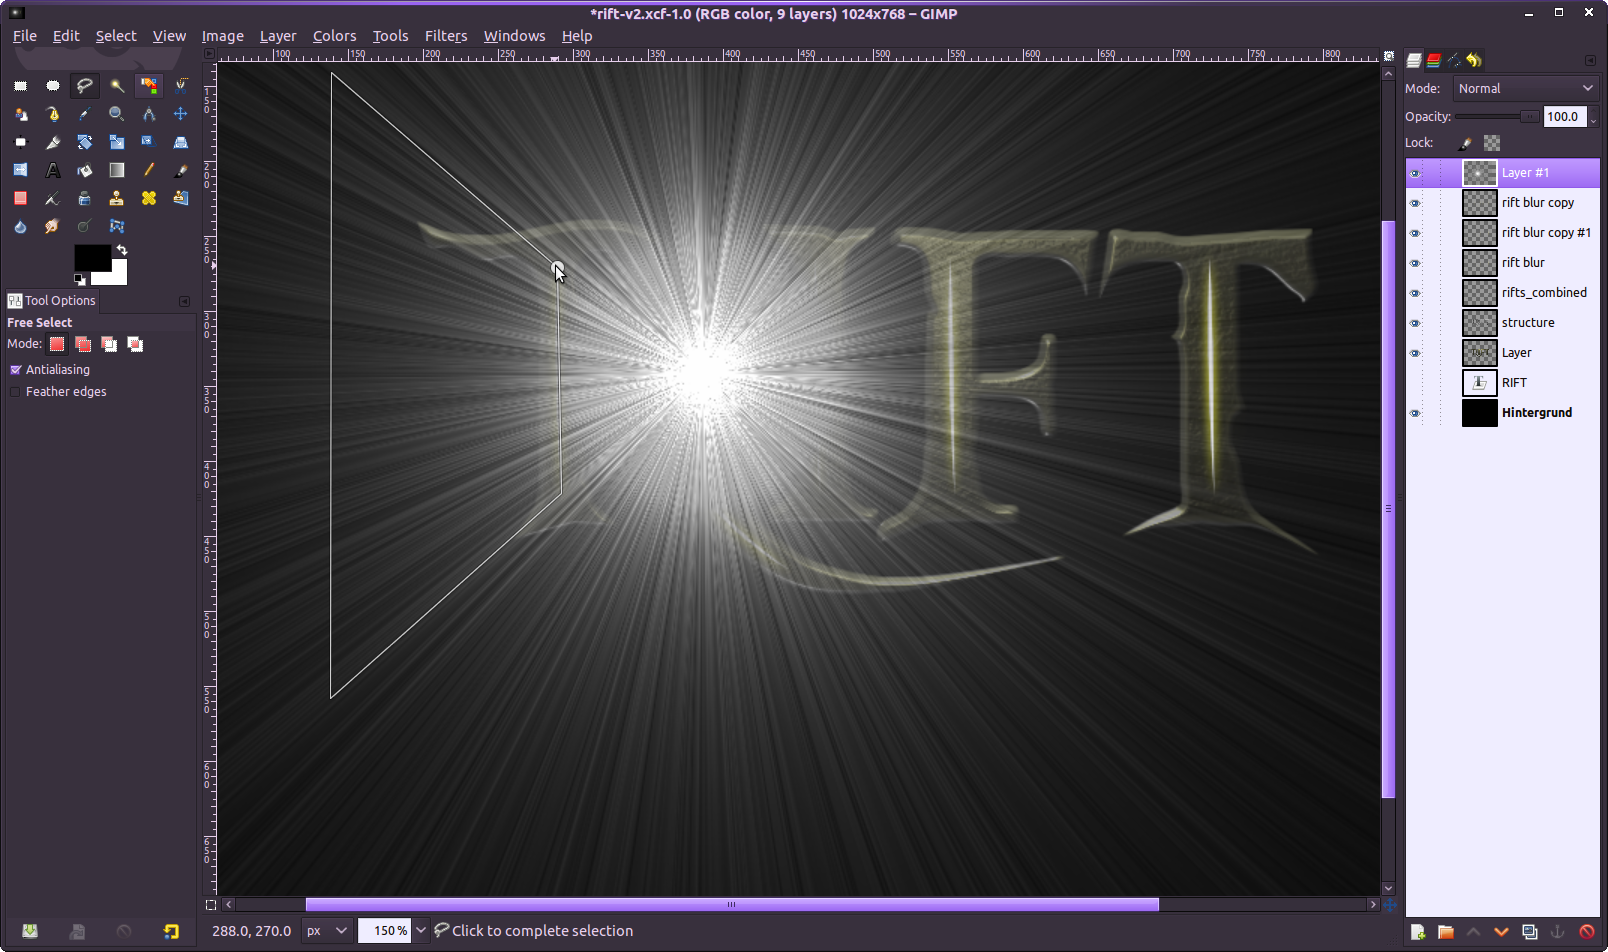
    Move the rays to a point where wou imagine the rays to come out of the rift. I put it a little left as shown in the image. Now use the Free select tool to cut out a rough part for the light of the “R”-characters.
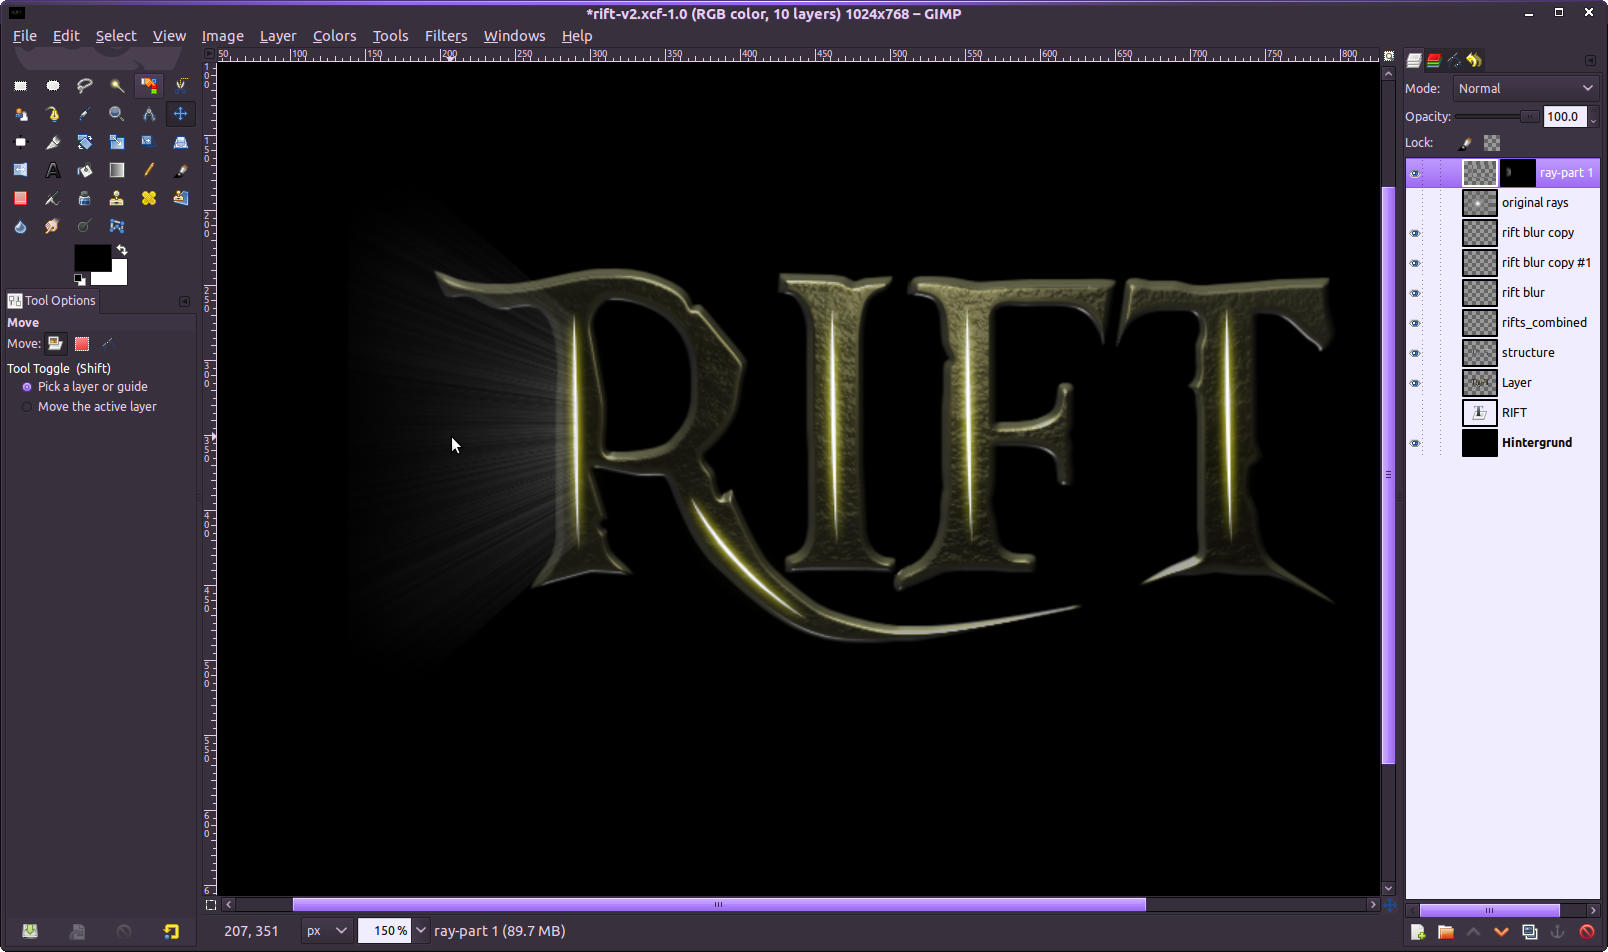
  17. 17

    Copy and paste that part to a new layer. and disable the visibility of the original rays layer. We want to have smoother rays though – make a free selection around the rays, then feather the selection (SELECT / FEATHER: 100px) and invert the selection.

  18. 18

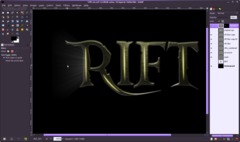
    Now add a layer mask to the layer and fill the selected parts on the mask with black. Then use a big soft brush to paint with black on the mask. Click the parts you want to remove. Make sure you use an opacity of around 30% to have more control on what removing from the details of the rays.

  19. 19

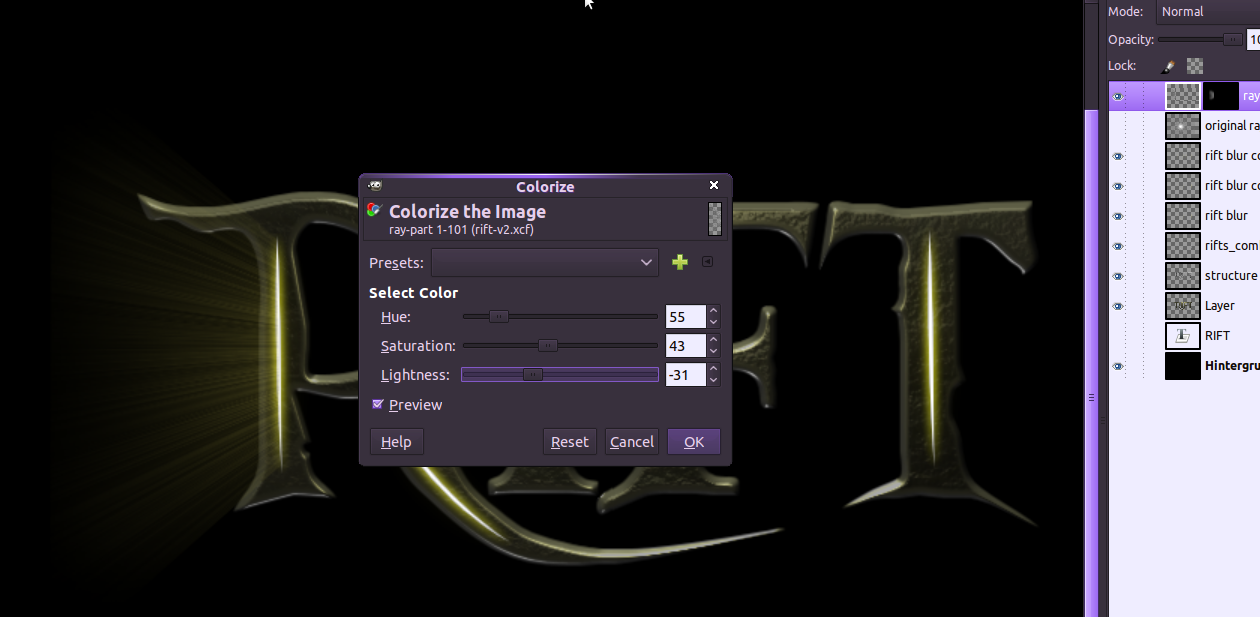
    Now go to Color / Colorize:

  20. 20

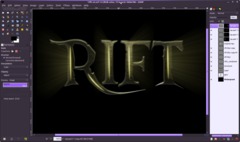
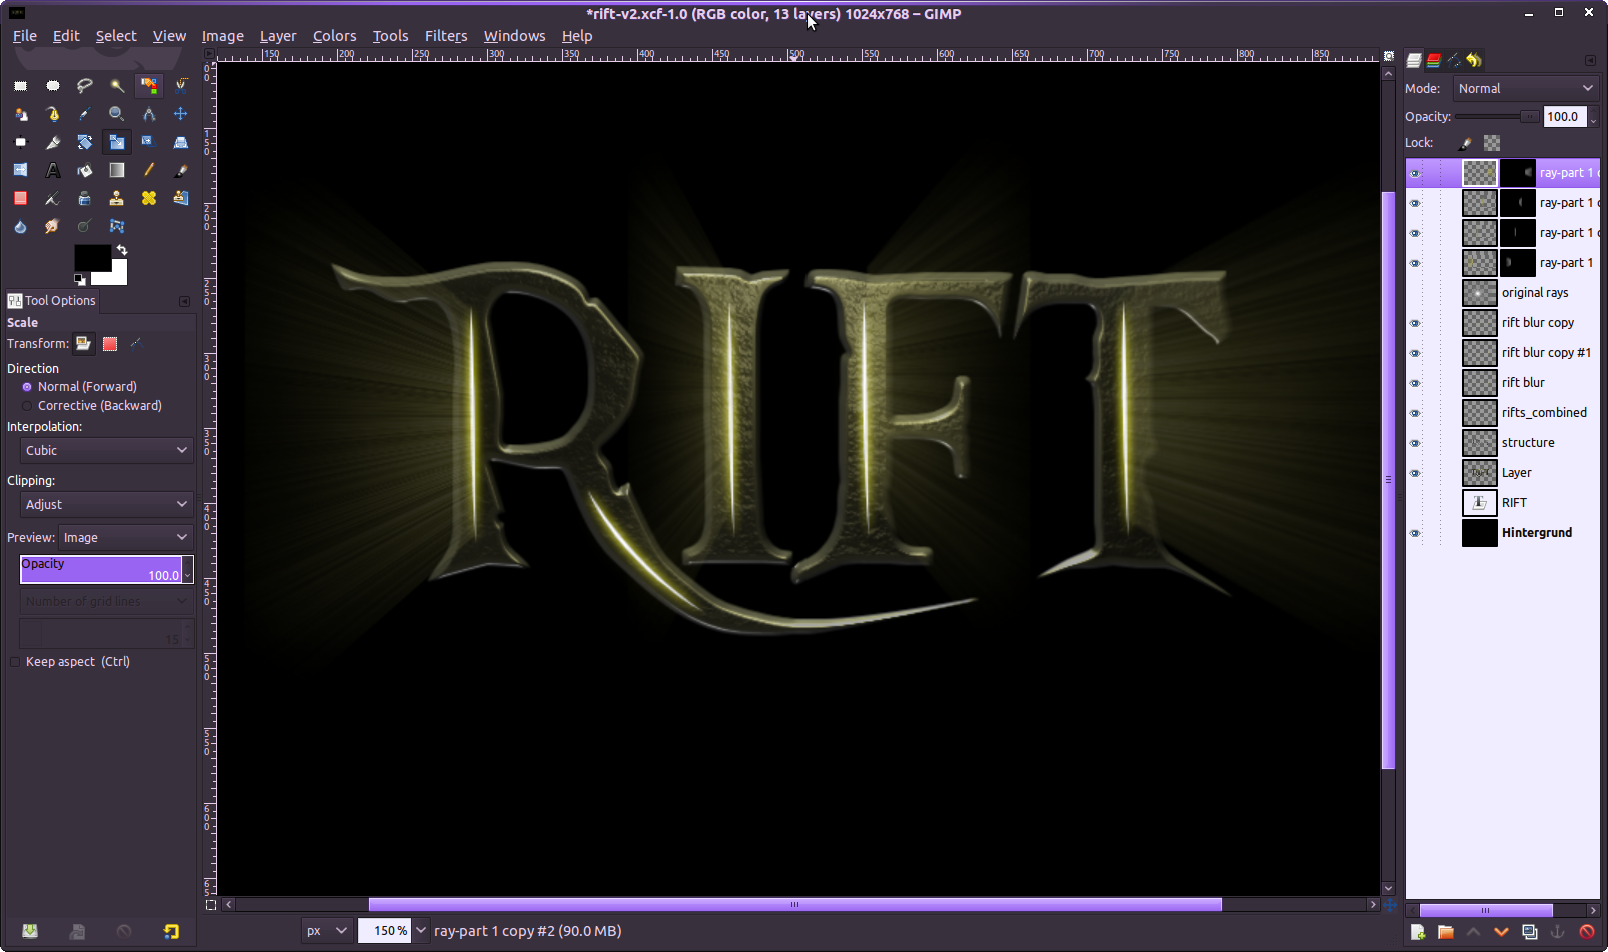
    Now copy the layer with the lightrays of the rift 3 times. Move them to the other rifts in the text and flip them accordingly. Also use the Scale tool to make the width smaller for the “I” and the “F” while you want to make it larger for the “T”.

  21. 21

    Now cut another nice part out of the original rays for the second lower rift on the “R”. Again use a layer mask and try what kind of rays look good for you.
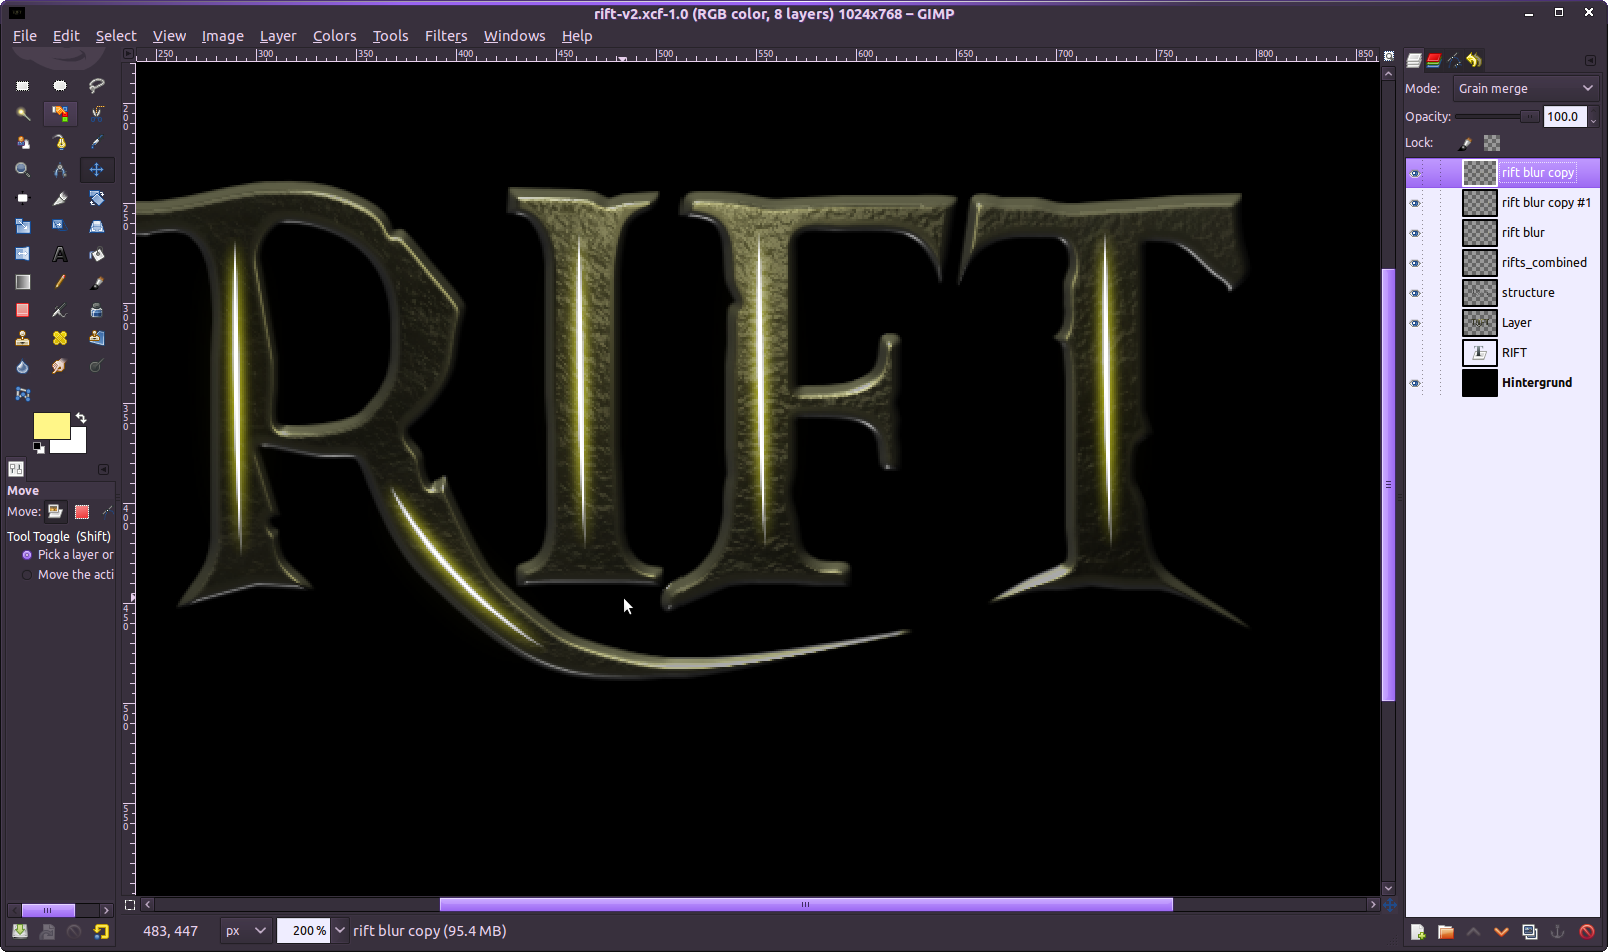
  22. 22

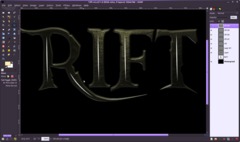
    Now for the final step right click a layer in the layers dialogue and select new from visible. The newly created layer needs the layer mode set to “Dodge” – that enhances the glowing effect of the light in a extremley nice way!

    Hope you enjoyed the tutorial – took me alot of time to reproduce ;)

Comments

Post your own comments, questions or hints here. The author and other users will see your posting and can reply to it.

Of course, you can also ask in the chat.

Subscription management

Please log in to manage your subscriptions.

User rating

This topic (Create cool rifts with translucent lights!) has been rated 5.0/5.0.

*

As a registered user, you can rate articles and comments, attach files to comments, subscribe to topics and you don't need to solve CAPTCHAs anymore.

*…optional

Rift Universe
about 1 month ago

This is a great way to change the look of the Rift logo and keeping your site original.

devvv member for over 5 years devvv 1197 comments
about 1 month ago

Ted: Be sure that the Bump map layer does have the exactly same size as the layer you want to apply the lightning effects. You can ensure this by choosing the bump map layer in the layers dialog and then go to Layer / Layer to image size. Then it should have the same size as the other layer and it will show up in the "Bump map" tab.

Ted
about 1 month ago

This looks like it would be cool but on step #6 when I go to the Bump Map tab in the Lighting Effects dialogue it doesn't allow me to choose the channel I created. I restarted GIMP like 5 times and I can't get it to work. PLEASE HELP

Lauren
3 months ago

I got it to work :) I had to close the image and restart it. I think GIMP just got confused XD Thanks for the response ;)

devvv member for over 5 years devvv 1197 comments
3 months ago

maybe you still selected a channel or so? explicitly click a layer in the layers dialog. otherwise restart gimp - that maybe fixes it ;) if it does not help just write again.

Lauren
3 months ago

This is an awesome effect, (or at least looks like it will be), but for some reason on step #12 when I try to fill the path selection with pure white, it fills it with yellow. The only colour that it will fill with is black. It's on full opacity etc. and the colour is white. To see what it was, I tried turning the visibility off all layers but the background, and it still painted yellow, even if I deselected. Just a bit confused :( Any ideas?

Firezar
11 months ago

Devvv: Thank you for your quick answer but i have already tried that.. With no luck. But i will try again.

devvv member for over 5 years devvv 1197 comments
11 months ago

Firezar: It maybe helps by doing a Layer / Layer to Image size on the layer you apply the lights on. It is very important that the layer where you want to add a bump map on. Hope it solves your problem!

Effector: I don't think that the glowing effects would come out niceley on white background.

@all: thank you so much for the positive comments, it makes me happy to read all that ;))

Firezar
11 months ago

Hi! Amazing tutorial but i'm stuck at step 6-7.. I can't apply the light? I figured out how to download the file and all that. But when I push "Apply" nothing happens? Any idea what i did wrong?

Effector
11 months ago

Is it possible to create the same effect on white background? I tried, but I wasn't able to do that. If it is, please could you instruct me.

devvv member for over 5 years devvv 1197 comments
12 months ago

Hi MrsZoeKnight! Thanks ;) I updated step 11 to make it more clear - is it working for you now?

MrsZoeKnight member for 12 months MrsZoeKnight 1 comment rated this topic with 5/5
12 months ago

This looks amazing but I'm stuck on 11. I have been working on this for two days now. Ugghh... I'm not sure what you mean about making the shape for the light to shine through..... It's not your tut it's me....

Gimper
about 1 year ago

Nice tutorial!
the font is more a pirate font, pieces of eight, being treasure talk for pirates(sorry if I seem like I am bragging)

Vadim
about 1 year ago

Amazing tutorial! Thank you!

127markaz member for almost 3 years 127markaz 6 comments rated this topic with 5/5
about 1 year ago

Now THIS is an excellent tutorial. Clear and concise. Will apply it after I hit the Create Comment button.
Thank you so much. I have the perfect graphic for it.

John Czajka
about 1 year ago

Awesome tutorial, definitely going to give this a shot when i get home.

GameCreator member for over 4 years GameCreator 9 comments
about 1 year ago

So how is that many people use it already? (they must use it in order to take screenshots and put into their tutorials, right?)
Some unofficial builds from sources?
I'm on a box with Gentoo Linux, so I build everything from sources already. Might it be available from sources for me now?
I see that they restored the dropdown list with percentage zoom values. That's great. I very missed it when I suddenly disappeared after one of the upgrades.

127markaz member for almost 3 years 127markaz 6 comments rated this topic with 5/5
about 1 year ago

Excellent tutorial. Good for so many applications in addition to fonts. Well done.
GameCreator-the single window of which you speak will appear in the much anticipated v. 2.8 release.

GameCreator member for over 4 years GameCreator 9 comments rated this topic with 5/5
over 1 year ago

Great effect and brilliant idea with cutting the Supernova rays! :)

BTW how did you do that that your GIMP has everything in a single window with tabs?

devvv member for over 5 years devvv 1197 comments
over 1 year ago

bones: use "Save link as" then name the file lights.txt for example. Or just click the link and copy/paste the text into a new file.

In the lighting effects filter open this file in under the "Light" tab.

For the "lock transparency" or "Lock alpha channel" (it's the same) see the attached file please.

bones
over 1 year ago

I still think this is cool, but I still can't seem to make it all happen.
Your lights settings don't make sense to me (sorry). When I right click, the options I get are "Save link as" or "Save target as". I don't have an option to just "Save as".
And I don't have a transparency lock icon next to the opacity option. Not sure why, but it's not there.
I come back to this every now and again. Thanks for making it available, but I'm a bit lost.

fortyseven
over 1 year ago

@devvv: It works beautifully if you use: "Layer/Layer to Image Size" on the text layer. Thank you for your response and help. Very cool tut, btw!!

fortyseven
over 1 year ago

@devvv: Thank you, I will try it as you have said and let you know if I am successful.

devvv member for over 5 years devvv 1197 comments
over 1 year ago

fortyseven: make sure the layer you want to apply the light&shadow filter on is the exact(!) same size. otherwise the channel won't show up in the drop down.

to make it the same size you could use: Layers / Layer to Boundary Size

fortyseven
over 1 year ago

I don't see the 'highlights" channel in the Bump Map in Step 6.

metshadow
over 1 year ago

Very nice man. Just a thing. I don't know how, but at step 5 , i can't click on Light & Darkness... it may be impossibile, but i cannot click o.O

Can you teach me why?

Bones
over 1 year ago

This looks incredibly cool, but I got lost at steps 6 & 7.
Step 6 - When I went to "Bump Map" tab, there was no option for "Highlights", so I'm not sure what I missed.
Step 7 - I just couldn't work out what to do with the presets file you supplied. Just clicking "save us" asks me where to save to.
Do I use the numbers to save three lights? I'm confused.
Anyway, it looks great, and I might try again later.
Cheers

devvv member for over 5 years devvv 1197 comments
over 1 year ago

did you just right click the file and choose "save as..." ?

dannyboy6896
over 1 year ago

This is awesome but I cant save your attached lights file. I'm really confused because you said to just save as but i cant. When I click it, it just redirects me to a page with the presets in text. Am I missing something? I really want to get this done

cak anas
over 1 year ago

good tutorials... i like it..

nexus
over 1 year ago

excellent results! I'm impressed!

GOD
over 1 year ago

Very nice!! thanks for sharing