RSS/Atom feed Twitter
Site is read-only, email is disabled

Tutorial: Equalize / Homogenize brightness on an image

Written by , translated by devvv · Created on Jan 29, 2011, last updated about 13 years ago CC BY-NC License

Motivation

This technique shows the simulation of a highpass filter in GIMP to influence the brightness of a picture. The aim of this is to get an equal homogenized level of brightness in your image.

Tutorial details

  1. 1

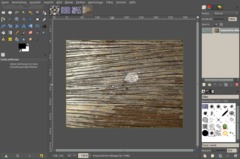
    Homogenizing the brightness

    I’ve opened a simple texture of wood that I want to prepare for making it perfectly seamless. Therefore I have to equalize the brightness of it (you can see that the left part of the image is brighter then the right part).

  2. 2

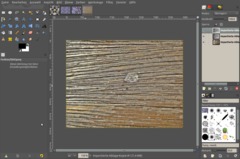
    To counter that uneven level of brightness you can simulate a highpass filter in GIMP.

    - Duplicate the background layer (the image you want to homogenize).
    - On this duplicate use Filter / Blur / Gaussian Blur. The pixels you enter in this filter determine how big the parts (that need to be homogenzied) should be. In this texture the brigher parts are distributed over a bigger part of the image, therefore I take a larger value – around 20-40 px.
    - Then do an Colors / Invert
    - Colors / Desaturate
    - Set the layers mode to “Overlay”

    By doing this the too bright parts get a little darker and vice versa – thats how the images brightness is equalized.

    Make the effect stronger by just duplicating the “overlay”-layer.

  3. 3

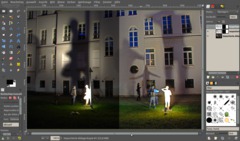
    Here is another example on a (shadowy) photo where I used the same technique to make the too dark parts brighter while the white parts still look white but not “overwhithened”.

Comments

Post your own comments, questions or hints here. The author and other users will see your posting and can reply to it.

Of course, you can also ask in the chat.

Subscription management

Please log in to manage your subscriptions.

User rating

This topic (Equalize / Homogenize brightness on an image) has been rated 4.3/5.0.

New comments are disabled because of spam.

Snowyfox
about 3 years ago

This is an amazing lifehack... Thank you! It's super effective on a photo of paper with writing..

G2Vicoigne member for almost 9 years G2Vicoigne 4 comments rated this topic with 4/5
about 6 years ago

Génial

JK
almost 7 years ago

Instead of Overlay, set the layer mode to Extract. Then you don't have to invert and desaturate the color.

alex
almost 7 years ago

I use it inverting the order, gaussian blur is the final step to play with pixels and visualization, it allows me to select the best blur pixels for optimal visualization

solensdatter2 member for over 11 years solensdatter2 15 comments rated this topic with 5/5
almost 10 years ago

Very useful, thank you!

Travis
over 11 years ago

Thank you so much,
That worked awesome
)

Francois member for over 15 years Francois 31 comments
over 12 years ago

The steps are written in plain English beside the images, lefty.crupps.
Maybe it is too technical for a newbie. You'll find a script that makes it easy if you click the link I posted previously.

lefty.crupps
over 12 years ago

I don't understand, where are the steps? or a video? or anything useful other than the wood image example of before and after, and the before/after shadow example?

Francois member for over 15 years Francois 31 comments rated this topic with 4/5
over 12 years ago

Useful technique.
A script by Andrew Robinson does exactly the same in less than one second:
http://registry.gimp.org/node/24852
(Andrew has now fixed an issue that caused the script to crash in some cases because he used "1" instead of "image").

UnconventionalT
over 12 years ago

Why is it that so many people post unhelpful/spiteful comments on this website? It doesn't say much about the comumity as a whole. I for one really enjoyed this tutorial, thanks.
The reason why I like it so much is because you have the finest control you could want over the image, and how it is homogenized.

pevsner
almost 13 years ago

There's a "contrast fix" plugin that does similar. Always good to know the theory though.
http://registry.gimp.org/node/182

lylejk
about 13 years ago

GIMP 1.x had a cool filter called Homogenize but they never ported it to GIMP 2.x for whatever reason. I can use various techniques such as this to do this, but I do miss this cool plugin. :)

devvv member for over 17 years devvv 1475 comments
about 13 years ago

what do you mean? what kind of codec? we do not use any codecs on gimpusers.com

gerard82
about 13 years ago

Why do you use a codec that can only be played on proprietary software?
Gimp is opensource (or isn't it?)
Gerard.

Mukesh
about 13 years ago

really useful. Please add a 'tweet this' or 'share of FB' buttons to get across to a larger viewership
Thanks

-Mukesh