


Despeckling photos
This discussion is connected to the gimp-user-list.gnome.org mailing list which is provided by the GIMP developers and not related to gimpusers.com.
This is a read-only list on gimpusers.com so this discussion thread is read-only, too.
| Despeckling photos | Gimp_Noob | 04 Dec 02:39 |
| Despeckling photos | Guy Stalnaker via gimp-user-list | 04 Dec 04:12 |
| Despeckling photos | Liam R E Quin | 04 Dec 08:44 |
| Despeckling photos | Gary Aitken | 04 Dec 16:32 |
| Despeckling photos | Liam R E Quin | 04 Dec 18:56 |
| Despeckling photos | Gimp_Noob | 20 Dec 20:12 |
| Despeckling photos | Liam R E Quin | 20 Dec 23:32 |
| Despeckling photos | Gimp_Noob | 14 Jan 23:28 |

- postings
- 10
Despeckling photos
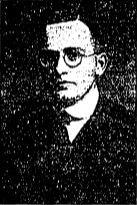
I have several photos which I'd like to try to clean up as best I can. They all have similar problems. They look like a bad copy of a black and white photo with large amounts of speckling.
I'm not sure which tools to use. Should I use some combination of blurs or masks?. Is there a particular tool that might be useful. Should the contrast be adjusted? I'm just looking to make minimal improvements. I know that I do not have a lot to work with. Any suggestions would be appreciated.
Attachments: * https://www.gimpusers.com/system/attachments/1309/original/despeckling.png
Gimp_Noob (via www.gimpusers.com/forums)
-
 speckled photo
despeckling.png (25.9 KB)

Despeckling photos
There are a lot of options. What I have used most is Wavelet Decompose (see
here for an explanation -
https://pixls.us/articles/skin-retouching-with-wavelet-decompose/ ). I fix
old family photos that are usually full of scratches, etc.
This technique works, but note it takes a lot of time to work on each layer.
Check out more of Pat David's guides and YouTube where there are folks who've posted videos for using GIMP. Best search terms are: enhance, retouch, restore, fix, restoration, etc.
GuyS
“Happiness is the meaning and the purpose of life, the whole aim and end of
human existence.”

― Aristotle

On Tue, Dec 3, 2019, 8:39 PM Gimp_Noob  wrote:

> I have several photos which I'd like to try to clean up as best I can.
> They all
> have similar problems. They look like a bad copy of a black and white
> photo with
> large amounts of speckling.
>
> I'm not sure which tools to use. Should I use some combination of blurs or
> masks?. Is there a particular tool that might be useful. Should the
> contrast be
> adjusted?  I'm just looking to make minimal improvements. I know that I do
> not
> have a lot to work with. Any suggestions would be appreciated.
>
> Attachments:
> *
> https://www.gimpusers.com/system/attachments/1309/original/despeckling.png
>
> --
> Gimp_Noob (via www.gimpusers.com/forums)
> _______________________________________________
> gimp-user-list mailing list
> List address:    gimp-user-list@gnome.org
> List membership: https://mail.gnome.org/mailman/listinfo/gimp-user-list
> List archives:   https://mail.gnome.org/archives/gimp-user-list
>
Despeckling photos
On Wed, 2019-12-04 at 03:39 +0100, Gimp_Noob wrote:
I have several photos which I'd like to try to clean up as best I can.
First, scan at higher resolution than yu plan to use. At least double.
SOmetimes i find that select by colour works well.
(1) make sure you have both blacks andwhites in your image, e.g. with
levels or curves.
(2) select by colour on a white area.
(3) grow selection e.g. 2 pixels
)4_ shrink selectin by 2 pixels
(6) feather by 1 pixel (requires greyscale or RGB iamge, not indexed)
(7) fill with white (e.g. drag the swatch from the toolbox, or use
control-. or control-,)
(8) select none
repeat steps 2 to 8 with black instead of white.
slave liam
Liam Quin - web slave for https://www.fromoldbooks.org/
with fabulous vintage art and fascinating texts to read.
Click here to have the slave beaten.
Despeckling photos
On 12/4/19 1:44 AM, Liam R E Quin wrote:
On Wed, 2019-12-04 at 03:39 +0100, Gimp_Noob wrote:
I have several photos which I'd like to try to clean up as best I can.
First, scan at higher resolution than yu plan to use. At least double.
SOmetimes i find that select by colour works well. (1) make sure you have both blacks andwhites in your image, e.g. with levels or curves.
(2) select by colour on a white area. (3) grow selection e.g. 2 pixels
)4_ shrink selectin by 2 pixels
(6) feather by 1 pixel (requires greyscale or RGB iamge, not indexed) (7) fill with white (e.g. drag the swatch from the toolbox, or use control-. or control-,)
(8) select nonerepeat steps 2 to 8 with black instead of white.
Can you explain what steps 3 and 4 acconplish? It seems like they should cancel each other.
Gary
Despeckling photos
On Wed, 2019-12-04 at 09:32 -0700, Gary Aitken wrote:
On 12/4/19 1:44 AM, Liam R E Quin wrote:
On Wed, 2019-12-04 at 03:39 +0100, Gimp_Noob wrote:
(2) select by colour on a white area. (3) grow selection e.g. 2 pixels
)4_ shrink selectin by 2 pixels
Can you explain what steps 3 and 4 acconplish? It seems like they should cancel each other.
Consider a black speckle that's a square 4 pixels wide and high (for an example).
The selection goes to the edge of the speckle, all round.
Growing the selection by 2 pixels will make the marching ants meet in the middle of the speckle - but there are no pixels of it left outside the selection, it'snow fully selected.
Shrinking the selection won't create holes, so the tiny speckles are gone.
Experiment using 1 pixel instead of 2, or grow by 2, shrink by 1, feather by 1 or 2, making sure you don't lose too much detail.
In practice i scan in greyscale, not black and white, so it also depends on the "threshhold" paraneter in the select-by-colour tool as to how close the the speckles the selection goes, but i use Curves first to brighten the hilights somewhat and to darken the shadows. If you are working with a film rather than something printed in a book, that may not be appropriate - in that case, it helps to have the image in Precision 16 integer of 32 floating point (from the Image/Precision menu) so that you don't lose detail as you work.
Hope this helps,
slave
- postings
- 10
Despeckling photos
Consider a black speckle that's a square 4 pixels wide and high (for an
example).The selection goes to the edge of the speckle, all round.
Growing the selection by 2 pixels will make the marching ants meet in the middle of the speckle - but there are no pixels of it left outside the selection, it'snow fully selected.
Shrinking the selection won't create holes, so the tiny speckles are gone.
Experiment using 1 pixel instead of 2, or grow by 2, shrink by 1, feather by 1 or 2, making sure you don't lose too much detail.
In practice i scan in greyscale, not black and white, so it also depends on the "threshhold" paraneter in the select-by-colour tool as to how close the the speckles the selection goes, but i use Curves first to brighten the hilights somewhat and to darken the shadows. If you are working with a film rather than something printed in a book, that may not be appropriate - in that case, it helps to have the image in Precision 16 integer of 32 floating point (from the Image/Precision menu) so that you don't lose detail as you work.
Hope this helps,
slave
Thanks.
What should I do if I only have a .jpg file? In other words,there is nothing to scan. If I remove too many speckles it looks fake.
Gimp_Noob (via www.gimpusers.com/forums)
Despeckling photos
On Fri, 2019-12-20 at 21:12 +0100, Gimp_Noob wrote:
What should I do if I only have a .jpg file? In other words,there is nothing to scan. If I remove too many speckles it looks fake.
There's no simple answer - you have to d the best you can with what
you've got. Sometimes resizing (image->scale) by a factor of 3 can
help: open image->scale image, append
* 3
to the width
and press tab, and GIMP will do the multiplication :) Use "cubic"
interpolation.
Then blur the now-larger image with radius 5. Then scale back down (again cubic but you could use / 3 instead of * 3 to have GIMP do the division) and then sharpen (filters->enhanve/>unsharp mask).
Technically what's going on is that this procedure will give the image a wider number of pixel values - more greys - especially in 16 or 32 bit - and reduce some of the effects of jpeg artifacts. t help.
Liam Quin - web slave for https://www.fromoldbooks.org/
with fabulous vintage art and fascinating texts to read.
Click here to have the slave make breakfast.
- postings
- 10
Despeckling photos
There's no simple answer - you have to d the best you can with what you've got. Sometimes resizing (image->scale) by a factor of 3 can help: open image->scale image, append * 3
to the width
and press tab, and GIMP will do the multiplication :) Use "cubic" interpolation.Then blur the now-larger image with radius 5. Then scale back down (again cubic but you could use / 3 instead of * 3 to have GIMP do the division) and then sharpen (filters->enhanve/>unsharp mask).
Technically what's going on is that this procedure will give the image a wider number of pixel values - more greys - especially in 16 or 32 bit - and reduce some of the effects of jpeg artifacts. t help.
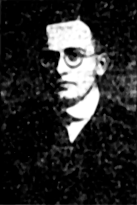
I lost some detail on the edit, but I got rid of a lot of the noise thanks.
Attachments: * https://www.gimpusers.com/system/attachments/1335/original/despeckling.png * https://www.gimpusers.com/system/attachments/1336/original/despeckling-edit.png
Gimp_Noob (via www.gimpusers.com/forums)
-
 original
despeckling.png (25.9 KB) -
 edit
edit
despeckling-edit.png (118 KB)


