Adding color to file
This discussion is connected to the gimp-user-list.gnome.org mailing list which is provided by the GIMP developers and not related to gimpusers.com.
This is a read-only list on gimpusers.com so this discussion thread is read-only, too.
| Adding color to file | sl60 | 05 Oct 19:02 |
| Adding color to file | Steve Kinney | 06 Oct 00:15 |
| Adding color to file | Guy Stalnaker | 06 Oct 04:39 |
| Adding color to file | Elle Stone | 16 Oct 19:05 |
| Adding color to file | rich404 | 06 Oct 08:55 |
| Adding color to file | sl60 | 06 Oct 16:20 |

- postings
- 5
Adding color to file
I want to color parts of what has been sent to me as a black-and-white pdf (line drawing, basically). What I usually do in a case like this is to change the original layer to Multiply, then duplicate this and multiply again. Then I select each part of the drawing I want to color and bucket fill it (different colors for each). if I save this as a pdf and open it, all it shows is the colors without the line drawing. if I save it as a png, all is preserved.
My question is--should I save the pdf as a png or jpeg first before I start the entire process? It's a very low resolution drawing. Or does it matter? It's a big file (the original is on a 24"x36" sheet and it will probably be printed out at some point).
I thank you for your help in advance!
Adding color to file
On 10/05/2017 03:02 PM, sl60 wrote:
I want to color parts of what has been sent to me as a black-and-white pdf (line drawing, basically). What I usually do in a case like this is to change the original layer to Multiply, then duplicate this and multiply again. Then I select each part of the drawing I want to color and bucket fill it (different colors for each). if I save this as a pdf and open it, all it shows is the colors without the line drawing. if I save it as a png, all is preserved.
My question is--should I save the pdf as a png or jpeg first before I start the entire process? It's a very low resolution drawing. Or does it matter? It's a big file (the original is on a 24"x36" sheet and it will probably be printed out at some point).
I would start by importing the page with the drawing in qustion into the GIMP, after doing a little math to determine what size to make the imported page to obtain about 300 DPI at the expected print size of the finished work, when the page is cropped to the image. Then I would crop the imported page to the image, scale it to its finished size @ 300 DPI, and proceed from there.
Your coloring method sounds effective to me. In some cases you might want to use two very similar colors with the Gradient tool to get variable effects within the given boundary, but that may not be relevant to the work at hand.
When finished I would (of course!) save the image in XCF format in case it needs any adjustments in the future, then export it to PNG format for delivery, unless another format has been specified. Making the exported image's background transparent assures no problems with matching the background color of the page or etc. when it's printed, or you might want a specific background color. Either way, PNG will do the deed, without noise from lossy compression.
:o)
Adding color to file
I'd like to suggest an alternative method for coloring an image that has some great advantages.
Use layers with masks!
1. Open PDF in GIMP
2. Scale image to increase dpi to 300 (for printing): menu Image > Scale
Image > set X and Y resolution to 300
3. Crop if needed
4. No need to duplicate base layer because you're going to leave it alone
5. Add new layer
1. Fill with a color you want for some part of your image
2. Give layer name (e.g., face, jacket, etc.)
3. Set the Mode to Soft light, or some other appropriate Mode (in the
example Soft Light lets the background show through)
4. Add mask to the same new layer: Right-click > Add Layer Mask
5. In dialog for Initialize Layer Mask to: select Black (full
transparency), click Add
6. On the Layer click on the new Mask box to select it (a white
rectangle should appear around it)
7. Because the mask was added at Full Transparency, the color of the
layer should NOT be visible
8. Use the Brush Tool to "paint" where you want the color to show --
Select the Brush tool and set its size, I vary this based on need, but a
good starting point is brush "2. Hardness 025", at size 15
9. Select from the Color Selection the color White; if you have the
default which is Black foreground and White background, click on the swap
control to reverse them. If no White, click on the foreground color box
then from the resulting dialog select White
10. Now, with your mouse (layer is active and mask is selected) use the
brush to "paint" on the image, which you can see because the mask is set to
transparency, where you want the color of the the layer to show. You should
see the color appear.
11. Add new layers for new colors as needed
12. Save as .xcf to retain all of this layer information for later use
13. Export to .png for other people to use. You may find setting the
background outside the bounds of the image to transparent helpful for other
uses if the image will be "placed" onto a document page, etc.
There are great advantage of this technique:
1. You can easily change the color of any layer
2. You can change the layer mode
3. You can change the layer opacity
4. You can edit the mask by swapping to black and "painting" which
"removes" the color by reversing the transparency
5. You never have to create a selection area, or edit a selection after
the fact (horrors!)
6. You never mess with the base image nor do you need to duplicate
it--you just add color layers, as many as needed, and use the brush where
you want the color to be visible
A proof-of-concept image is attached as a .xcf so you can see the layers used, etc. -- a black and white image of a cowboy that's been colorized using this technique (which I did not devise myself--it was found via Google search, but long ago, and of such value that I've long since added it to my standard repertoire of GIMP techniques that I frequently use).
Hope this is as helpful for you, if you have not used this technique before, as it was, and has been, to me.
Regards,
Guy S.
Guy Stalnaker jimmyg521@gmail.com
On Thu, Oct 5, 2017 at 2:02 PM, sl60 wrote:
I want to color parts of what has been sent to me as a black-and-white pdf (line
drawing, basically). What I usually do in a case like this is to change the original layer to Multiply, then duplicate this and multiply again. Then I select each part of the drawing I want to color and bucket fill it (different
colors for each). if I save this as a pdf and open it, all it shows is the colors without the line drawing. if I save it as a png, all is preserved.My question is--should I save the pdf as a png or jpeg first before I start the
entire process? It's a very low resolution drawing. Or does it matter? It's a
big file (the original is on a 24"x36" sheet and it will probably be printed out
at some point).I thank you for your help in advance!
-- sl60 (via www.gimpusers.com/forums)
_______________________________________________ gimp-user-list mailing list
List address: gimp-user-list@gnome.org List membership: https://mail.gnome.org/mailman/listinfo/gimp-user-list List archives: https://mail.gnome.org/archives/gimp-user-list
Adding color to file
Sometimes wonder about this mailing list format.
I want to color parts of what has been sent to me as a black-and-white pdf (line drawing, basically). What I usually do in a case like this is to change the original layer to Multiply, then duplicate this and multiply again.
Guessing that the line drawing is faint and the multiply operation is to make the outline darker. No need to set the base layer to multiply, it has nothing to act on. As an alternative, have you tried Filters -> Generic -> Erode which shrinks lighter areas, making the lines more distinct, or Color -> color Curve and pull the curve down and to the right, that often works.
Then I select each part of the drawing I want to color and bucket fill it (different colors for each). if I save this as a pdf and open it, all it shows is the colors without the line drawing.
I can not reproduce that.
if I save it as a png, all is preserved.
My question is--should I save the pdf as a png or jpeg first before I start the entire process? It's a very low resolution drawing. Or does it matter? It's a big file (the original is on a 24"x36" sheet and it will probably be printed out at some point).
I thank you for your help in advance!
First the PDF, which might contain vector objects incl text which can be scaled to any size. Equally might contain an embedded bitmap which has an original pixels-per-inch (ppi). Low resolution original then scaling that up will degrade the line drawing in Gimp.
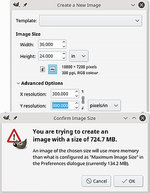
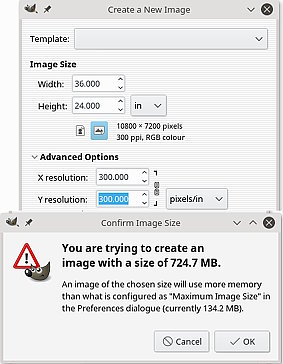
Next, Gimp will by default use 100 ppi when importing a PDF. It is up to you to set the ppi value in the import dialogue. ***Warning*** a 24" x 36" image @ 300 ppi is seriously large (see screenshot). A poster-size image rarely needs printing at a photographic quality 300 ppi. Depending on viewing distance, a rough guide is ppi = 1/((distance-in-inches x 0.000291) / 2) which for about 6 foot is 95 ppi.
What you need to do is ***ask the printing company*** for their requirements. They want a monster image like a hole-in-the-head.
FWIW, my advice, import the PDF with say, 150 ppi. It will still be a large size in memory maybe 500-600 MB) but not unmanageable. Save in Gimp xcf format. Save frequently, careful when saving, make sure the save procedure completes or you might lose it. Lots of solid colour compresses well so a final export as png and the file will be much smaller. Need a PDF for the printing company, very popular these days. Open your png file, export as a PDF.
rich: www.gimp-forum.net
-
 too big
300ppi.jpg (26.9 KB)
- postings
- 5
Adding color to file
Sometimes wonder about this mailing list format. Guessing that the line drawing is faint and the multiply operation is to make the outline darker. No need to set the base layer to multiply, it has nothing to act on. As an alternative, have you tried Filters -> Generic -> Erode which shrinks lighter areas, making the lines more distinct, or Color -> color Curve and pull the curve down and to the right, that often works.
I can not reproduce that.
First the PDF, which might contain vector objects incl text which can be scaled to any size. Equally might contain an embedded bitmap which has an original pixels-per-inch (ppi). Low resolution original then scaling that up will degrade the line drawing in Gimp.Next, Gimp will by default use 100 ppi when importing a PDF. It is up to you to set the ppi value in the import dialogue. ***Warning*** a 24" x 36" image @ 300 ppi is seriously large (see screenshot). A poster-size image rarely needs printing at a photographic quality 300 ppi. Depending on viewing distance, a rough guide is ppi = 1/((distance-in-inches x 0.000291) / 2) which for about 6 foot is 95 ppi.
What you need to do is ***ask the printing company*** for their requirements. They want a monster image like a hole-in-the-head.
FWIW, my advice, import the PDF with say, 150 ppi. It will still be a large size in memory maybe 500-600 MB) but not unmanageable. Save in Gimp xcf format. Save frequently, careful when saving, make sure the save procedure completes or you might lose it. Lots of solid colour compresses well so a final export as png and the file will be much smaller. Need a PDF for the printing company, very popular these days. Open your png file, export as a PDF.
rich: www.gimp-forum.net
Thanks for the replies!
If it's printed, it will be at 24"x36", but since it's an architectural elevation, the lines are heavy and there's no need for 300 dpi (probably half that, or 200). if I scale it up to 200, then look at it on the screen at 100%, it starts to blur when I scroll in close.
Adding color to file
On 10/06/2017 12:39 AM, Guy Stalnaker wrote:
I'd like to suggest an alternative method for coloring an image that has some great advantages.
Use layers with masks!
5. Add new layer
1. Fill with a color you want for some part of your image 2. Give layer name (e.g., face, jacket, etc.) 3. Set the Mode to Soft light, or some other appropriate Mode (in the example Soft Light lets the background show through)
Hope this is as helpful for you, if you have not used this technique before, as it was, and has been, to me.
I agree with Guy, this approach - which he describes perfectly - is a wonderful way to add color to an image. Soft light is a good blend mode, probably the best for GIMP 2.8, and useful in any image editor.
If you have access to GIMP-2.9 (preferably GIMP-2.9.6), there are some
new blend modes, specifically the LCH blend modes, which I use (a lot)
for coloring/recoloring black and white images. If you might be
interested, I wrote up an introductory tutorial which has a simple
example of adding color in Part C:
https://ninedegreesbelow.com/photography/gimp-lch-blend-modes.html
Best, Elle